• Home
  • About
    • Personal Posts
  • Privacy
  • Shop
    • My Account
    • Checkout
    • Email
    • Facebook
    • Instagram
    • Pinterest
    • Twitter
    • YouTube
Sawdust Girl®

Sawdust Girl®

Renovation, cabinet building and woodworking plans and tutorials. Build like a Girl®

  • My Home
    • Clinton TN House
      • Clinton TN House in Progress
    • Maryville TN House
      • Maryville TN House Tour – Completed Rooms
      • Maryville TN House in Progress
        • Basement
        • Basement Storage Closet
        • Bedroom Office
        • Craft Room
        • Dining Room
        • Entry
        • Garage
        • Guest Bedroom
        • Hallway
        • Jack and Jill Bathroom
        • Kitchen
        • Kitchen Entry
        • Laundry Room
        • Library
        • Living Room
        • Loft
        • Madison’s Room
        • Master Bedroom
        • Master Closet
        • Pantry
        • Porch
        • Powder Room
        • Wes’ Office
    • Illinois House
    • Calderwood Cottage
  • My Workshop
    • Clinton Workshop
  • Build & Breakfast
  • Cabinet Making 101
    • Cabinets
    • Doors
    • Drawers
  • Projects and Plans
    • Countertops
    • Beds
    • Benches
    • Bookshelves
    • Desks
    • Gift Ideas
    • Holiday
      • Christmas
      • Halloween
    • Home Accessories
    • Kids
    • Kitchen Cabinets
    • Lockers
    • Nightstands
    • Organization accessories
    • Recipes
    • Sewing
    • Tables
    • Vanities
    • Wardrobes
    • Woodworking
      • Wood Finishing
    • Workshop
    • Workshop Storage and Organization
  • Remodeling 101
    • Baseboard and Trim
    • crown molding
    • Demolition
    • Door and Window Casings
    • Door Installation
    • Drywall
    • Electrical work
    • Flooring
    • Home Maintenance
    • Painting
    • Plumbing
    • Resources
    • Safety
    • Tile
    • Wall and Ceiling Treatments
  • Sawdust Squad
  • The Sawdust Diaries
    • Andrea
    • Ava D.
    • Beckie F.
    • Cara C.
    • Courtney B
    • Fawn T.
    • Jenn D.
    • Kelly C.
    • Kristy K.
    • Lara T.
    • Malisa B.
    • Marnie D.
    • Robin C.
    • Val F.
  • Tools
    • Products
    • Tool Reviews & Overviews
    • Inspiration & Ideas

How to Cut Crown Molding using easy Templates

All Posts, crown molding, Projects and Plans, Remodeling 101

Make cutting crown moulding easy using templates.

Cutting crown molding can be frustrating and confusing. Inside and outside corners are cut with different settings. Usually the right side of the cut is the left side of the corner. Sometimes you need to flip the crown upside down to cut. Using templates gives you a visual reference for which piece you need to cut and how to cut it. So I’m going to show you how to cut crown molding templates to take the confusion out of cutting crown molding.

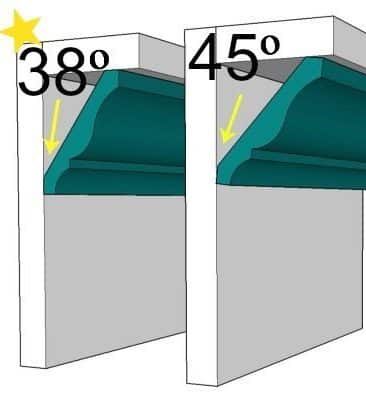
Common spring angles

There are several different common crown molding spring angles. Most home improvement stores carry mostly 38 angle molding. So that’s what my template examples are for.

If you’re cutting templates for crown molding with 45 degree spring angles, substitute these angles on your miter saw.

  • set miter angle to 35.3
  • set bevel angle to 30
Understanding spring angles in crown moulding.

Setting up your miter saw to cut templates for 38• spring angles

This method of cutting crown molding can be done with any miter saw.   

*These two things are constant:

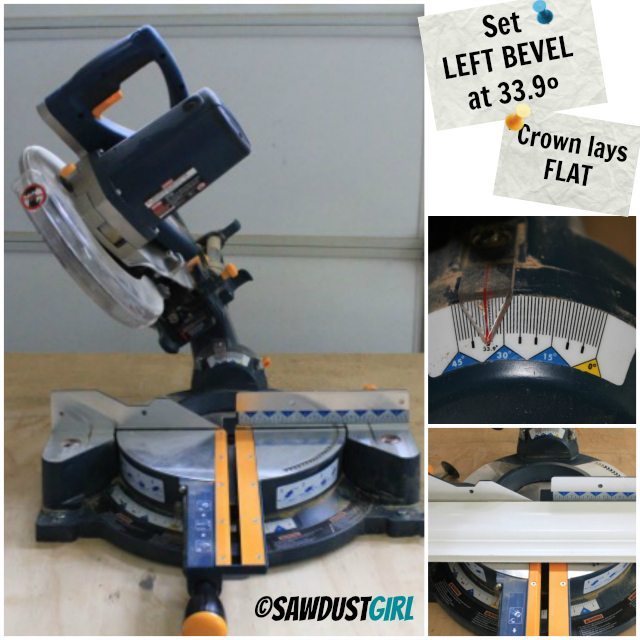
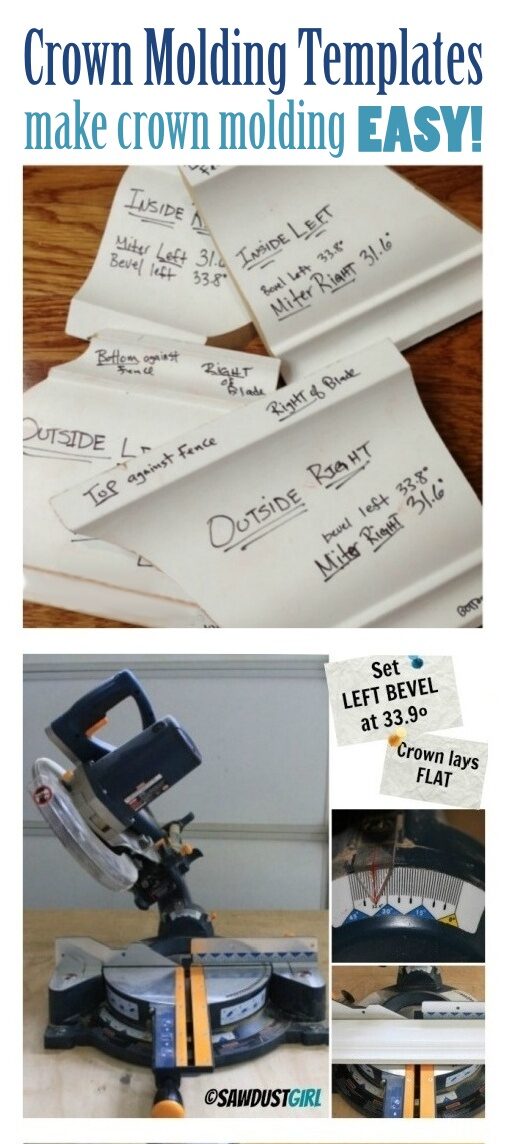
  1. Set your miter saw to bevel (tilt) left at 33.9 degrees.  (Your saw might say 33.8 — the .1 degree is not enough of a difference to matter.)
  2. Your crown molding always lays flat on the saw.
How to cut crown molding with a single bevel miter saw.

*These two things will change depending on the cut you are making.

  1. Miter will change between right and left (but at the same setting of 31.6 degrees).
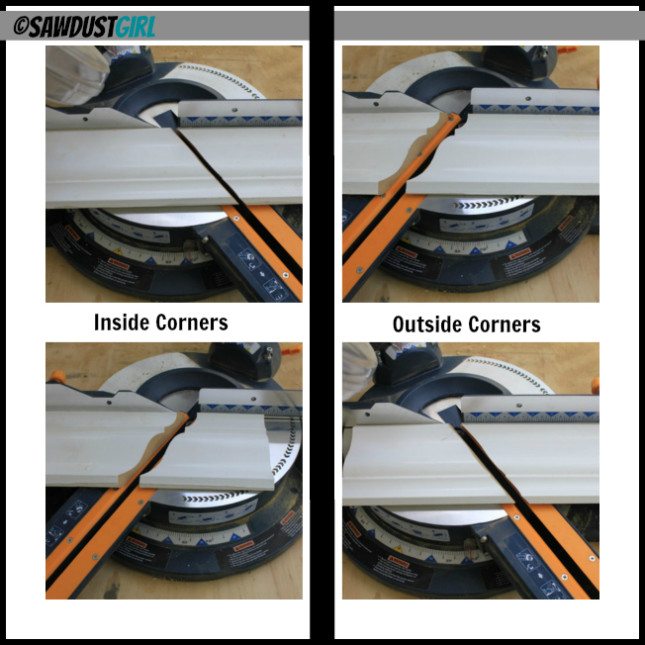
  2. Sometimes the bottom of the molding will rest against the fence.  Sometimes it will be the top.  (The bottom of the molding has the decorative profile.)
How to cut crown moulding corners.

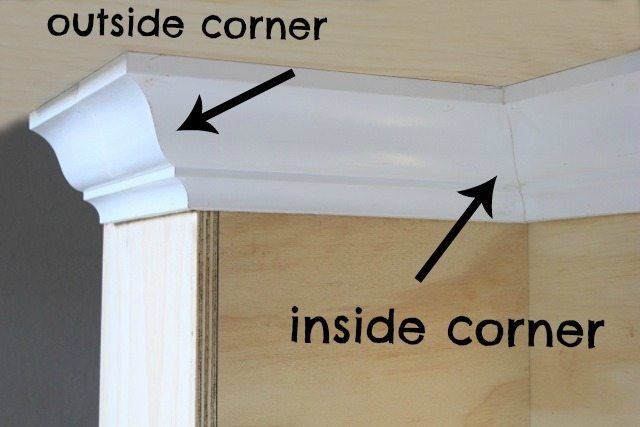
Inside Corners vs Outside Corners

It is easy to get confused about what you need to cut:

  • Inside left
  • inside right
  • outside right
  • outside left

You can think about it logically: Inside corners are 90 degrees. Outside corners are 270. Inside corners turn IN on each other. Outside corners turn OUT away from each other.  That information is about as useful as word salad to a visual person like me without visual aids.

Understanding crown molding inside corners and outside corners.

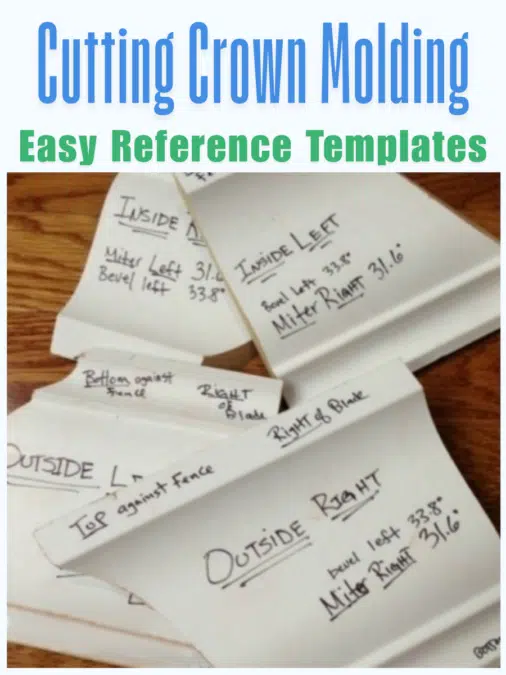
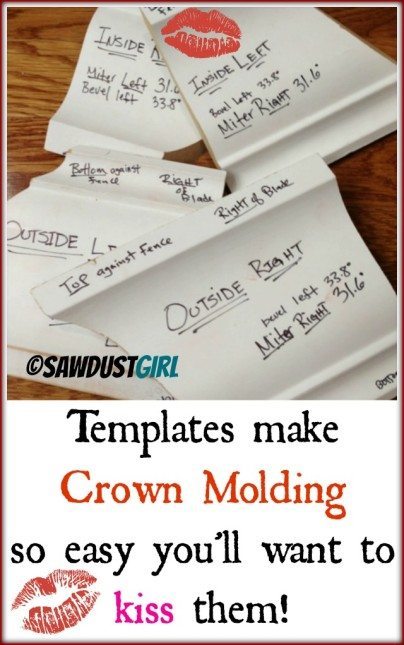
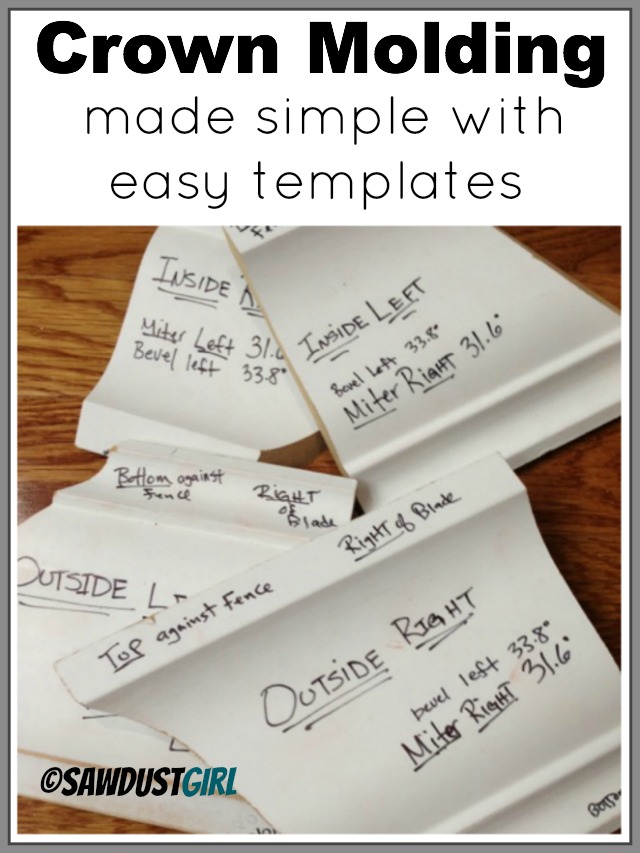
A set of crown molding templates give you a visual guide which you can cary around and use to figure out every single corner you have to cut!  You hold your templates up in the corner you’re working in, and figure out if you’re an doing inside or outside corner.  Easy peasy!

I’ve been doing this for a good long while and I still get confused EVERY TIME.  My brain is very visual.  It doesn’t translate, “left outside corner”  into any kind of usable information.  I HAVE to look at my visual guide – EVERY SINGLE TIME. I tell you this so no one out there feels inadequate or not smart because they find this confusing.  I do too!  BUT, you CAN do it…just make the templates and give it a try.

Cut Crown Molding Templates

I’ve included a close up of each crown molding template.  Use the crown molding you plan on installing in your home to create your templates because they not only make determining your cuts easier, they also come in handy when you are installing your crown.

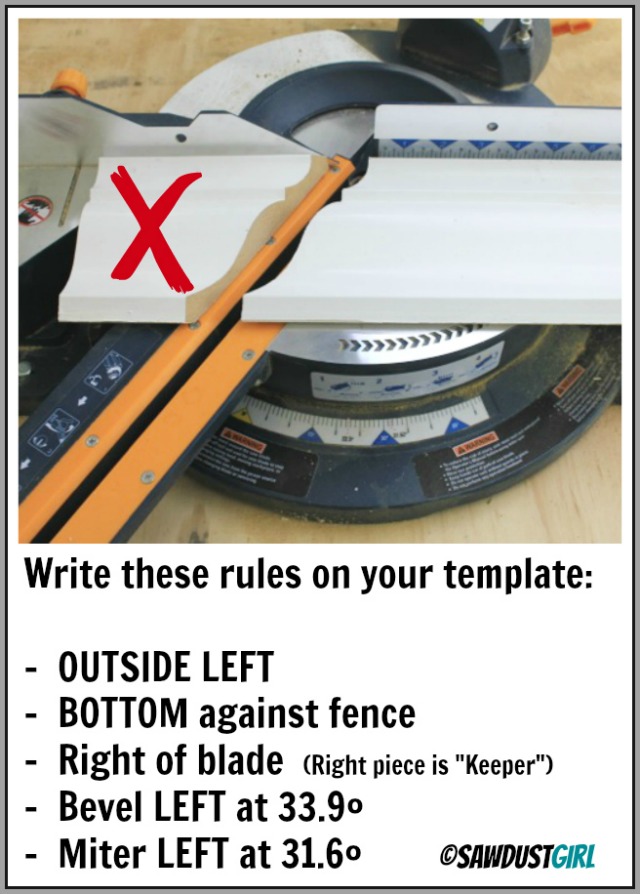
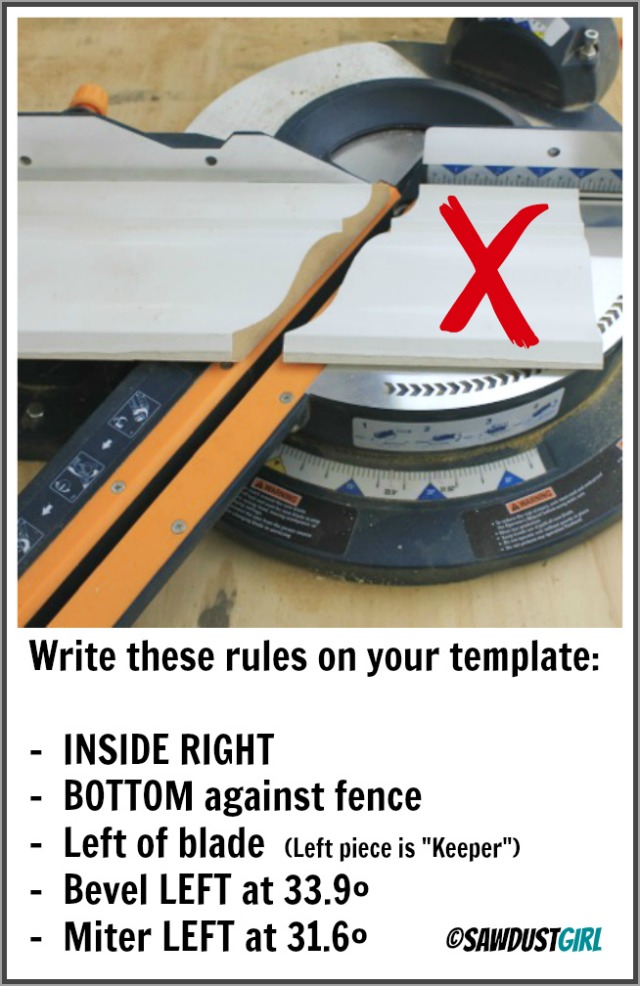
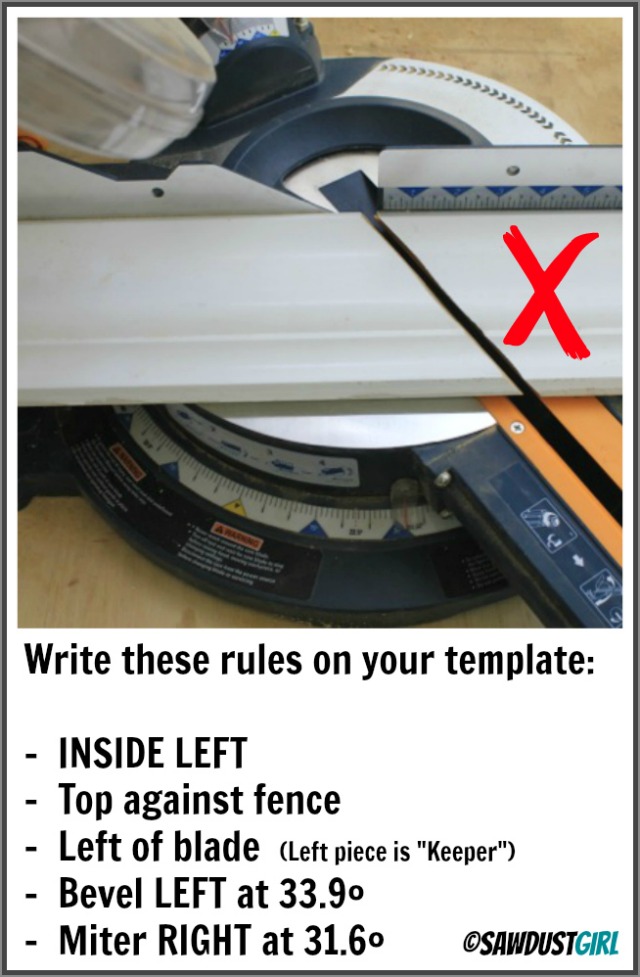
Remember that your saw is set to bevel left at 33.9 degrees and the molding lays flat — for all these cuts.

*The “bevel” is the vertical tilt.

Cutting crown molding with a basic miter saw that only bevels (tilts) in one direction.

Cut each template about 12″ long according to the instructions below each picture and then write the instructions directly onto each template.  In SHARPIE!  

Outside Right
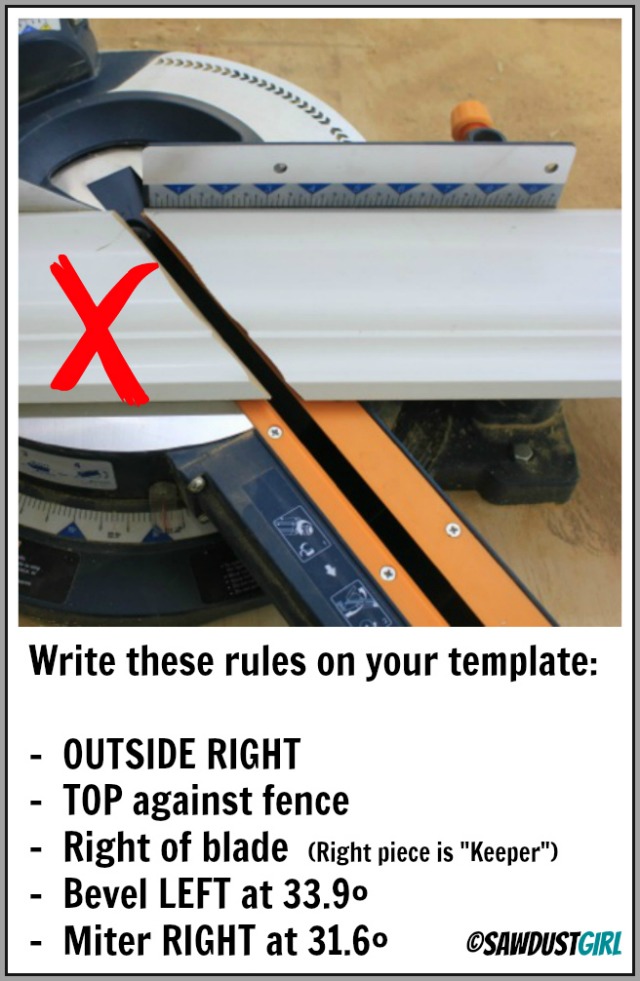
How to set up your miter saw to cut an OUTSIDE RIGHT corner on crown molding.

Outside Left

How to set up your miter saw to cut an OUTSIDE LEFT corner on crown molding.

Inside Right

How to set up your miter saw to cut an INSIDE RIGHT corner on crown molding.

Inside Left

How to set up your miter saw to cut an INSIDE LEFT corner on crown molding.

Now you should have four of your very own crown molding templates that are going to make your job so much easier!

Crown molding templates make cutting crown molding EASY!

In all seriousness, learning how to cut crown molding is still tricky because you are usually working with very LONG pieces, climbing ladders, climbing ladders with very long pieces, working with another person who may not like climbing ladders…or worse yet, trying to install crown ALL BY YOURSELF which I think is plumb crazy–but it is doable.

So no, these instructions won’t suddenly make you a professional crown molding installer. But, crown molding templates that make installation easier should at least clear up any confusion about what cut needs to be made where!

*Also, if you corners are out of square, you’ll either have to make micro adjustments to your saw settings to get a perfect corner joint.  OR, you can use a little trick of mine to fix gaps in crown molding with spackle!

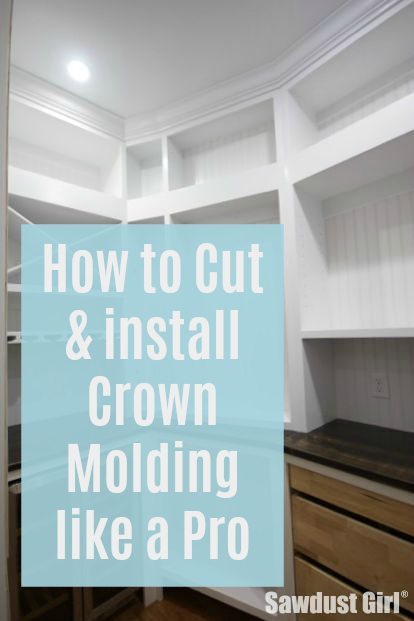
You might also like: How to Cut and Install Crown Moulding like a Pro, and Crown Moulding Stop and Cutting Guide, and How to Install Crown Molding on Cabinets

And these handy crown molding hangers make installing tons easier!

crown molding made simple with templates - https://sawdustgirl.com

August 24, 2020 · 117 Comments

« July Update
How to Build a Drawer for Blum Drawer Slides »

Comments

  1. [email protected] says

    August 19, 2013 at 8:40 am

    Thank you for this! I’m still trying to master using my mitre saw – never know which way to set the blade so I fudge it. Now I know!!

    Reply
    • Sandra says

      August 19, 2013 at 9:59 pm

      Glad I could help but there’s noting wrong with fudging things, I do that a lot too. 😉

      Reply
    • Noelle says

      February 2, 2023 at 7:35 am

      Wow! THANK U! This is super helpful to me.

      Reply
  2. Janis says

    August 19, 2013 at 9:42 am

    Excellent!!!!!!!!!!!!!!!!!!!!!!! I really needed this.

    Reply
    • Kari says

      February 20, 2021 at 11:15 pm

      I know you posted this awhile ago but I am new to the world of crown molding and was looking for something exactly like this. I actually spent like two hours making my own templates today and these are soooooooo helpful. The first one I made, I stared at it for like 30 minutes thinking THIS CAN’T BE RIGHT but lol it was. Having these as a reference was a real game changer. Thanks for posting such clear instructions.

      Reply
  3. Diana W. says

    August 19, 2013 at 3:50 pm

    OMG!!!! Thank you, thank you, thank you! I read about templates in other wood blogs, but they never included saw settings and I always came away feeling vaguely stupid, not just ignorant. (Two very different things to me.) I really appreciate this and will put it to good use when we finally reno our ceilings. We’ll be putting up bead board, crown molding and picture molding. Should prove interesting….. to say the least! Thanks again!

    Reply
    • Sandra says

      August 19, 2013 at 10:02 pm

      We all think about and understand things differently. My brain sometimes has to go on a long journey to get to the same conclusion that someone else might get to in a split second. It doesn’t mean anything more than I need a different explanation or approach. That is why I try to give detailed tutorials for those that have very creative brains like me. We think and understand things much differently than others. (Because we are awesome!)
      SO, don’t ever feel even slightly stupid because you don’t understand something, just keep looking for an explanation that speaks to your brain better. 🙂

      Reply
      • Debbie says

        December 30, 2019 at 12:15 pm

        Thank you for your response. It’s nice to know I’m not alone! And it’s a nice reminder not to be so hard on myself and to not give up before the miracle happens.

        Reply
  4. Robyn @ Everydayday a la Mode says

    August 19, 2013 at 8:25 pm

    I should complain about the splinters on my lips! 😉 I just made the templates. Sandra, your post was AWESOME! It was so easy to follow! I’m installing crown in my bathroom. I have never done crown before. The timing of your post was perfect! Templates are done. Now, on to the project!
    It was also great to meet you at Haven!

    Reply
    • Robyn @ Everydayday a la Mode says

      August 19, 2013 at 8:28 pm

      Doh! My comment should say from Robyn @ Everyday a la Mode. I blame it on kissing the templates too much. 🙂

      Reply
      • Sandra says

        August 19, 2013 at 9:56 pm

        Well I knew it was you because it says so in the author field. LOL Mwah! Go refresh your lipstick now. 🙂

        Reply
    • Drema says

      February 11, 2022 at 11:00 pm

      I always have issues with upper and crown Moulding., wrong every time. Either my measurement is wrong or the actual cut doesn’t match the next piece., I only have a regular mitre saw.,

      I have been told so many things like you have to flip it upside down., etc., stand it up don’t lay down. It’s truly hard to practice on this expensive stuff.,

      I kinda understand your directions but not totally so I’m bring a dumb blonde.,

      I’ve always used 45 degree cuts so is that my problem but I don’t know how to get the angle you’re referring to.. could you elaborate or send me info to my email [email protected] Com or do a slow video? That’s be great thx., Drema DYI

      Reply
      • Sandra says

        February 15, 2022 at 8:40 pm

        Sorry this didn’t make sense to you. Unfortunately I cannot create a video tutorial at this time. Sometime when I’m doing crown moulding again, I’ll try to do a video.

        Reply
  5. Feral Turtle says

    August 19, 2013 at 8:47 pm

    Awesome tutorial. I don’t have a compound miter saw yet, but as soon as I add one to my “tools instead of jewels” gift hint list, I’ll be back! Cheers

    Reply
  6. Wendy says

    August 19, 2013 at 9:16 pm

    Thank you so much! You are a total ROCK STAR!!! I can’t wait to put this to use!

    Reply
    • Sandra says

      August 19, 2013 at 10:05 pm

      Rock star status achieved! I can retire now. LOL

      Reply
  7. Serena @ Thrift Diving says

    August 20, 2013 at 8:51 am

    Hey, Sandra! Okay, seriously, this post ROCKS. I’ve still got my templates you gave me at Haven, and I am ready to use them–just gotta get the miter saw first 😉 It’s in the works! I think I’ll end up having my own house in crown molding! LOL. Excellent instructions. I”ll be bookmarking that when I am ready to get started. Hope you’re doing well, girl!

    Serena
    Thrift Diving

    Reply
  8. Judy D says

    August 20, 2013 at 9:31 am

    Sandra, thanks so much. I have so many molding projects dancing around in my head. I got as far as buying some tools then went for the miter saw. Got it home and panic set in….I never took the saw out of the box. This tutorial is just what I needed.

    Reply
    • Fatguy says

      April 18, 2020 at 8:06 am

      This is the ONLY tutorial that made sense. Others use miter saw to saw them awkwardly and wrong, then use coping saw to fit them. That’s dumb and nuts!
      And I won’t kid you – I’m a middle aged, chubby dude from Finland. When Sawdustgirl-site caught my eye on Google results, I just continued to check the other sites and videos. Dumb me. I was sure that somebody has these instructions, and then (even then by accident!) I checked this site.
      Thank you, sawdustgirl, and sorry for every girl and woman for my prejudice. I’m working on it.

      Reply
      • Sandra says

        April 19, 2020 at 10:42 am

        Well, glad you were able to find a tutorial that made sense to you. Even if it DID come from a lady! Haha. Also, good for you for working on changing your inner brain. 😉

        Reply
      • BobL says

        December 12, 2020 at 1:25 am

        You still need a coping saw.

        Reply
        • Sandra says

          December 15, 2020 at 11:24 am

          The point of this method is to create compound mitered joints. Using a coping saw to remove the profile off one side of the joint so it fits over the other piece of moulding is a whole different method.

  9. Tina says

    August 20, 2013 at 10:45 am

    Thanks so much. This was so helpful I want to dance and sing. You’re right, it won’t make me an expert but man, it will sure make me better than I was. I am getting excited just thinking about how much molding I won’t ruin now that I have this! Thanks again.

    Reply
  10. Joe says

    August 20, 2013 at 3:24 pm

    Sandra, This is awesome !!!!!!!!!!!! Thank You!!!!!!!!!!!!

    Reply
  11. Lindsay says

    August 22, 2013 at 9:46 am

    Thank you!! This is exactly what I need right now! I was planning to try this on my own today because I don’t have the patience to wait til my husband gets home tonight. Maybe I should rethink and wait for the help ha :). This tutorial will be sooo helpful!

    Lindsay

    Reply
  12. Wendell Wight says

    August 27, 2013 at 3:40 am

    Just for you Sweetie. Just in case……

    Reply
  13. Rachel says

    August 29, 2013 at 5:28 am

    Yay! I needed this. I feel silly for not thinking to make templates before. Every time I tackle crown in a room, I inevitably cut a piece wrong and then end up either wasting sections or piecing 2 smaller sections for one wall 🙁 thank you for the wonderful idea and tutorial!

    Reply
  14. Connie says

    August 29, 2013 at 4:55 pm

    thank you so much. I’ve been procratinating tackling this very project because I get so confused just trying to figure it out before I cut anything!! So much help. Now I can have a little more confidence and a starting point at least.

    Reply
  15. [email protected] The Serene Swede says

    August 30, 2013 at 2:10 pm

    Perfect timing for me to run across your tutorial on Pinterest! We are finishing up our basement remodel and plan on putting in some crown molding! Thanks for the helpful hints!

    Reply
  16. Jody says

    September 1, 2013 at 11:31 am

    AWESOME!!!! I have ALWAYS wanted to do this in my living room/hallway and entry but have been afraid to try it on my own. This is perfectly clear and thank you so much for the easy to understand photos!! Off the the home improvement store for molding!!!!!

    Reply
  17. [email protected] says

    September 2, 2013 at 12:08 am

    This is an awesomely helpful and pinable tutorial – thank you so much for posting it!

    Reply
  18. Robin says

    September 28, 2013 at 6:48 pm

    Thank you SO much, this is fabulous. I have always struggled with crown. Question for you…I am reusing old molding and a little nervous that it may not be 38. What are the miter degrees for 45 and 52? Thanks again for supporting the girls who love to remodel.

    Reply
  19. Bobbie Morin says

    October 26, 2013 at 6:00 pm

    Great tutorial. Thanks for such great pictures and complete information. Really helped me when I needed to add crown moulding to my DIY fireplace surround.

    Reply
  20. Danny says

    January 6, 2014 at 7:50 pm

    Try coping one of the inside pieces with a coping saw to avoid imperfection. Especially when using stained crown mould.

    Reply
  21. Kellie (The Pauper's Castle) says

    January 9, 2014 at 1:34 pm

    OMG! I CANNOT wait to share this with my husband! We wasted a WHOLE, did I say WHOLE 8 ft section of crown molding several…OK….8 years ago trying to figure out the settings for the miter saw. We had books and the whole shebang. We gave up. I am ready to try it again. THANK YOU from the bottom of my heart! PS-I’ll let you know if it works 🙂

    Reply
    • Sandra says

      January 9, 2014 at 1:37 pm

      please do. I SO hope it helps you out! 🙂

      Reply
  22. Craig says

    January 12, 2014 at 7:09 pm

    Great tips!!! Made up these templates for doing some crown work on kitchen cabinets and so far install has been flawless! Thanks for the write up,
    U saved me a lot of time today!!

    Reply
  23. Gentry says

    January 19, 2014 at 11:19 pm

    I’m working on a built in book shelf for my office. I have some crown molding to top it off with. You just saved me a huge brain ache. Thank you. I have a crown molding jig but its tough to figure out.

    Reply
  24. Cindy says

    January 29, 2014 at 9:38 pm

    I have corner cabinets and my husband can’t get the angle right any tips for this ? I hope so ; ~ }

    Reply
  25. Tina Barta says

    February 6, 2014 at 2:58 pm

    HOLY MOLY is this what I needed! I have gone through…..so many, boards of crown moulding because I kept on messing up the angles. This totally simplified my thought process. Thank you so much for this step by step template tutorial. So easy to follow too! THANK YOU, THANK YOU, THANK YOU!!!!

    Reply
  26. Erin says

    February 22, 2014 at 5:25 pm

    Wow, this tutorial is amazing!!! Thank you so much. You just saved my husband and I hours of headaches at the end of our kitchen remodel. Did I say thank you yet!!!??

    Reply
  27. Larry Riegel says

    March 5, 2014 at 7:25 am

    Doing a room with all inside corners. Measured the angles and they are all 46-92 degrees. What if any adjustment do I make on my saw for this? Thank you!

    Larry

    Reply
    • Sandra says

      March 9, 2014 at 4:50 pm

      Sorry Larry, This tutorial only includes the information that it includes — settings for 90˚ angles. You can google “Crown moulding angles” to find a chart that will have ALL the different angles and settings.

      Reply
  28. m @ random musings says

    March 8, 2014 at 10:15 am

    thank you so much, Sandra!! I just put up crown molding in our dining room (first time working with crown) and this made life a breeze! Not one wrong cut. you are awesome

    Reply
    • Sandra says

      March 9, 2014 at 4:48 pm

      So glad it was helpful!

      Reply
  29. Kaley says

    July 10, 2014 at 10:06 pm

    Wow I used this for a project and it worked perfectly. Not one wasted cut. Thank you very much. If you ever travel to vermont ( haha) I will owe you a steak dinner. Thanks again,kaley

    Reply
  30. Sharon loney says

    July 21, 2014 at 2:13 pm

    Hi, thanks so much for the great instructions to create templates. I’m getting ready to attempt crown molding in our home. Any suggestions for bull cornered walls? Do you have templates for those? Thanks!!

    Reply
  31. Steve says

    August 6, 2014 at 11:21 am

    Had a VERY hard time tying to figure out how to cut A corner on our home re-model……Finally came across your page . All I can say is I LOVE YOU SANDRA !!!! (LOL) This template idea made things soooooo easy THANK YOU !!!

    Reply
  32. Amanda says

    February 19, 2018 at 9:25 am

    These were excellent instructions! worked perfectly, thank you thank you!

    Reply
  33. B-dawg says

    February 21, 2018 at 1:51 pm

    Oh man….read all those woodworking books and mags and those guys never make it easy. Sorta’ like engineers that make really easy stuff impossible! I especially liked your “visual” explanation. When you’re 12′ up on scaffold and half to climb back down to make your cut and then someone asks you something…geeze…back up you go. I’ve been using patterns for years when I’m up in the air. Can’t forget with pattern in hand! I too am a “visual” person. A pic is worth a ga-zillion words for me! Great article and you MAKE IT ALL SIMPLE!!!

    Reply
  34. Sam Hart says

    March 6, 2018 at 4:50 pm

    Every time I cut mitres for crown I always end up looking on the internet for “how too’s” SOOO glad I found your site, first time I ever saw mentioned and explanation of 38, 52 and 45 degree crown, WOW what a difference, will bookmark your site and look forward to more..

    Reply
  35. Scott roop says

    March 11, 2018 at 7:25 pm

    I like your post to a point. I have done trim work my whole life. Never 45 inside corners, always cope them. Compound mitre saws are great for the jobs they were meant for. Cut all crown upside down and backwards with the saw set at 90 degrees. Swing from left to right to make the cut. Make it simple on yourself and every one that follows you. Try it, you’ll really like it

    Reply
    • Stella says

      November 16, 2018 at 5:13 pm

      Your way does not work for me! I need a visual guide

      Reply
      • Sandra says

        November 17, 2018 at 10:20 pm

        Everything doesn’t work for everyone.

        Reply
  36. Melanie Austin says

    April 6, 2018 at 7:23 pm

    Thank you so much for the crown molding pattern idea. It helped so much!

    Reply
    • Sandra says

      April 7, 2018 at 8:55 am

      Glad it helped. Visual templates just make it easier for my brain to connect the dots.

      Reply
  37. [email protected] says

    April 8, 2018 at 7:53 am

    That is absolutely the most difficult way to do it and it’s not 100% foolproof because manufacturers are not standardized like they should be abd the angles on the back of the crown are not always the same so it changes the inside and outside angles change. the best way to do it is to turn the crown upside down and cut it backwards on the angle that it would be on the wall so easy even a child could do it.

    Reply
    • Sandra says

      April 8, 2018 at 9:08 am

      The problem with that is a lot of people have miter saws that only bevel in one direction and that have a short fence so you can’t cut tall crown, even on the angle. This method is one that works with any saw.

      Reply
  38. Penny cathey says

    April 10, 2018 at 11:11 am

    You have saved me!! After reading countless instructions, watching instructional videos, and going through too much wasted molding I still don’t understand all these concepts. (My fence wasn’t tall enough to prop the molding up & I didn’t want to spend $100 on crown stops for my new saw.). With these templates I don’t have to! I only have to follow my new (perfectly cut) templates. Thank you for breaking this down for us amateurs!

    Reply
  39. Libby says

    May 2, 2018 at 7:18 am

    YOU SPEAK MY LANGUAGE!!!! My husband and I bought a 1960’s Tri/Split-Level home last year that was in desperate need of some renovations. We contracted out some of the work, but did a lot of it ourselves. You don’t realize how much trim is in a 3500 sq/ft home until you take it ALL down paint it and then (attempt) to put it back up…?
    Several rooms had Crown Moulding; in some rooms it was 3 1/2 inches wide, and in other rooms it was the smaller, 2 in cove type Moulding. We also installed headboard and trim in several rooms. But in doing this I would say to my husband (Who has never done a project like this before) “We need 2 left inside corners and 2 right inside corners.” After about a day of this he said to me, “I have no idea what you are talking about when you say ‘inside corners and outside corners’!??‍♂️??‍♂️??‍♂️ I’m not sure that I was able to clearly explain to him what I meant. We still have trim work that needs to be done this summer; hopefully your article will help me explain what I mean by inside corners and outside corners!

    Reply
    • Libby says

      May 2, 2018 at 7:19 am

      *Beadbord, not headboard??‍♀️

      Reply
  40. Peter F Brands says

    May 2, 2018 at 6:45 pm

    What a huge difference in your in your tutorial vs. the world of other tutorials out there. Bravo! Now I know why I purchased a compound miter saw. It took me two long days of trial and kj;bivucp]-py; to finally try your site out. Your guide made everything work for me. Seeing, hearing, reading . Perfect!!!!

    Reply
  41. zackmack says

    May 7, 2018 at 10:28 am

    Hi, I am an newbie “do it yourselfer” and use the internet to find how to videos and instructions on projects! OMG…you are the best at explaining crown molding corner cuts. Like everyone else I have made my templates and am in “crown molding” bliss! Thank you for such a simple and basic explanation and for the templates….I can put my Kregg set away for good!

    Reply
    • Sandra says

      May 8, 2018 at 8:18 am

      Thanks so much for your note. I love hearing success stories!

      Reply
  42. Jennifer Gautier says

    May 29, 2018 at 2:31 am

    Thank you!! Your “word salad” made total sense to me, & now I get it! You rock!
    Thanks!!
    Jenn G ??

    Reply
  43. ckenna says

    June 17, 2018 at 6:11 pm

    I need help! I have cut my pieces using the templates have worked out great, with few adjustments because of uneven walls. However I am having a tough time cutting bull nose corner? I have been using bevel 33.9 and miter 31.6 for other corners, Tried 22 and change for bullnose doesn’t fit please help,

    Reply
  44. Jeannine says

    September 16, 2018 at 9:40 am

    Saw Dust Girl!!!! I have read and watched dozens of how to blogs and videos about cutting crown Moulding corners. YOU explained it SO clearly. SDG…. you saved my faux BILLY bookcase project!! (And hours of future frustration and much wasted Moulding at $1.45 a sq ft).
    Thank you!!!???

    Reply
  45. John mccallum says

    September 30, 2018 at 11:55 pm

    I always have to order 50% more material to do trim. This is the best explanation I’ve seen. So easy now makes perfect sense. Can’t wait for the next opportunity to do trim work . thanks so much.

    Reply
    • Sandra says

      October 7, 2018 at 12:58 am

      50% is a lot of extra trim. Glad to help.

      Reply
  46. chris says

    October 9, 2018 at 12:56 pm

    Thanks for the tutorial, great help!

    Reply
  47. Stella says

    November 16, 2018 at 5:16 pm

    I know this is an old thread but I need to know if the molding is face up or face down? White primed side up or unfinished side up? Also, instead of saying top and bottom of the crown… maybe say the ceiling edge or the wall edge? In my mind I can visualize that.

    Reply
    • Sandra says

      November 17, 2018 at 10:19 pm

      The moulding is always face up. The “bottom” of the crown moulding is the part that sits on the wall. The “top” is against the ceiling. The photos demonstrate each cut.

      Reply
  48. Amanda Duke says

    December 2, 2018 at 4:14 pm

    Do you have any videos that explain working with angled ceilings?

    Reply
  49. Joe says

    March 26, 2019 at 7:40 pm

    when cutting this molding on the flat
    What happens when you come up to a 22.5 angle

    Reply
  50. James says

    April 15, 2019 at 12:09 pm

    Great tutorial but do you have any tips on all to measure the trim runs or distance from one inside corner to another inside corner, or an inside corner to an outside corner?

    Reply
  51. handyhomo says

    May 5, 2019 at 8:50 pm

    Awesome tutorial!! I kept the laptop opened and I had to have the visual for each cut I did…but it worked and it was SOOOO much easier!!! I’m pretty handy but never had the courage to try crown molding. Now it’s easy peasy!!

    Reply
    • Sandra says

      May 5, 2019 at 10:53 pm

      I have to have a visual aid every single time I do crown too. Glad I could help.

      Reply
  52. Dee says

    May 23, 2019 at 5:23 am

    I just read and understood your explanation about crown molding. I renovated our bathroom and still have the crown to finish. Well, it has been renovated for about a year now, but the crown has given me fits and I just decided it would have to stay this way until I could get my brain wrapped around how it needed to be done. Thank you so much for putting it into clear terms and adding the pictures! My family will be SO surprised when I finally wrap that project up.

    Reply
  53. Carl Lambeck says

    June 30, 2019 at 3:01 pm

    This makes it very easy to accomplish. I’m still having problems joining three cabinets together with crown. The angle where the cabinets meet is 22.5 degrees. What do my sample measurements then become?

    Reply
    • Sandra says

      June 30, 2019 at 4:33 pm

      I use an angle finding tool that then sits on the miter saw and shows you where to set it.

      Reply
  54. Kelly Lawson says

    July 18, 2019 at 7:54 pm

    Bless you for this!! ?

    Reply
  55. Mike M says

    November 25, 2019 at 2:41 pm

    Genius!! Thanks so much. I’ve been tentative about trying this on some very expensive molding. But now I’m going to buy some cheap “practice” molding and give it a whirl.
    Thanks so much…

    Reply
  56. Linda says

    December 27, 2019 at 6:42 pm

    Thank you sooooooo much! I’m working on my first project with crown moulding and was all turned around and upside down! Then I remembered I pinned your templates. Wow, this will save me a lot of cuts and frustration! Very grateful! Thanks again.

    Reply
  57. Leslie pucheu says

    February 29, 2020 at 12:32 pm

    My husband would not listen to me, and this old house had him building fences for saw that didn’t work, I showed him the “girl” explanation and suddenly it became clear to him…and he’s using my compound mitre saw that he broke and taped together with electrical tape! Told him he owes me a new saw.

    Reply
    • Sandra says

      March 1, 2020 at 9:30 pm

      LOL electrical tape to hold together a miter saw. So funny! Do what works though. Glad my instructions were helpful!

      Reply
  58. Steve says

    March 22, 2020 at 4:02 pm

    Thanks a ton – for the reassurance that we aren’t losing our minds when we can never ever remember this stuff intuitively as well as the great template steps – best website overall on this topic out there!

    Reply
  59. Ronnie says

    March 30, 2020 at 10:46 pm

    On crown molding can you lay it flat no matter the size? Or not? And does it make it harder of the walls aren’t square or plum and the ceiling is not flat.

    Reply
    • Sandra says

      March 31, 2020 at 10:53 pm

      If you have a really small miter saw, you may not be able to cut super large crown. But your miter saw will be the determining factor in that regard. The answer to the other questions are, “yes”. Corners that are really out of square, wavy walls and ceilings…all that makes it harder. Just takes more szhushing.

      Reply
  60. Mark says

    April 8, 2020 at 8:59 pm

    Grateful to you! Thanks a million.

    Reply
  61. Victoria Dennis says

    May 7, 2020 at 10:20 am

    Hi
    Stumbled onto your crown templates. Thank you so much! I too have watched multiple other videos and didn’t get it. I too have the creative brain and math/numbers confuse me. I have a powder room that is waiting for crown…I’m excited now to try. I have 2 miter saws and more tools that the average guy ( some duplicates because I couldn’t find the first one….lol )but your work shop and table saw and vacuum thing make me drool. I’m technically challenged is there a way to follow you and your video posts? Lol I’m sure I’ll have more questions down the road!
    Thanks
    Victoria
    (Crazy dog lady)

    Reply
    • Sandra says

      May 10, 2020 at 11:21 pm

      Glad to help. If you sign up for my “newsletter”, I send out an email letting you know when I publish a new post. Subscribe to my Youtube channel for videos too. Thanks!

      Reply
  62. Nick Thompson says

    August 25, 2020 at 11:40 pm

    Will this still work with different angles other than 45?

    Reply
    • Sandra says

      August 26, 2020 at 9:06 am

      You have to make adjustments for angles other than 45.

      Reply
  63. Sarah says

    September 1, 2020 at 3:33 pm

    Ok! I have no idea what on earth I’m doing wrong and I’m slightly losing my mind.. I am extremely crafty, handy.. I have hung other kinds of moulding in my house but this is the first time I have tried crown and I have wasted soooo much trying to do this. It is moulding that has a 45 degree spring angle and I set the saw like you said according to left and right sides miter at 35.3( which is just a line on mine) and bevel at 30.. does not match up at all.. what on earth am I doing wrong.. Help, please…..

    Reply
    • Sandra says

      September 1, 2020 at 3:45 pm

      Hi Sarah, did you check your walls and ceiling angles? If the house is not square itself, creating a molding joint that is square –won’t fit the out of square wall/ceiling. Check wall-to-wall (the corner) and wall to ceiling (on both sides of the corner) to see if things are square? I generally don’t change the settings on the saw, I just use shims to pull down, push up, or pull forward or backwards… on the moulding to create a tight joint. Then caulk the crap out of the wonky wall/ceiling to moulding joint.

      Reply
  64. Gary D Morrison says

    October 9, 2020 at 4:58 pm

    Obviously, walls are frequently too long for a single stick. Do you suggest a butt joint, a simple miter, or a compound miter overlap?

    Reply
    • Sandra says

      October 11, 2020 at 7:46 pm

      I use a scarf joint (https://sawdustgirl.com/making-invisible-molding-seams-scarf-joint/)

      Reply
  65. kathy says

    October 11, 2020 at 12:47 pm

    GENIUS!!!!

    Reply
  66. tanya says

    October 21, 2020 at 7:57 pm

    Hi Sandra!

    Thank you so much for this article, it has helped me wrap my mind around what to do next! I do have a question though, I have a dual bevel compound miter saw – I know your instructions are best for single bevel and I could absolutely do it but I was curious how your instructions would change for a dual bevel?

    Thank you!!
    Tanya

    Reply
  67. mars says

    November 16, 2020 at 3:20 pm

    I know it’s a super old thread but I’m trying to figure out the trick to cut the exact length you need when the bottom (wall) side of the molding is up against the fence on a single bevel small miter saw. Since you’re measuring from the walls of your house, you need to see where that cut is going to be on the underside of the crown that is up against the fence. What’s the trick there? Just cut long and then make micro adjustments until you’re on your mark?

    Reply
    • Sandra says

      November 16, 2020 at 8:53 pm

      When you’re cutting in that situation it’s always good to cut long and then sneak up on your mark. (Often a good idea to test fit the “long” cut before trimming it down.)
      However, the mark shouldn’t bee on the underside of the moulding. It should be on the top face, at the bottom.

      Reply
  68. Hamberg says

    November 30, 2020 at 7:19 am

    Any chance there is a printable version of this post?

    Reply
    • Sandra says

      November 30, 2020 at 9:03 am

      That is a good idea but I don’t have that option at this time. You could screen shot each photo and then print those out.

      Reply
  69. Vernon says

    December 4, 2020 at 4:34 am

    Thank you so much. This is perfectly clear and wow you the best.

    Reply
  70. Stephen Hosmer says

    February 12, 2021 at 3:15 pm

    Hi
    I have been doing trim for a long time but I to need to refresh myself before I get started.
    This is the best description and with pictures too.
    Tommy Silva needs to understand that most people need clear visuals.
    Thanks again
    Steve

    Reply
  71. Drew says

    April 5, 2021 at 1:12 pm

    Thank you!!! Many hours and dollars saved with a few easy to understand visuals, much appreciated!

    Reply
  72. Tony B says

    April 25, 2021 at 6:10 pm

    Struggled for hours on YouTube videos saying to cope this, cope that. Find this site with awesome instructions for templates and really saved me from driving myself crazy that things weren’t fitting for some reason. Thank you. Have templates made and saved for more crown molding projects.

    Reply
    • Sandra says

      April 27, 2021 at 9:18 am

      Glad this method was helpful. When I don’t install crown for long periods of time, I have to re-remember all the things and I refer back to this tutorial myself.

      Reply
  73. M B says

    February 12, 2022 at 7:47 pm

    This was so useful! I love my little templates with the instructions on them. Thank you!

    Reply
  74. Viktoria says

    February 14, 2022 at 5:18 pm

    Thanks so much, it made easier for me to complete my project!

    Reply
  75. Rita R says

    August 12, 2022 at 10:45 am

    I wish I could reach through the phone and hug you! I’ve spent the last two days crying out of frustration and feeling like an idiot, not to mention wasting money and time buying more crown molding because I just could not get it to make sense. I made your templates and just got it right on the first try! THANK YOU!!!!

    Reply
    • Sandra says

      August 22, 2022 at 9:41 am

      I’m so glad this method helped you conquer that frustrating project. Every time I install crown, I have to follow my own instructions because it’s not intuitive and I can’t remember how to keep everything straight in my mind – no matter how many times I’ve installed crown. I’m a visual person and I have to hold up the templates and make my brain understand what I’m doing. With each cut.

      Crown is just that kind of project for me. I like to remind people as often as possible that even I, after renovating for over 25 years, am still confounded when converting “upside down and backwards” on the ceiling to …”What the heck am I supposed to do at the miter saw?”.

      So anyway…kindred minds. Just wanted to give you reassurance that we aren’t idiots, we just have to find the method that works for our creative brains.

      Reply
  76. Dixie says

    August 18, 2022 at 9:25 am

    OMG, forget kissing the templates, I could kiss you! I have watched video after video, and no one was doing cuts like you, and they did not fit! Finally, I found you, and guess what, the cuts were easier (laying the boards flat) and they fit!!! I’ve only put up 2 boards so far, but I am now so excited to put crown molding in my entire house! This has by far been the hardest DIY for me, but you have made it doable! Thank you for sharing your knowledge!

    Forever grateful, Dixie

    Reply
    • Sandra says

      August 22, 2022 at 9:51 am

      Yeah! So glad this method is working for you. It is inevitable that you will come to a corner where it won’t be a perfect fit because the wall/wall/ceiling corner of the room is that out of square. I don’t mess with trying to make small adjustments to the cuts, I just use shims behind the crown to keep those pieces tight and caulk the wall and ceiling lines which are always imperfect anyway (because every wall I’ve ever seen is not perfectly straight). But you will figure out how to deal with the small hurdles that you run into as you run into them – in the best way that fits the situation you’re specifically dealing with.
      At least having a jumping off point that makes sense and works pretty darn well is a good starting point.
      Hope the rest of the project goes well for you!

      Reply
  77. Ed Rosner says

    August 27, 2022 at 3:39 pm

    I have view multiple pages and videos on crown molding and this was the only one I understood and that was truly helpful. Thanks.

    Reply
  78. Bella says

    October 22, 2022 at 11:23 am

    Hi! You saved me from a complete nervous breakdown! Can’t tell you how many times I messed up left and right side cuts before printing out pics of your instructions and hanging them up on the wall in front of my miter saw. Thanks a million! xoxo

    Reply
  79. John says

    January 28, 2023 at 6:49 pm

    This was by far the best tutorial on how to do crown molding using miter and bevel flat cut method.

    The pictures of how to lay the wood down for right and left inside cuts was the thing lacking in a lot of YouTube tutorials.

    I used this tutorial plus this calculator, to account for the fact that my corners weren’t near 90 degrees. Came out perfect.

    https://www.blocklayer.com/crown-molding

    Thank you!

    Reply

Leave a Reply Cancel reply

Your email address will not be published. Required fields are marked *

Categories

New Post email notification signup

You Subscribed!

Legal Stuff

Terms of Use

Privacy Policy

Disclosure

Recent Posts

  • March 2023 Lodge Update- Moved in
  • January 2023 Lodge Update
  • Lodge Update – Floors, Cabinets, Countertops, and Appliances
  • Lodge Kitchen Cabinet Progress
  • Halloween Mad Gab – Halloween Party Ideas

Disclaimer:

Although it is my intention to provide accurate plans and clear instructions, not all plans have been tried and tested. Using plans or information found on SawdustGirl.com indicates that you agree with the Terms of Use policy and will accept full responsibility for the process and outcome of any project you attempt. All plans are for private use only. Plans and information published on SawdustGirl.com may not be reproduced, republished or distributed in any manner without written permission from Sandra Powell, Sawdust Girl. Actual projects built using Sawdust Girl plans may be published on your own site without instructions or "tutorial" as long as you provide a link to my original post with full post title or "SawdustGirl.com" as link title.

Copyright © 2023 · anchored theme by <a target="_blank"