• Home
  • About
    • Personal Posts
  • Privacy
  • Shop
    • My Account
    • Checkout
    • Email
    • Facebook
    • Instagram
    • Pinterest
    • Twitter
    • YouTube
Sawdust Girl®

Sawdust Girl®

Renovation, cabinet building and woodworking plans and tutorials. Build like a Girl®

  • My Home
    • Clinton TN House
      • Clinton TN House in Progress
    • Maryville TN House
      • Maryville TN House Tour – Completed Rooms
      • Maryville TN House in Progress
        • Basement
        • Basement Storage Closet
        • Bedroom Office
        • Craft Room
        • Dining Room
        • Entry
        • Garage
        • Guest Bedroom
        • Hallway
        • Jack and Jill Bathroom
        • Kitchen
        • Kitchen Entry
        • Laundry Room
        • Library
        • Living Room
        • Loft
        • Madison’s Room
        • Master Bedroom
        • Master Closet
        • Pantry
        • Porch
        • Powder Room
        • Wes’ Office
    • Illinois House
    • Calderwood Cottage
  • My Workshop
    • Clinton Workshop
  • Build & Breakfast
  • Cabinet Making 101
    • Cabinets
    • Doors
    • Drawers
  • Projects and Plans
    • Countertops
    • Beds
    • Benches
    • Bookshelves
    • Desks
    • Gift Ideas
    • Holiday
      • Christmas
      • Halloween
    • Home Accessories
    • Kids
    • Kitchen Cabinets
    • Lockers
    • Nightstands
    • Organization accessories
    • Recipes
    • Sewing
    • Tables
    • Vanities
    • Wardrobes
    • Woodworking
      • Wood Finishing
    • Workshop
    • Workshop Storage and Organization
  • Remodeling 101
    • Baseboard and Trim
    • crown molding
    • Demolition
    • Door and Window Casings
    • Door Installation
    • Drywall
    • Electrical work
    • Flooring
    • Home Maintenance
    • Painting
    • Plumbing
    • Resources
    • Safety
    • Tile
    • Wall and Ceiling Treatments
  • The Sawdust Diaries
    • Andrea
    • Ava D.
    • Beckie F.
    • Cara C.
    • Courtney B
    • Fawn T.
    • Jenn D.
    • Kelly C.
    • Kristy K.
    • Lara T.
    • Malisa B.
    • Marnie D.
    • Robin C.
    • Val F.
  • Tools
    • Products
    • Tool Reviews & Overviews
    • Inspiration & Ideas

Rolling Tool Cart and Air Compressor Storage

All Posts, Free Plans, Workshop

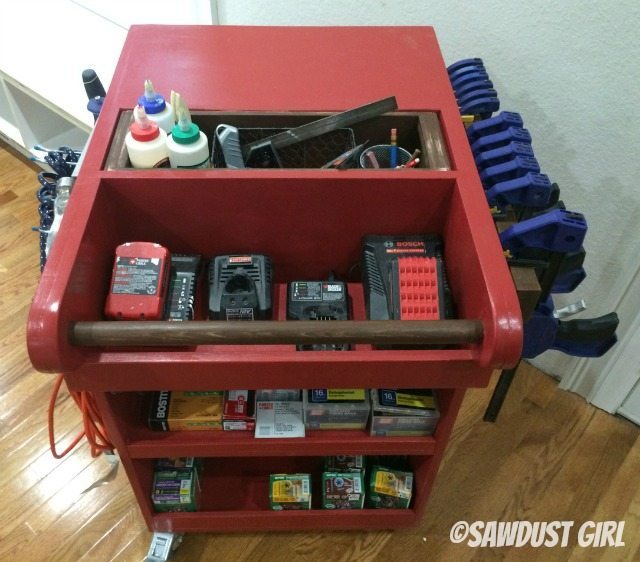
This rolling tool cart with storage for my air compressor, nail guns, drills and other tools I use on a daily basis is one of my best projects to date! I can roll this bad boy from room to room while I’m working on my ongoing 20 projects. It keeps my tools organized and saves my sanity! I’m slowly building lots of organized storage for my tools and lumber in my workshop.  But I need a way to keep track of the tools I’m using “on site”. My rolling tool cabinet literally holds EVERYTHING I need while working on a project. It holds all my nail guns and a couple drills, tons of nails and screws, clamps, glue, squares, pencils, extension cords and battery chargers.  Literally EVERYTHING. Want to build one?  Keep reading!

This post is sponsored by Scotch Brand.
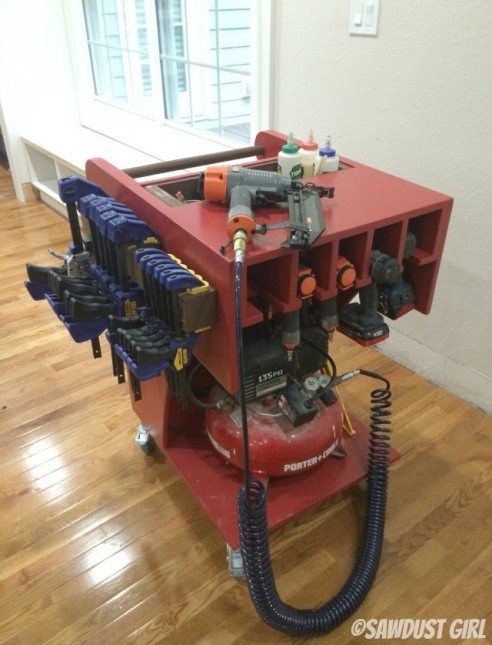
Rolling tool cabinet with storage room for an air compressor and lots of tools and supplies!

Rolling cart for tool and air compressor storage. Woodworking plans

Rolling Tool Cart

Materials:

  • 3/4″ plywood
  • 1/2″ plywood
  • 1 1/2″ wood dowel
  • wood glue
  • pegboard
  • 2×4
  • furring strip
  • 4 locking swivel casters (3″ is what I used)
  • 1 1/4″, 1 3/4″ and 3″ screws
  • Scotch Bundling Straps

Build it:

I designed this cart to hold my pancake compressor and my nail guns and drills — so you’ll need to measure your own tools and make sure to modify any part of this cart tutorial to fit your tools.

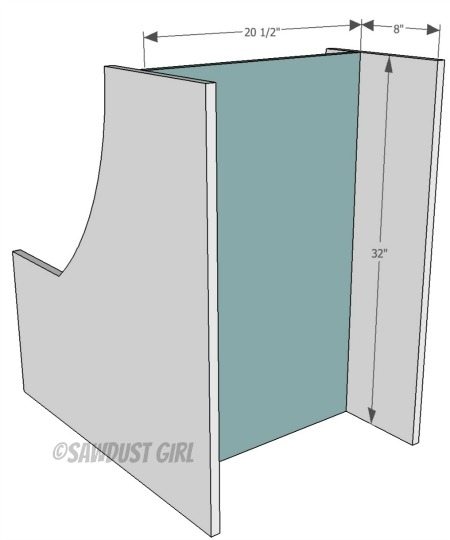
  • Cut sides out of 3/4″ plywood as shown in diagram to provide easy access to air compressor.
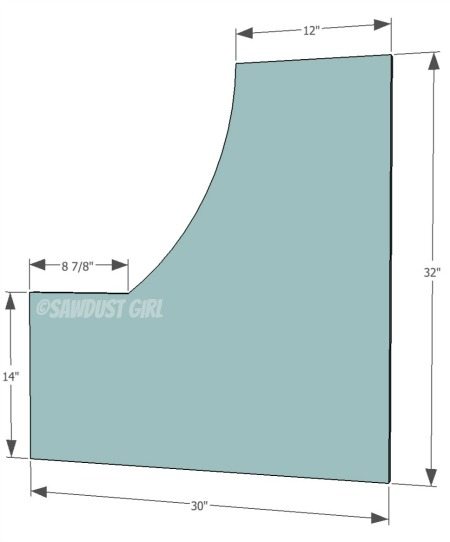
Build a Rolling Air Compressor and Tool Organizing Work Cart

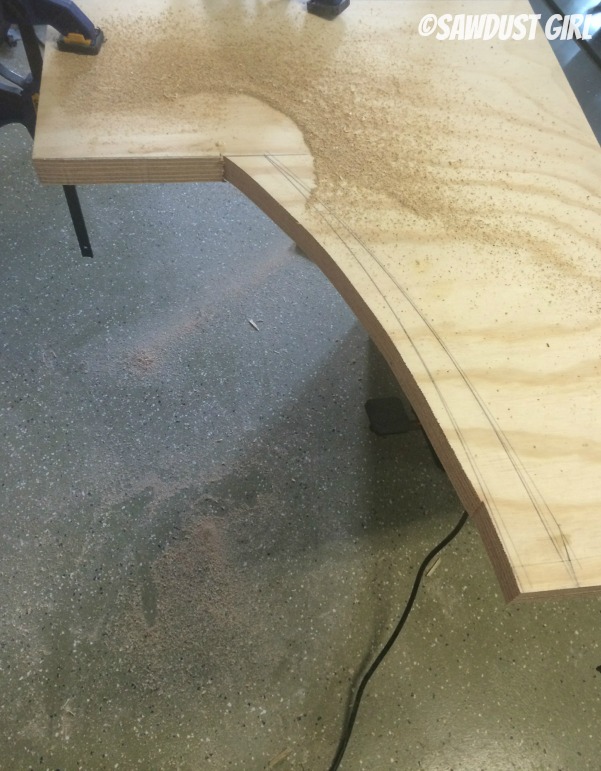
  • You can use a piece of thin MDF or plywood to create your curve.  Just put a nail on either side where you want the curve to start and end and then force the wood to bend to the angle you want it.
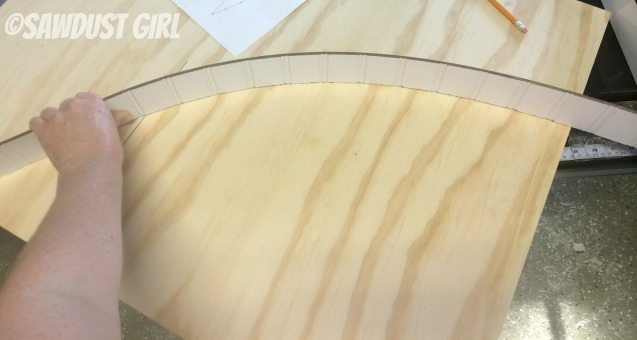
cut an arch in wood

  • Use a jigsaw to cut the curve.

Rolling Air Compressor and Tool Organizing Work Cart

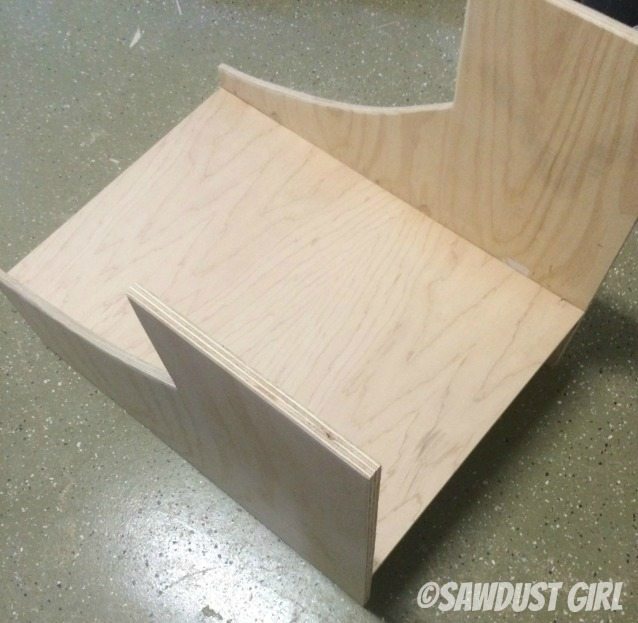
  • Secure 3/4″ divider to sides using wood glue and 1 3/4″ wood screws.
  • Divider is 8″ from cart cart back.

How to build a rolling work cart - free woodworking plans

Rolling Air Compressor and Tool Organizing Work Cart

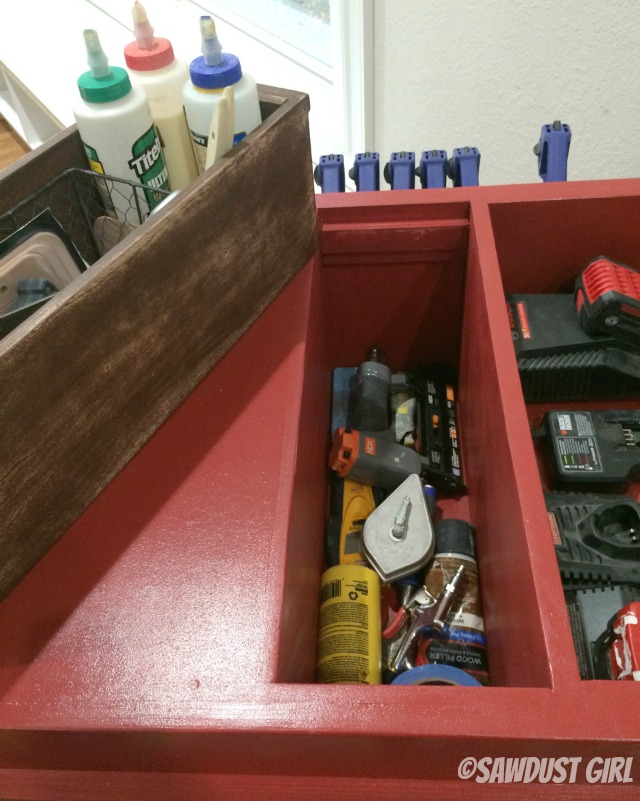
Storage for Drills and Nail Guns

  • Next I build the section that will become the work cart “top” as well as the nailer/drill storage section.
  • For this part, it’s really important that you measure your nail guns and drills to see how tall this section needs to be, how wide each box needs to be and how narrow a space you need to create at the bottom to allow your tools to slide IN but not FALL OUT.
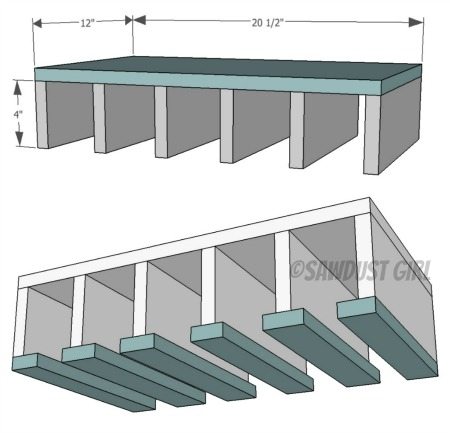
how to build a hanging storage for drills and nail guns

  • This entire section is 3/4″ plywood.
  • Dividers are secured with wood glue and 1 3/4″ wood screws.
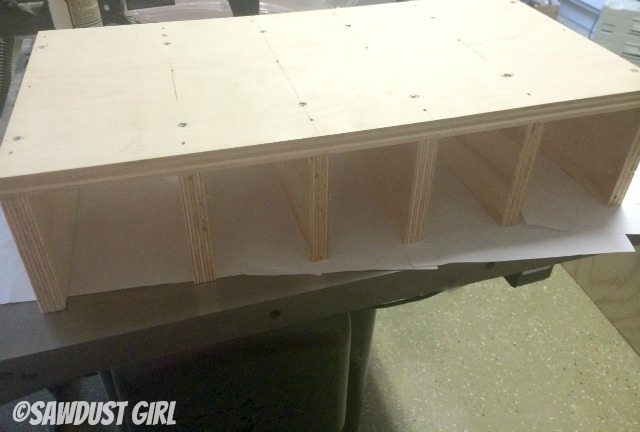
diy tool storage ideas

  • Each section has a different sized bottom plate to secure my specific tools in each compartment.
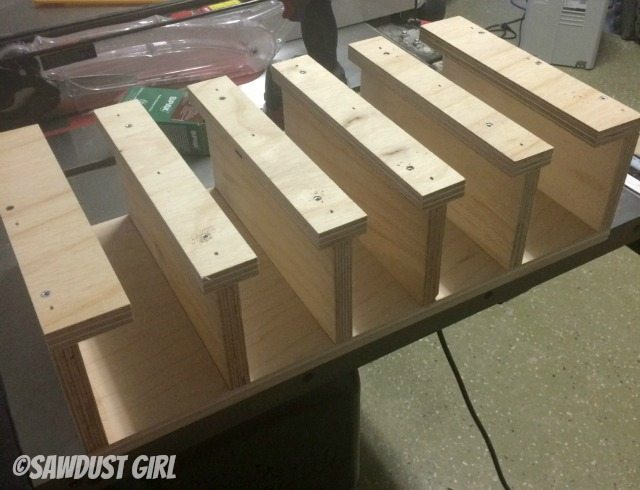
building hanging storage for drills and nail guns

  • Once that part is build, use glue and 1 3/4″ wood screws to secure it to the “TOP” of the cart.
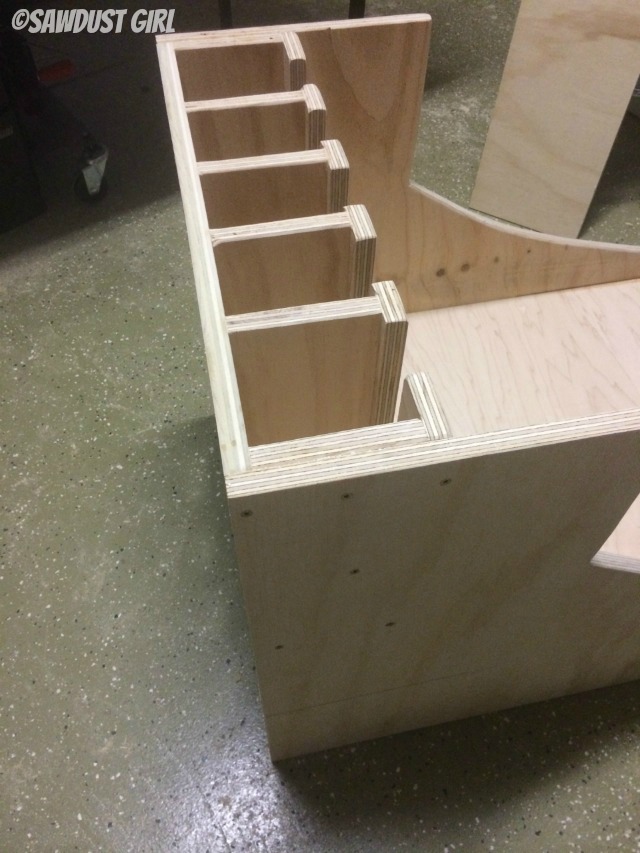
Tool storage for drills and nail guns

Casters

  • Now is a good time to flip the cart upside down and install the bottom and casters.
  • Use wood glue and 1 3/4″ wood screws to secure bottom.
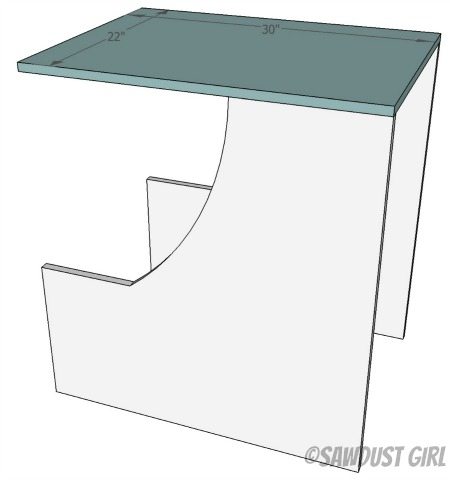
Build a DIY rolling tool cart with storage for an air compressor!


  • My cart has 4 locking, swivel casters so I can pull it in any direction and roll it around in a circle to access all four sides but lock it in place so it won’t roll away if I’m on an uneven surface.
  • You may choose to use different casters to fit your needs.

Attach casters to rolling tool cart

Flip the cart right side up and this is what it should look like so far!
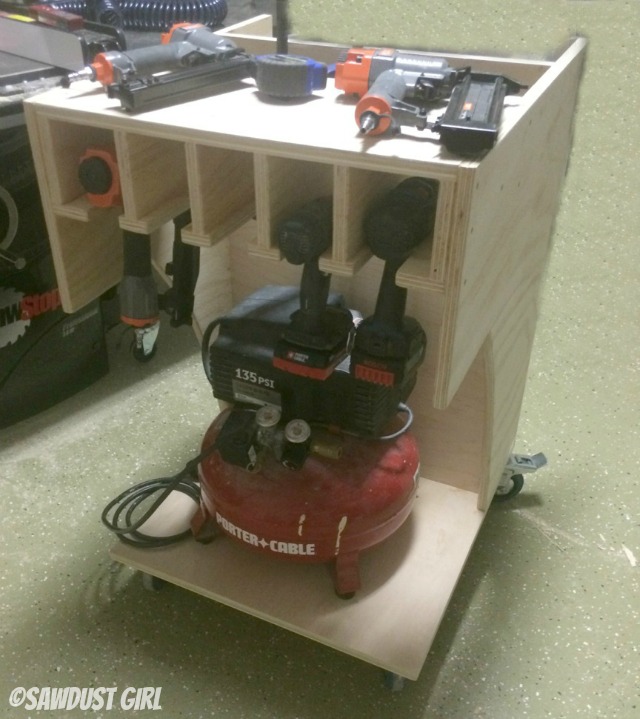
diy work cart with tool storage and air compressor with wheels

Pull out tool caddy

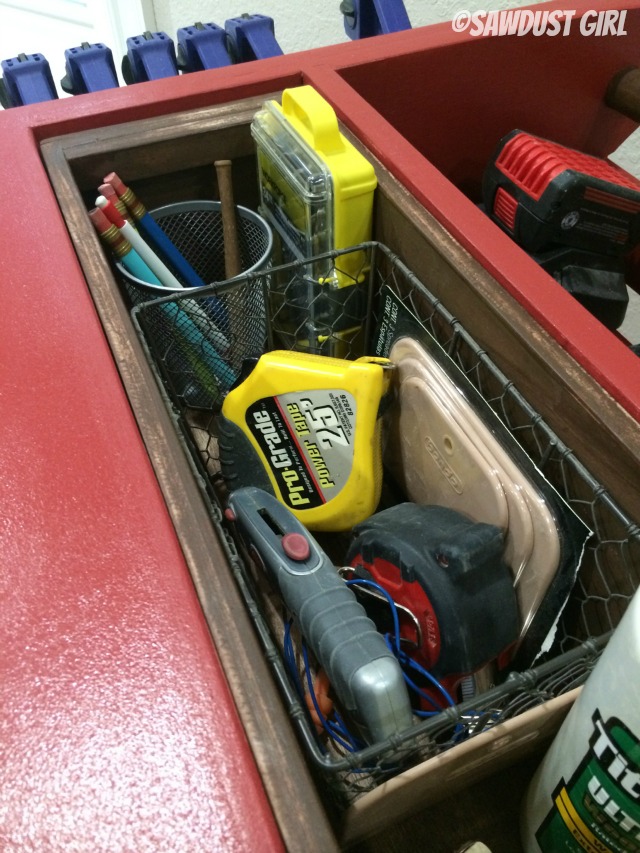
  • There is some space behind my nail gun/drill storage section and above my compressor that I didn’t want to waste so I built a 3 sided box out of 1/2″ plywood to fit into place (the cart divider became the 4th side of my box).
  • This space will be different depending on the height of your compressor and depending on how deep you built your nailer/drill section.
  • Secure this box to the cart sides with wood screws.

Rolling Air Compressor and Tool Organizing Work Cart

  • This space is most likely a very deep cavity which is not the most functional way to store tools — everything piled on tope of each other.  Avoiding that is the reason why I built this thing in the first place!
  • I built another box to fit inside, taking up about half the depth.
  • This box is slightly smaller on all sides so it will slide in and out easily.
  • Leave space on the sides to install a cleat on both the box and inside pocket to hold box in place.
  • Cleat is 3/4″ plywood and about 1 1/2″ tall.
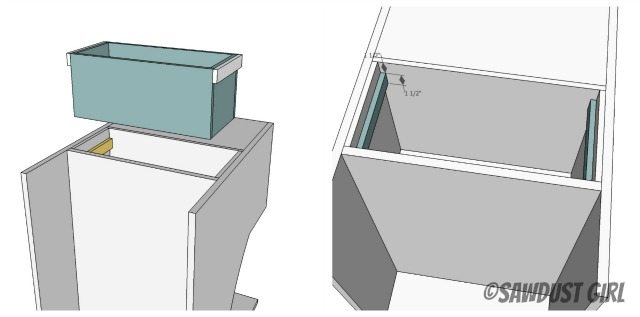
Pull out tool caddy on rolling work cart woodworking plans

  • Drill several holes in the bottom of the deep box too allow air to escape when the smaller box is put in place.
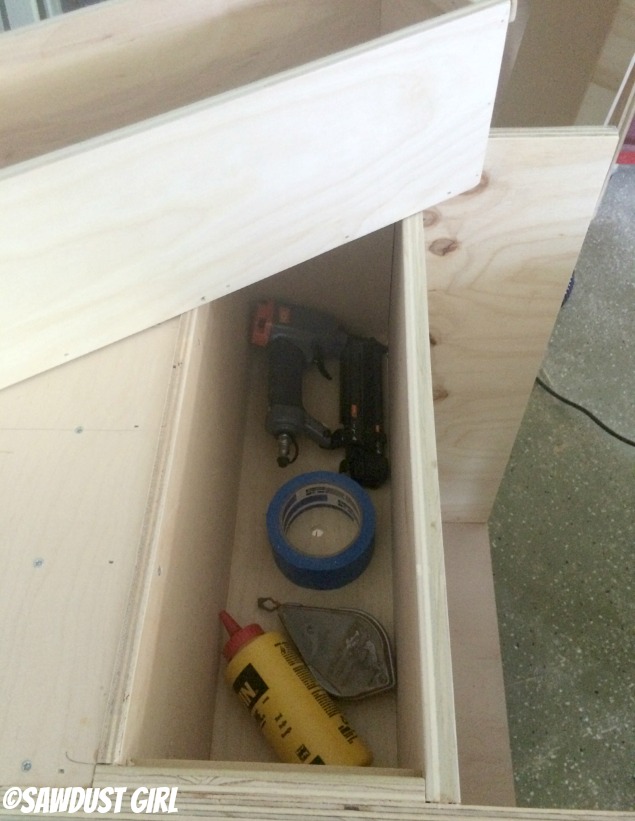
this rolling tool cart comes with a pull out tool caddy!

Shelves for additional storage

  • Use small wood cleats (whatever scraps you have laying around) to secure shelves in that 8″ space we left in the back of the cart.
  • Depending on what you want to store here, you’ll want to adjust the quantity and height of your shelves.
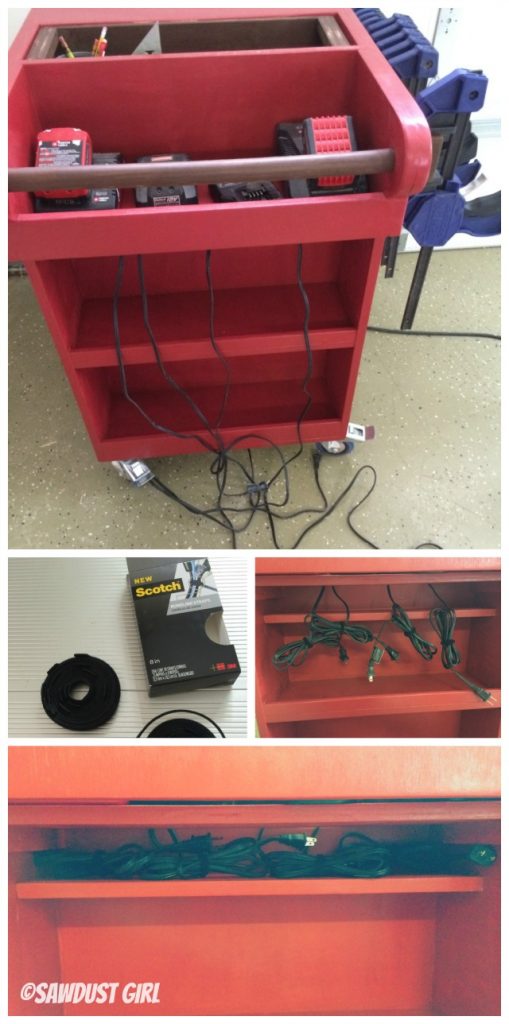
  • Create one shelf that leaves a 2″ gap in the back. Battery chargers can sit on the shelf but the cords fall through and can be stored out of the way under the shelf.
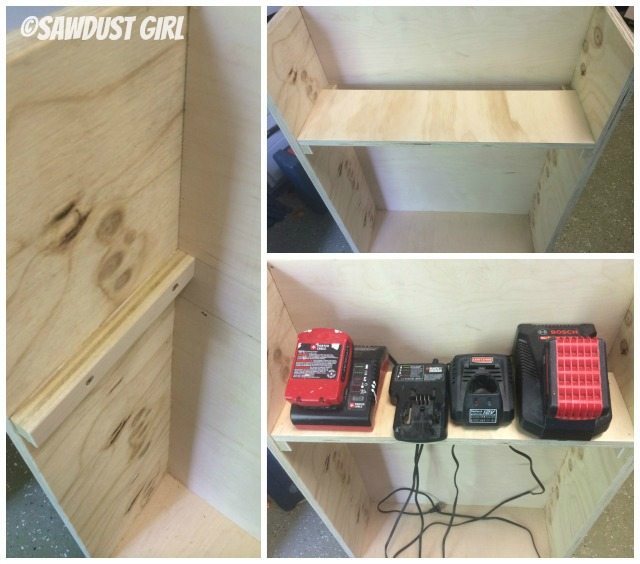
battery charger for tools in rolling work cart -woodworking plans

  • I installed 1/2″ plywood “aprons” on my shelves so things would not fall off.
  • Use glue across the bottom of this apron and secured on the side with screws.
Rolling Air Compressor and Tool Organizing Work Cart

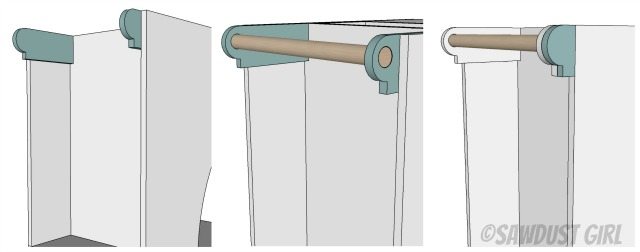
Handles

Rolling Air Compressor and Tool Organizing Work Cart

  • Use plywood about 5″ tall and 13″ long and shape the ends as shown in my drawing.
  • Cut holes for a 1 1/2″ wood dowel.
  • Insert dowel.
  • Trace the shape of the handle that is showing on the outside of the cart.
  • Cut that out and glue and screwed it into place.  *These pieces keep the dowel from falling out.
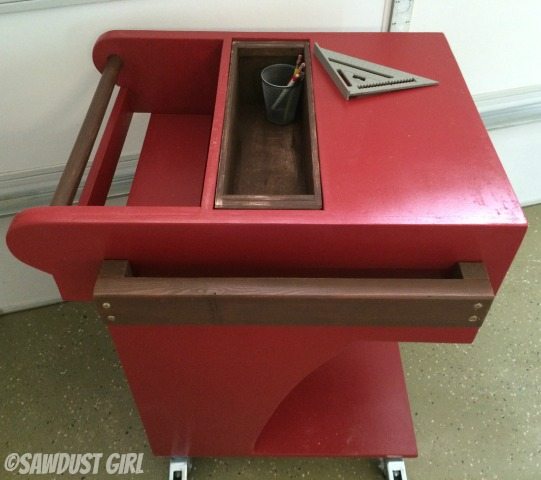
  • Add a 1/2″ strip of wood across the font of the cart (at the bottom of the handles where it is flat) to create another shelf “apron” to keep your battery chargers in place.
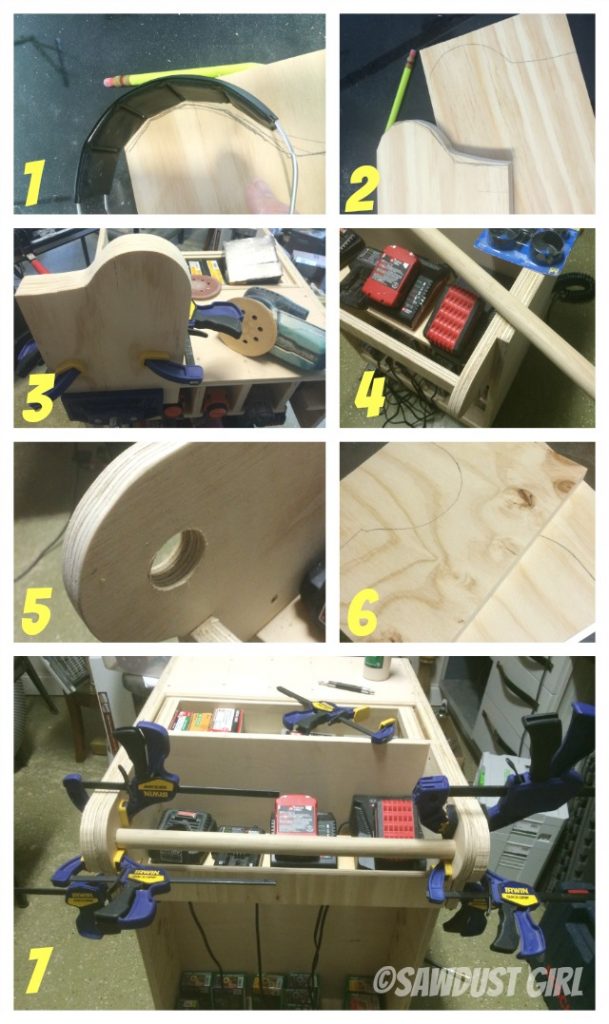
shop_built_rolling_work_cart_step 10 - handles

Now you just need to fill ALL those screw holes and sand all the edges super well.  No one likes rough plywood edges that snag your sweaters and give you splinters!
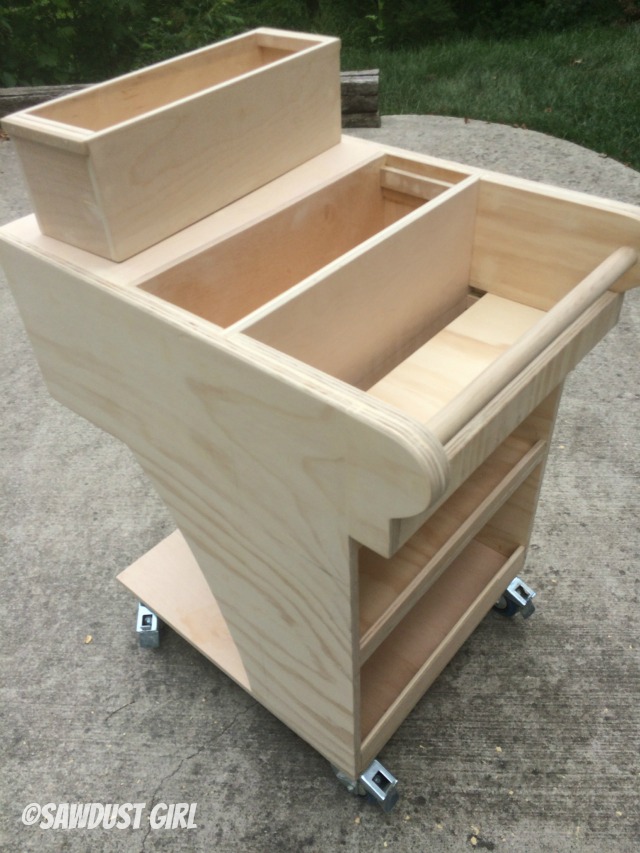
Free woodworking plans for a rolling tool cart with air compressor storage

Finish with poly or paint

Now protect your work cart in whatever way will make you happy. Since it’s plywood, I chose to paint mine.

  • I chose to paint my cart red but protected the handle so I could stain and poly that as well as the storage box. I wanted a little contrast

shop_built_rolling_work_cart_paint

Now it’s time to accessorize!

Rolling Air Compressor and Tool Organizing Work Cart

Clamp Storage

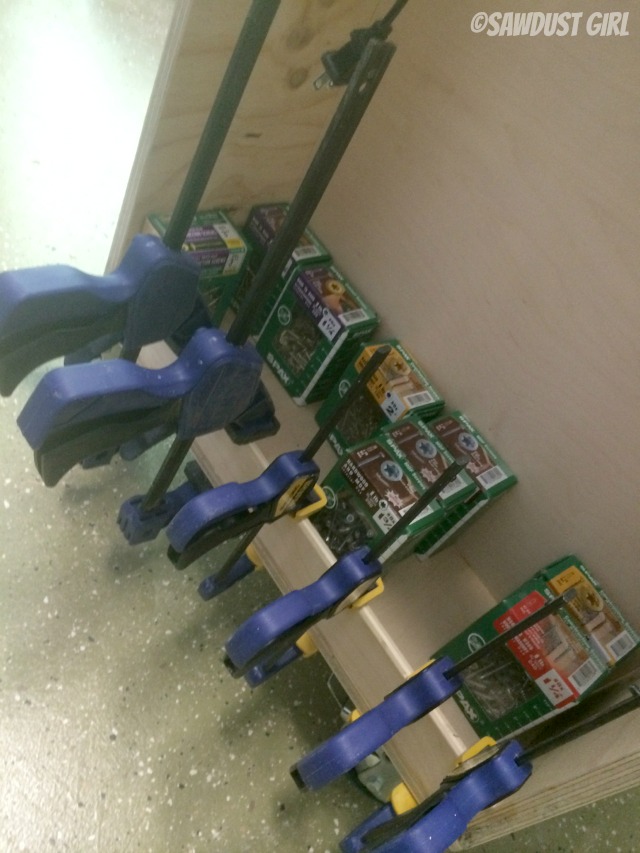
  • I installed clamp storage on one side of my cart.
  • Secure 2×4 blocks to the cart side and then secure a 2×4 on top of those blocks to create extra depth for wide clamps.
  • I used 3″ screws to secure these 2×4’s.
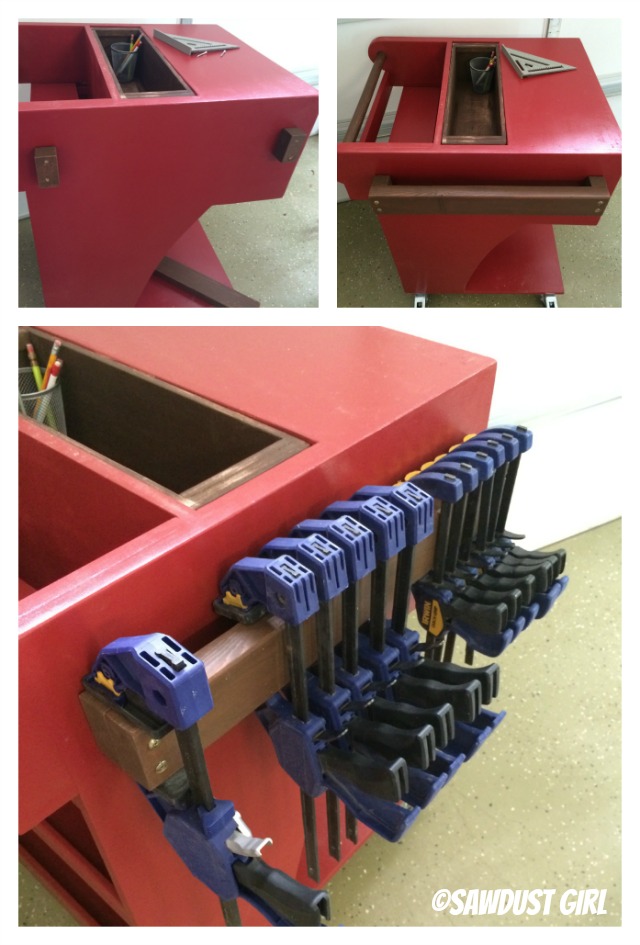
mobile clamp storage

Pegboard Storage

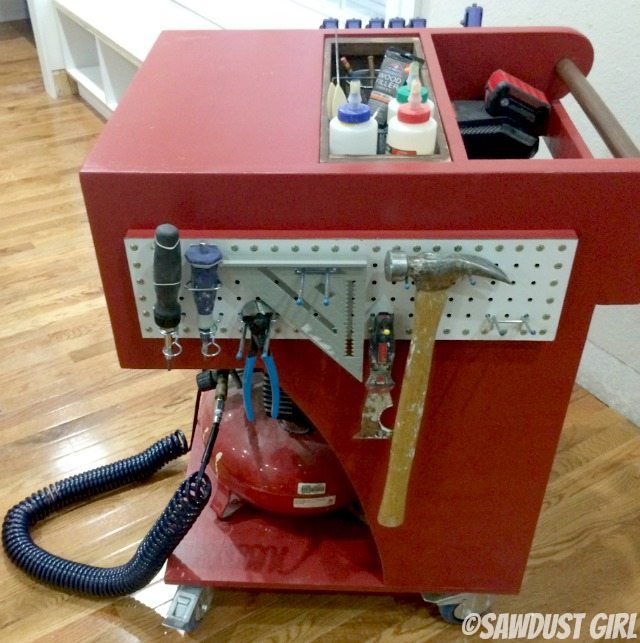
  • Screw 1×2 cleats to the other side of your cart to create a grid to hold pegboard.
  • Use a bit of double stick tape to hold the pegboard in place to free up your hands while you secure the pegboard to the cleats.
  • You DO NOT need to go crazy with the screws like I did!  Three screws across both the top and bottom would be plenty.   😀
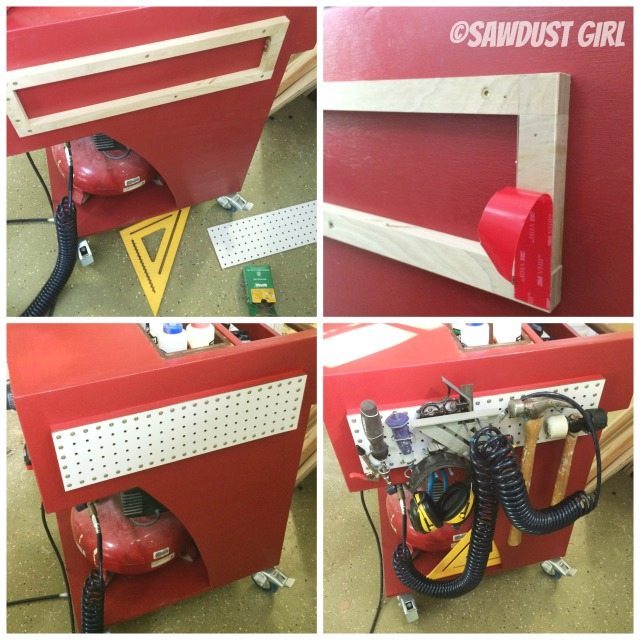
Pegboard storage on diy rolling tool cart

Cord Management

  • To keep those battery charger cords from becoming a hot tangled mess, I used Scotch bundling straps to keep wrap them up into tidy, managed bundles.

Rolling Air Compressor and Tool Organizing Work Cart

Cord management for power tool battery chargers

  • I created a ledge under my battery charger shelf to hold a power strip so they can all be plugged in at once.

Now, load your rolling tool cart up with tools, supplies and your air compressor!
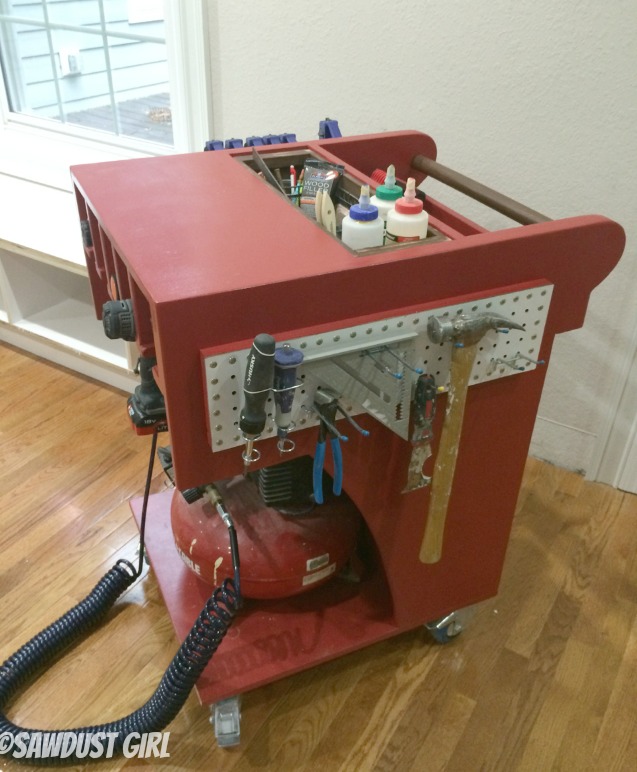
Store your air compressor, nail guns, drills and tons of other tools in this awesome rolling tool cart. Free woodworking plans!

tons of useful tool storage

DIY tool cabinet on wheels

Rolling Air Compressor and Tool Organizing Work Cart

I seriously LOVE using this thing.  I have never been so organized with this much tool storage in a rolling work cart!

If you liked this post, check out my other free woodworking plans and consider sharing!

Rolling tool cart with TONS of storage. Free woodworking plans!

disclaimer

July 28, 2014 · 26 Comments

« She Knows TV: HomeStretch – Season 7 – Laundry Room Makeover
Beautiful Master Bedroom Makeover »

Comments

  1. Sarah says

    July 28, 2014 at 1:26 pm

    Sandra, this is just the best. Wow! I love it. I wish I had a tidy place in my garage to put it when I wasn’t using it. Maybe I’ll have to create one. Although going from my garage to house there are three steps. But it’s so cute, maybe I’ll just keep it in my house, instead. 😉

    Reply
  2. denise says

    July 28, 2014 at 2:22 pm

    Sandra, I absolutely love this. We moved and now have a workshop/art studio house in the backyard with ac/heat etc. But I cannot tell you with all the fixing up that comes with a new (older) home. We have made more trips back and forth just to get the tools we need to complete something in the house. Along with those trips I typically end up injuring myself by running into something usually my potter’s wheel on a cart I built on wheels for it. More trips = more chances of me tripping! Love that you shared this idea.

    Reply
  3. ANge says

    July 28, 2014 at 3:11 pm

    Wow, I am so impressed. Wish I had your talents. Thanks for sharing, great instructions and photos. Love reading your blog!

    Reply
  4. Kim says

    July 28, 2014 at 4:06 pm

    You should get an award for this newest creation! It’s a masterpiece! 🙂

    Reply
  5. Ayisha says

    July 28, 2014 at 5:24 pm

    I love it. Since I occasionally try to build things myself, I have as much appreciation for building “utility” items as I have for the pretty stuff. You are one clever gal.

    Reply
  6. Bonnie says

    July 28, 2014 at 7:07 pm

    I built a rolling pedestal so that I can swing my air compressor through my house; this is a much better idea that I will be borrowing! thanks for the really good posts.

    Reply
  7. Michelle says

    July 28, 2014 at 9:37 pm

    I hope you’re getting a patent on that design. That is phenomenal!!!

    Reply
    • Mary Ruth says

      July 29, 2014 at 1:40 pm

      I so agree! I also can’t stand tools and useful home items being abused… the need to re-purchase is just a waste!

      Reply
      • Mary Ruth says

        July 29, 2014 at 1:41 pm

        I meant to add to the ‘I agree’ that I think you should patent this too!

        Reply
  8. Annet M says

    July 28, 2014 at 10:39 pm

    I really love this and such a great tutorial as always. Wouldn’t work in this house though – lots and lots of steps.

    Reply
  9. Cathy Michels says

    July 29, 2014 at 9:48 am

    This is great!! I built a cart for my large compressor years ago but I may need to build this one for my smaller compressor. You are so smart to take good care of your compressor and share that info with others. I had a seasoned carpenter working with me last year and he broke the stem off of my beloved pancake compressor and never drained it once in the 5 months he was using it. Made me so mad I had to replace it so I would quit fuming. Tool abuse really bugs me since I consider them my close friends. 🙂

    Reply
  10. Tania // Run to Radiance says

    July 29, 2014 at 10:35 am

    Wow this is amazing!!! I am so impressed!! I just got my first jigsaw- going to play with it a bit tonight and practice!! Maybe in a few years I’ll be able to build something like this. 🙂

    Reply
  11. Jake's a Girl says

    July 29, 2014 at 12:03 pm

    Love it!!!

    Reply
  12. John @ azdiyguy.com says

    July 29, 2014 at 3:27 pm

    This is great. I’ve wanted to build something like this for a long time. It seems like I’m leaving a trail of tools and materials in a 15 foot radius around my work-space as well as along whatever trail I took to get there.

    Reply
    • Sandra says

      August 5, 2014 at 12:55 pm

      I know what you mean. I wish I would have built this 10 years ago. A place for everything and it just wheels around with me.

      Reply
  13. Trudi says

    July 30, 2014 at 7:32 am

    It is a thing of beauty. Truly!

    Reply
  14. MarieRoxanne says

    July 30, 2014 at 11:46 am

    Super awesome! Love the color and personalization of the copyright of sawdust girl on the side.
    One question… why do you need so many nail guns? Are there that many different sizes of nails for the guns so you need a separate gun for them all? (curious because I would like to own a nail gun)

    Reply
    • Sandra says

      August 5, 2014 at 12:54 pm

      Thanks. Yes, I use different gauge nails for different things. I have 3 nail guns that I use regularly and then a drill and an impact driver.

      Reply
  15. bryan patterson says

    July 30, 2014 at 1:23 pm

    love the project!! you have a much better mind for design than i do 🙂 keep up the great work!!

    Reply
  16. Feral Turtle says

    July 30, 2014 at 2:06 pm

    This is fantastic!

    Reply
  17. kim massa says

    July 31, 2014 at 7:23 am

    That is beautiful Sandra. Don’t take this post down as I hope to build one of my own someday. How long did it take you to build?

    Reply
    • Sandra says

      August 5, 2014 at 12:45 pm

      Thanks Kim. I worked on it over a couple days. It took me longer than it should you because I was making it up. Now that I’ve figured it out — it should be easier to recreate. ;-D

      Reply
  18. Tori says

    April 10, 2018 at 10:10 pm

    This.is.awesome. Seriously! Awesome! Is it just me that sees the resemblance to a grocery cart? Haha! I have “inherited” some of my husbands tools for my workshop. Things he gave me to use since he’s a handyman and has duplicates of a few things. I have they tiniest pancake air compressor ever! But, it just enough for my needs right now. We used to have one just like yours, I’d like to get another, so I would make my cart along the same-ish measurements as yours for that part. That way I can upgrade eventually!

    Reply
  19. Linda says

    January 10, 2019 at 2:41 pm

    Awesome! Is there a pdf of the plan?

    Reply
  20. Chris says

    January 24, 2020 at 10:49 pm

    When you say 3/4” plywood. Did you use a full sheet?

    Reply
  21. Raymond Chojnowski says

    April 23, 2020 at 8:21 am

    Great looking project!

    Reply

Leave a Reply Cancel reply

Your email address will not be published. Required fields are marked *

Categories

New Post email notification signup

You Subscribed!

Legal Stuff

Terms of Use

Privacy Policy

Disclosure

Recent Posts

  • Building and Installing a Giant Faux Beam on the Ceiling
  • White Wash Pine Wood Ceiling
  • Lodge and Life Update
  • How to Choose Which Track Saw to Buy in 2021
  • How to Choose a Paint Sprayer to Buy in 2021

Disclaimer:

Although it is my intention to provide accurate plans and clear instructions, not all plans have been tried and tested. Using plans or information found on SawdustGirl.com indicates that you agree with the Terms of Use policy and will accept full responsibility for the process and outcome of any project you attempt. All plans are for private use only. Plans and information published on SawdustGirl.com may not be reproduced, republished or distributed in any manner without written permission from Sandra Powell, Sawdust Girl. Actual projects built using Sawdust Girl plans may be published on your own site without instructions or "tutorial" as long as you provide a link to my original post with full post title or "SawdustGirl.com" as link title.

Copyright © 2022 · anchored theme by <a target="_blank"