• Home
  • About
    • Personal Posts
  • Privacy
  • Shop
    • My Account
    • Checkout
    • Email
    • Facebook
    • Instagram
    • Pinterest
    • Twitter
    • YouTube
Sawdust Girl®

Sawdust Girl®

Renovation, cabinet building and woodworking plans and tutorials. Build like a Girl®

  • My Home
    • Clinton TN House
      • Clinton TN House in Progress
    • Maryville TN House
      • Maryville TN House Tour – Completed Rooms
      • Maryville TN House in Progress
        • Basement
        • Basement Storage Closet
        • Bedroom Office
        • Craft Room
        • Dining Room
        • Entry
        • Garage
        • Guest Bedroom
        • Hallway
        • Jack and Jill Bathroom
        • Kitchen
        • Kitchen Entry
        • Laundry Room
        • Library
        • Living Room
        • Loft
        • Madison’s Room
        • Master Bedroom
        • Master Closet
        • Pantry
        • Porch
        • Powder Room
        • Wes’ Office
    • Illinois House
    • Calderwood Cottage
  • My Workshop
    • Clinton Workshop
  • Build & Breakfast
  • Cabinet Making 101
    • Cabinets
    • Doors
    • Drawers
  • Projects and Plans
    • Countertops
    • Beds
    • Benches
    • Bookshelves
    • Desks
    • Gift Ideas
    • Holiday
      • Christmas
      • Halloween
    • Home Accessories
    • Kids
    • Kitchen Cabinets
    • Lockers
    • Nightstands
    • Organization accessories
    • Recipes
    • Sewing
    • Tables
    • Vanities
    • Wardrobes
    • Woodworking
      • Wood Finishing
    • Workshop
    • Workshop Storage and Organization
  • Remodeling 101
    • Baseboard and Trim
    • crown molding
    • Demolition
    • Door and Window Casings
    • Door Installation
    • Drywall
    • Electrical work
    • Flooring
    • Home Maintenance
    • Painting
    • Plumbing
    • Resources
    • Safety
    • Tile
    • Wall and Ceiling Treatments
  • Sawdust Squad
  • The Sawdust Diaries
    • Andrea
    • Ava D.
    • Beckie F.
    • Cara C.
    • Courtney B
    • Fawn T.
    • Jenn D.
    • Kelly C.
    • Kristy K.
    • Lara T.
    • Malisa B.
    • Marnie D.
    • Robin C.
    • Val F.
  • Tools
    • Products
    • Tool Reviews & Overviews
    • Inspiration & Ideas

Reversible, Ruffled, Reusable Grocery Bags

All Posts, Sewing

I always try to remember to take reusable grocery bags to the grocery store.  Because I like to do my part, however small, to take care of this lovely Earth!  Also, because my bags are cuter than the ones the Grocery store sells for $1.99 each.   (And I think that $1.89 of that cost is for printing their own name on the bag.)
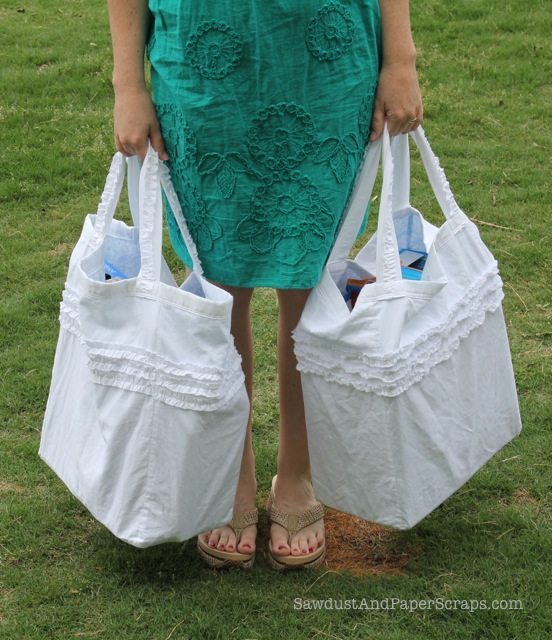
ruffled reusable reversible grocery bags

 Reversible, Ruffled, Reusable Grocery Bags

I chose WHITE as my color because it is my favorite color.  I made these ruffled grocery bags out of an old white sheet (No stains just old and nubby) and 2 cute pillowcases (because I wanted a little POP of color in the liner).
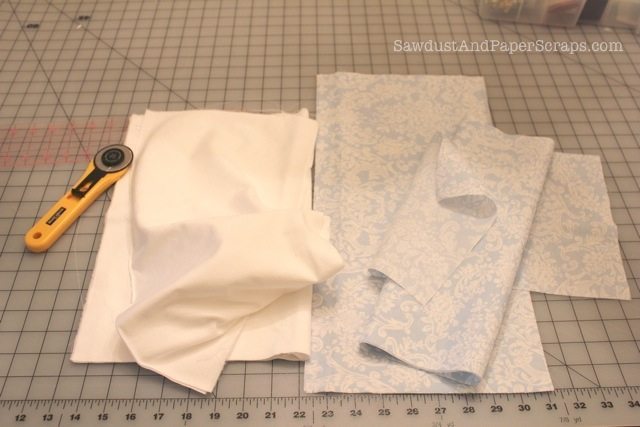
Sewing ruffled grocery bags

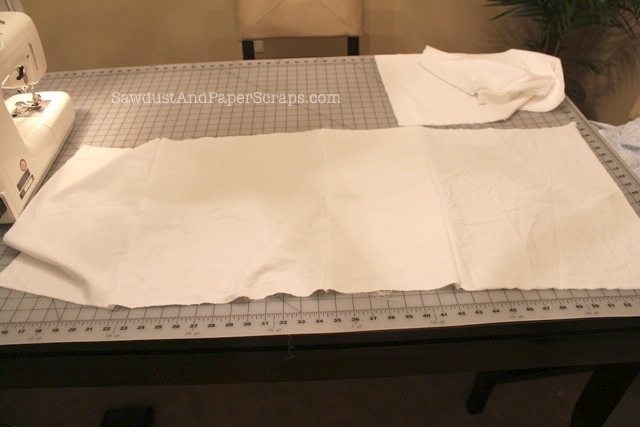
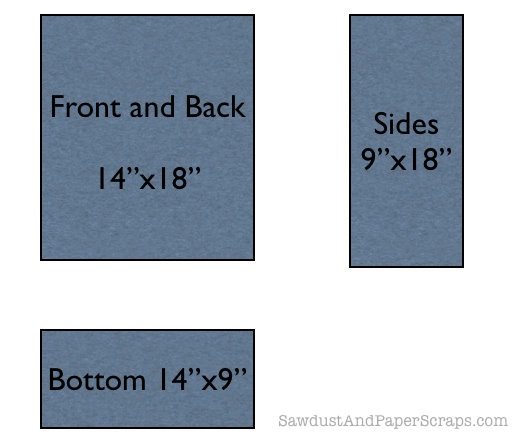
This is a really easy pattern that I made from looking at a canvas tote.  (It fits perfectly on a standard pillowcase)
*Seam allowance?  I run the fabric along the right side of the foot.  I think it’s a waste to take a wide allowance and then trim!
1.  Use the same pattern for the bag and the liner.  You could use the same fabric for both or mix it up for fun.
I like to use 2 different fabrics so I can flip it inside out and have a totally different bag!

ruffled reusable reversible grocery bags

2.  Sew all 4 pieces (excluding the bottom) together like this:  front/side/back/side making one long piece of fabric.
Sewing instructions for a grocery bag

3.  If you are going to add any kind of embellishment, now is the time.  I’m adding three rows of ruffles!

  1. To make my ruffles, I cut small slits in the fabric 1″ apart from each other.
  2. Then I ripped them the rest of the length!  If you’re not comfortable with the ripping technique, go ahead and cut 1″ strips.

Either use a ruffling or gathering foot, or stitch using a large stitch and pull one string to gather up your fabric.
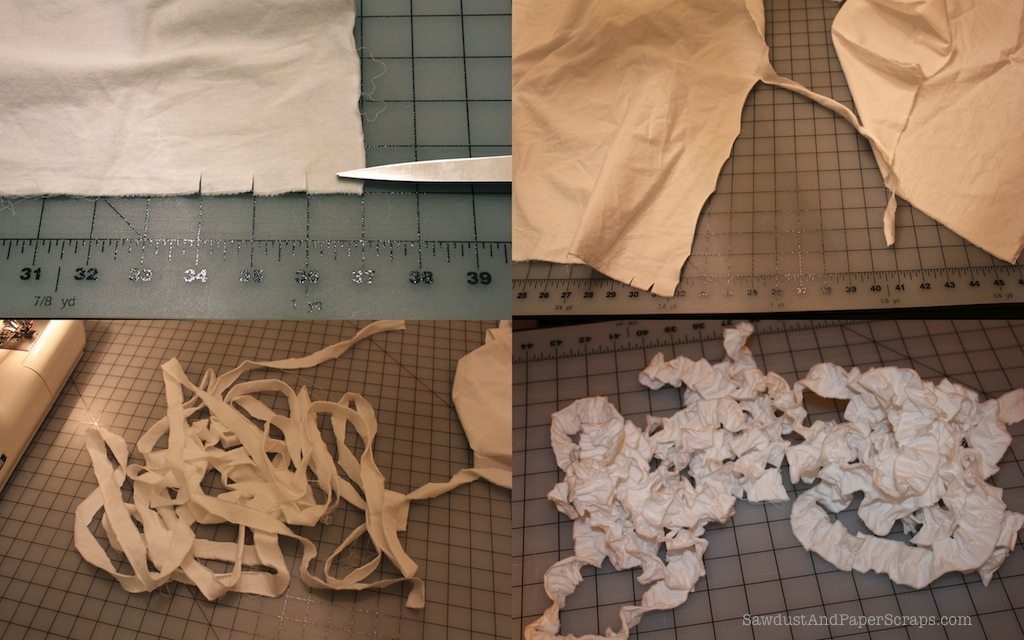
How to sew ruffles

4.  I used a mark b gone marker to mark my fabric on the RIGHT side where I wanted my ruffles. (It disappears in the wash which is another great thing about these bags.  You can throw them in the wash.  Just make sure you wash your fabric before you start the project if using NEW sheets or pillowcases.)
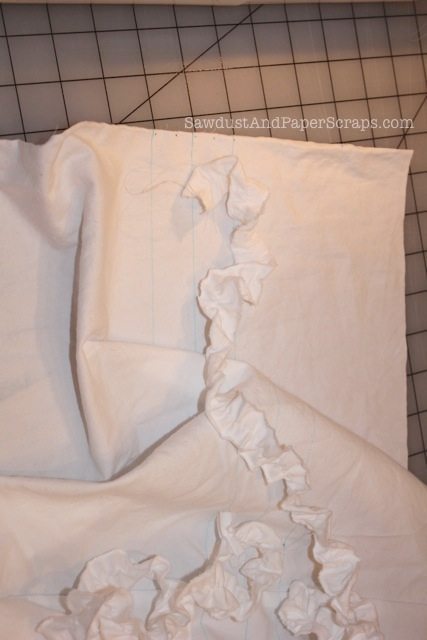
I put the first row 5″ from the top.  Then the next row 1″ down from there and so on.
Sewing ruffles onto fabric

5.  Pin the ruffles on and sew right down each center line!
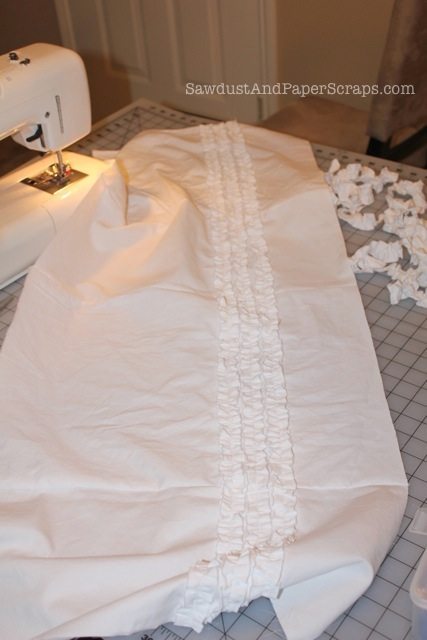
I didn’t do anything to the edges of the ripped ruffles.  It frays, but I like the raw edge.
How to sew a ruffled bag

6.  Now pin the sides together inside out making sure your rows of ruffles meet up and sew that together.
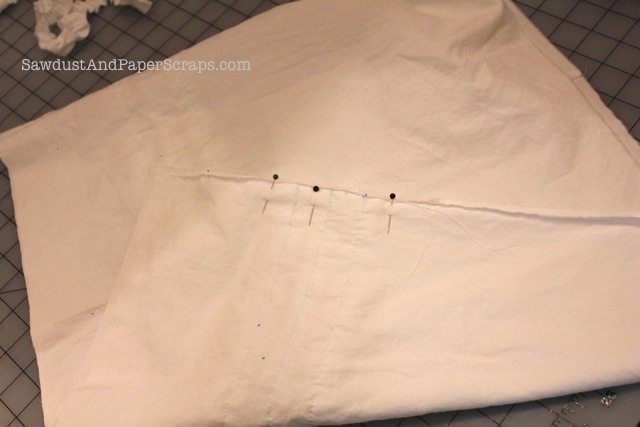
How to sew a reusable bag

7.  Pin the bottom on to make sure it fits and make adjustments accordingly. You might have to pinch the corners but it’s just a grocery bag.  No one’s judging!
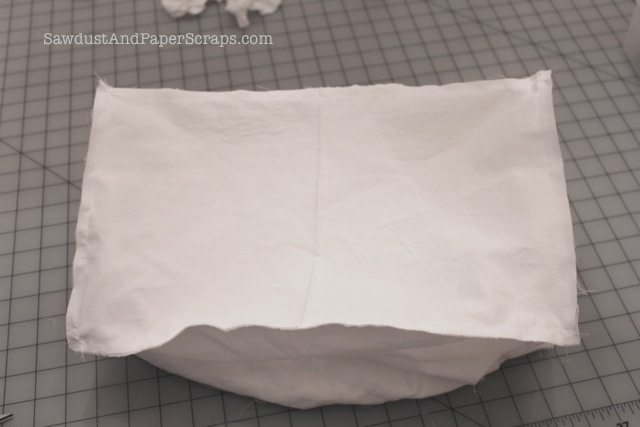
Sewing a reusable grocery bag

8.  Now sew your liner the same way with or without the ruffles, depending on what you want to see when/if you reverse your reversible reusable grocery bag.  (I just wanted to say that again!)

9.  Pin the liner inside the bag so the WRONG sides are facing each other. (So you see the RIGHT side of the liner when you look in the bag.)
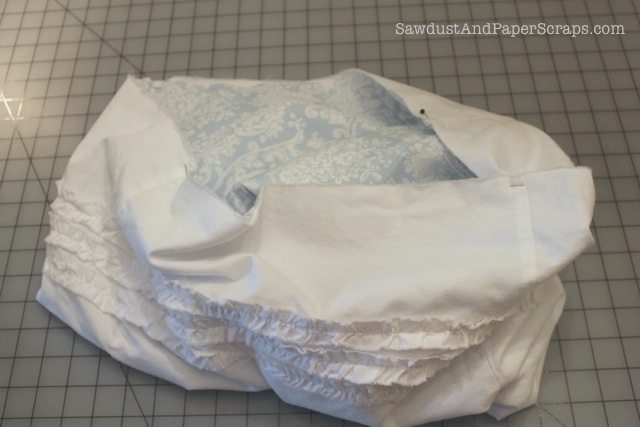
Ruffled grocery bag tutorial 15

10.  Cut a piece of either fabric about 48″ long and 4″ or 5″ wide.

  1. Iron it with the ends meeting in the middle.
  2. Fold it in half and iron again.
  3. Pin it onto the top of your bag with the fold at the top so the “band” covers both the inside and outside of your bag.
  4. When the ends meet, fold the top one under to make a hem so it overlap the bottom piece by about an inch.   (You might want to trim a little.)
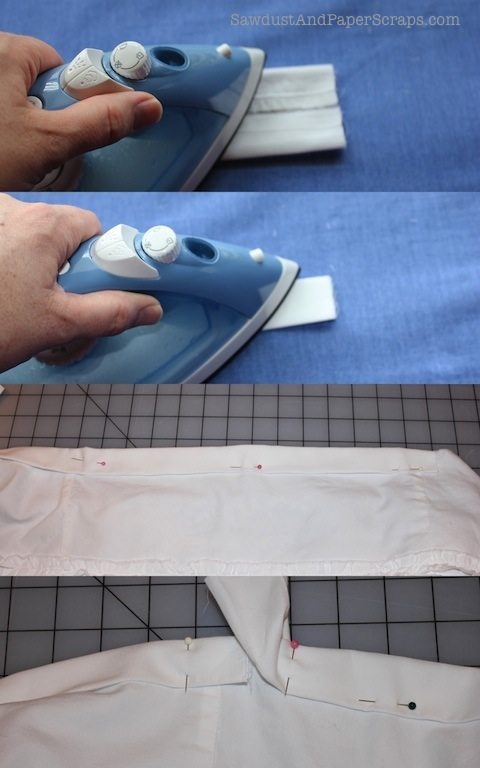
sewing ruffled grocery bags

11.  I sewed close to the bottom edge and then went back and put a second row of stitching about 1/4″ from the first one both to strengthen the seam and because I like the look of a double stitch.
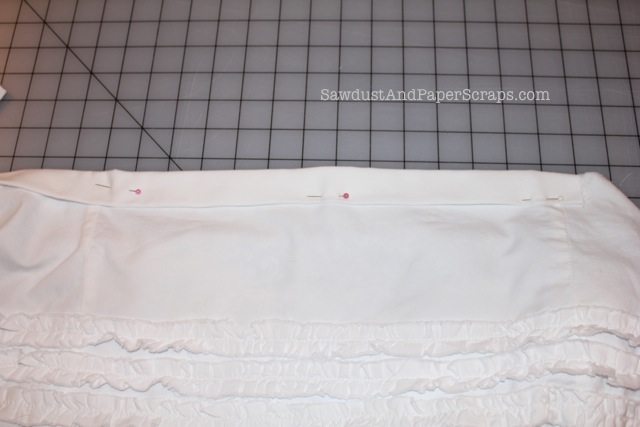
How to sew ruffles

12.  I cut 2 handles about 20″ long and 3″ wide and sewed them closed at the side and one end.

13.  Then I turned them right side out, snipped off the closed end, ironed them with the seam in the middle and sewed another ruffle in the center of each one.
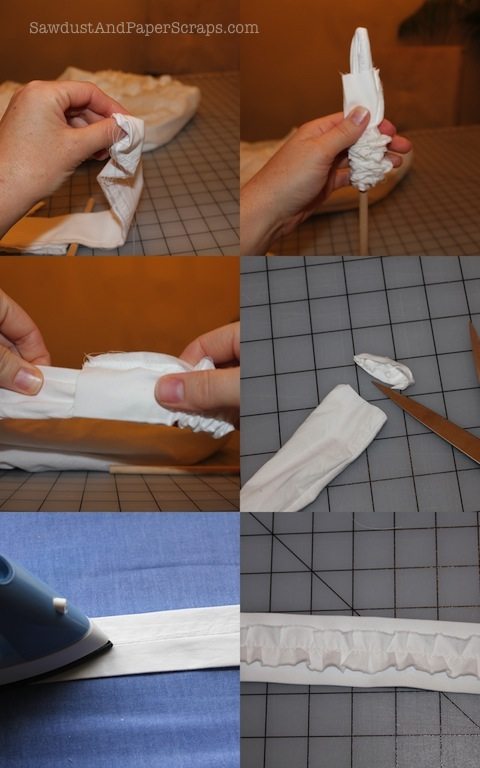
Sewing ruffles

14.  Fold the ends under and pin in place.  I made sure my “band” ended where I was going to place my handle so that seam would be covered.

ruffled reusable reversible grocery bags

15.  Sew handles in place however you want. I sometimes do criss cross applesauce and a square around that.  This time I just did a double stitch at the top and bottom.

Now, I’ve learned from experience, that having a little tab to go over the metal hook-ey-ma-thingy at the grocery store is handy for holding the back of the floppy fabric bags up while you use one hand to hold the other end and another hand to load it up!

16.  Make a hanging tab.

  1. Cut a piece of fabric about 4″ long by 2″ wide.
  2. Fold and iron like you did for the top band (But fold your ends in first like I DIDN’T do in this picture).  It should end up being about 1/2″ wide.
  3. Sew it closed.
  4. Make a loop and sew it onto the front of bag.  I layed my tab down into the bag and sewed along the top because I didn’t want the tab sticking out when not being used.
All done!
Now you can turn it inside out when you want to mix it up.  Say, if you were wearing a white dress, you might not want white grocery bags too!
They’re not just for groceries either!  You could use them for picnics, the beach, a diaper bag, overnight bag…the possibilities are endless!  Like you needed me to point that out.
 You can REDUCE your plastic bag use by RECYCLING an old sheet into a REUSABLE all purpose bag!   Now that’s what I call “Going Green”!
So I went Green and White…  get it?  Ha!

Before you sew these bags, you might want to make a Magnetic Pin Holder to hold all your pins.  🙂
May 16, 2011 · 56 Comments

« SOLD
Goodbye Chicago, we’re going to miss you! »

Comments

  1. Milk & Cookie Party says

    May 16, 2011 at 10:17 am

    Adorable!!!

    Reply
  2. Brandy Miller says

    May 16, 2011 at 10:26 am

    Great job! Those are too cute. Maybe I will muster up the guts to make some of my own.

    Reply
  3. Morgane @ Bear, Dolly and Moi says

    May 16, 2011 at 11:23 am

    your bags are so cute, I totally knew it!
    Now I am the one who feels bad!
    OK it is not a competition!
    Who has the cutest bag win?
    Love the ruffles!

    Reply
    • Sawdust and Paper Scraps says

      May 16, 2011 at 12:08 pm

      Haha- not competition, inspiration! It’s good if we inspire each other. And we both know that you are just saying that to make me feel good anyway. 🙂

      Reply
  4. Delia says

    May 16, 2011 at 11:25 am

    I love the hanging tab! Nice touch. And love that they are reversible. Great project Sandra.

    Thank you for being my guest!

    Reply
  5. Lisa~ says

    May 16, 2011 at 11:25 am

    So I want to know, did you hand your camera to the man at the meat counter and ask him to take a picture of you with your adorable bag? LOL! Lisa~

    Reply
    • Sawdust and Paper Scraps says

      May 16, 2011 at 12:16 pm

      I actually talked my husband into following me around the grocery store. Every time I looked at him I couldn’t help laughing because he was wearing my ruffled, polka dot camera strap!

      He really got into the role though, acting like what he imagined a pro would act like! We were getting lots of curious looks.

      The best part was at the register. I asked the guy bagging up if I could do his job for a photo. Everyone seemed amused and nice enough. He was smiling. He even said I could wear his name badge and orange jacket (but that offer came as I was just finishing up or I would have jumped on that!)

      I’m sure there were several people thinking, “Well, Bless her heart!” which I have learned is NOT a nice thing to think or say to a person at all! Oh well. We had fun with it. It doesn’t take much to amuse us! Date night activity- check!

      Reply
  6. Andrea says

    May 16, 2011 at 12:07 pm

    Is there anything you can’t do? I don’t think so. I justify my NOT using reusable grocery bags by recycling/reusing the plastic ones many times over. But if my life slows down any time soon, I think I will be tempted to make 50 of these (because that’s how many I would need for the kind of grocery shopping I do) – they are so adorable. Also, I have a couple old white sheets that I use for EVERY thing. They are the best. I don’t know what I’ll do when I run out of scraps from them. Maybe I’ll have to start buying fabric?

    Reply
    • Sawdust and Paper Scraps says

      May 16, 2011 at 12:20 pm

      Well as long as you’re using them over and over, I won’t hate on the plastic usage. Haha I do love using sheets for fabric! I’ll go to Ross and get a twin set for $8 and it’s like 20 yards that would be at least a couple bucks a yard – if you got it on sale! And maybe not 20 yards but a heck of a lot more fabric than $8 would buy me anywhere else. It’s not that sturdy, but it’s great for this purpose.

      Reply
      • Missy says

        July 23, 2011 at 7:59 am

        I do the same thing at Ross! i’ve made many curtains out of sheets from there. my mother in law is so sweet. she always compliments my creativity and says if she tried to make curtain panels out of sheets it would just look like sheets on the windows. so love these bags… i might not forget mine all the time if they were THIS pretty!

        Reply
        • Sawdust and Paper Scraps says

          September 14, 2011 at 9:04 am

          Missy, I’m thinking we should have kept our sheets for fabric trick to ourselves? Have you had a hard time finding any good “fabric” at Ross lately? I can’t find any decent sheets anymore. 🙂

  7. Jaime says

    May 16, 2011 at 12:21 pm

    Sandra they are beautifully green. You know I’ll be making some too, thanks for the tut with sizing and the lining really completes it. No more ‘store bags’ for me (mine are ripping at the seams anyways). So glad you’re crafting while the house hunt is in a lull.

    Reply
  8. Samantha says

    May 16, 2011 at 12:32 pm

    Oh these are adorable. I love them. I’ve never had a go at making a bag before but think I might try now.
    Well done!
    ~Sam

    Reply
  9. julie says

    May 16, 2011 at 2:46 pm

    Those are too cute for groceries! I think they deserve to go shoe shopping!!

    Reply
  10. Lorajean says

    May 16, 2011 at 4:36 pm

    Love it! these turned out so great!!

    Reply
  11. Donna says

    May 16, 2011 at 4:49 pm

    Those are great. Another project to put on the list! Thanks.

    Reply
  12. Lindsay Lee says

    May 16, 2011 at 5:10 pm

    THESE are adorable! Now if only I could sew…

    Reply
  13. Erin says

    May 16, 2011 at 5:53 pm

    Those are super cute. I’ll trade you a pen for one!

    Reply
    • Sawdust and Paper Scraps says

      May 16, 2011 at 6:14 pm

      Haha. Erin that’s not even a fair trade. But heck yes! 🙂

      Reply
      • Erin says

        May 16, 2011 at 6:59 pm

        Woo hoo! I also still have the one you liked in my giveaway.

        Reply
  14. Pink Toes and Power Tools says

    May 16, 2011 at 10:28 pm

    Love, love, love the ruffles!!! I have a suggestion for eliminating the pinning of the bottom and then sewing (I hate pinning). Eliminate the bottom piece. Use one long piece of fabric, bring the tops up to meet and sew the side seams. Decide how wide you want the sides to be and sew a seam that wide across the side seams on each side (that seam will make a plus sign with the side seam and you will have a triangle sticking out on each side). If you want more definition for a bottom, turn it right side out and topstitch around the bottom. Was that clear as mud? I can send a photo if that would help.

    That also makes a stronger bottom since there isn’t any seams that can rip out and spill your cans all over the place 🙂

    Reply
    • Sawdust and Paper Scraps says

      May 16, 2011 at 11:06 pm

      Clear as mud! That is a great idea. I like having the “square” bottom so it holds a kind of rectangular shape but I think if you sewed around the bottom, it would work. Great suggestion. But go ahead and send me a picture for good measure. 🙂 Thanks!

      Reply
  15. Holly says

    May 17, 2011 at 12:50 am

    I love the bags! and your dress is so cute too!!!

    Reply
  16. Katie from Sew Woodsy says

    May 17, 2011 at 11:31 am

    Love your grocery bags!!! 🙂

    Reply
  17. Booyah's Momma says

    May 17, 2011 at 11:07 pm

    Oh my gosh. You are the cutest little grocery shopper ever. I am kind of glad you don’t live in my town… you’d make this lady who wears sweats and burp stained t-shirts to the grocery store look like an old hag! 🙂

    I love that you coordinate your bag with your outfit (or turn it inside out to match). Tres, tres chic, Sandra.

    Reply
    • Sawdust and Paper Scraps says

      May 19, 2011 at 10:19 am

      Well I only wear cute dresses to grocery shop when my polka-dotted strapped camera wearing husband is following me around pretending we’re on a Professional photo shoot! It’s good fun!

      The rest of the time, I wear sweats and t-shirts which I’m sure are stained with something if not baby burp.

      Reply
  18. Booyah's Momma says

    May 17, 2011 at 11:10 pm

    Also? I am willing to barter future services for a set of those bags. They are seriously that cute. 🙂

    Reply
  19. Chelsea says

    May 18, 2011 at 11:36 am

    Oh, how lovely! I am loving these – I definitely wouldn’t forget these babies at home!

    Chelsea

    Reply
  20. KayT says

    May 18, 2011 at 8:56 pm

    How long did they take to make, any idea??

    Reply
    • Sawdust and Paper Scraps says

      May 19, 2011 at 10:21 am

      Without the ruffles they are really fast. Maybe about 1/2 hour each. Of course, when you start adding ruffles and other embellishments it takes longer. But I got nothing better to do with my time right now. LOL

      Reply
  21. Anita @ GoingalittleCoastal says

    May 18, 2011 at 11:47 pm

    These are so cute. I have saved this post because it was a great tutorial. I really love the ruffles.

    Reply
  22. Mary says

    May 19, 2011 at 1:27 pm

    I have been wanting to dress my drab premade bags that I have gotten here and there. Gosh now I might just have to make new ones after seeing yours!

    Reply
  23. Marga Lund Quilt says

    May 21, 2011 at 2:50 am

    I LOVE this ! ! ! !

    Reply
  24. Nicole Kimble says

    May 23, 2011 at 11:48 am

    Ok…I tried the bags….ruffles and all…maybe its the fabric…maybe its the seamstress….I really wanted mine to look like yours…so much for inspiration. 🙁

    Reply
  25. CCBinegar says

    June 11, 2011 at 10:48 am

    Very cool! Nice work!

    Reply
  26. Jen says

    June 20, 2011 at 1:27 pm

    I am going to try my hand at making these this week or weekend. Two of my reusable bags just broke. Perfect timing. And these are a million times cuter than the ones from the store. Great tutorial!

    Reply
  27. teri mac says

    July 20, 2011 at 8:55 am

    This is great! I just found a bunch of fabric that I had forgotten about so I will now put it to good use…

    Thank you so much for posting, I went to look at patterns the other day. Has anyone else been SHOCKED by the price of a pattern? It has been a long time since I actually purchased a pattern and just about fell over by the prices.

    Reply
    • Sawdust and Paper Scraps says

      July 20, 2011 at 9:41 am

      Hobby Lobby and JoAnn’s sometimes have patterns on sale for $1 and that is the only time I buy them.

      Reply
  28. Kassandra @ Coffee and their Kisses says

    July 30, 2011 at 1:41 pm

    Hello! I’m Kassandra @ Coffee and their Kisses. I featured this here at my blog. I hope you’ll stop by and grab a featured button. Thank you for sharing this with us!

    Reply
  29. Ashley | Domestic Fashionista says

    August 1, 2011 at 10:39 pm

    These are adorable! Adding to pinterest and my to-do list!

    Reply
  30. Sara says

    September 14, 2011 at 12:20 am

    The local Aldis store has tons of 5-sided boxes that fit into reusable bags almost perfectly. It makes the inside ugly, but makes the bag EXTREMELY durable since they are corrugated cardboard. I wonder if there is a way to incorporate a cardboard insert for the bottom. Not as strong as having a whole box liner, but prettier. With some kind of pocket it would still be washable. And (sigh) more complicated to make. Hmm. Waste of time if the fabric is durable enough without?

    Reply
    • Sawdust and Paper Scraps says

      September 14, 2011 at 9:07 am

      Sara putting a cardboard insert in the bag is a great idea I think. I wouldn’t try to sew it in because it would just turn to mush in the wash. You could insert it for use and then removed it to wash. Great idea!

      Reply
  31. Pamela Palmer says

    October 30, 2011 at 1:06 pm

    Love these. I need to buy me a sewing machine. I think I could make these. Thanks for sharing.

    Reply
  32. Sunshine says

    December 21, 2011 at 6:36 pm

    I love this idea! I’m making them for christmas instead of wrapping paper gifts come in bags! I was just wondering if i could fold down the top instead of creating the band(step 10) trying to get it all done with christmas 4 days away its easier to just fold n sew but i dont want to effect the strength of the bag. Thanks for the help and the GREAT tutorial!

    Reply
  33. inge says

    March 17, 2012 at 6:16 pm

    I really like these! I have also noticed that the ones I buy at the store are not as thick as they used to be. I think I might put 2 tabs on mine so they will stay open a little better. Thanks for the step by step with lots of photos!

    Reply
  34. Ginny says

    April 2, 2012 at 4:12 pm

    What a great tutorial – it combines my loves of shopping, sewing, and being green! I like it so much, I included it on my blog… http://darlingadventures.com/?p=635
    Thanks!

    Reply
  35. Shanea Champlin says

    April 2, 2012 at 7:22 pm

    Hey just wanted to say I made this but I put a blanket between the layers (as batting) and then quilted it because I use mine as Library bag and boy do my books get heavy so I needed the extra support.

    Reply
  36. Kerri says

    April 15, 2012 at 3:59 pm

    Hello, I am new and I love these bags. Very cute. I definitely want to make these as gifts for all my girls.
    I do have a question though. What was the thread count of the sheets you used? I have some old sheets, but I don’t think they would work. Mostly because they are so thin that you can see your hand through them and that does not seem strong enough to me. Thank you.

    Reply
  37. Fishtail Cottage says

    July 16, 2012 at 2:17 am

    do you sell these? love them!

    Reply
    • Sandra says

      July 18, 2012 at 11:46 pm

      I would certainly whip some up for you. I have an Etsy shop but haven’t found the time to put anything in there. (Remodeling has taken over my life. LOL) Email me and we’ll discuss. 🙂

      Reply
      • Jaima @ Ring Around the Rosies says

        September 10, 2012 at 12:35 pm

        I would love to buy a couple too!!!

        Reply
  38. Carol says

    July 25, 2012 at 10:26 am

    Great tutorial ! Thanks so much for sharing. Can’t wait to make a few.:)

    Reply
  39. lovethis says

    August 1, 2012 at 12:13 pm

    SWEEEEET! 😀

    Reply
  40. Angel says

    September 22, 2012 at 12:39 pm

    What is your etsy site? I’d buy a couple too!

    Reply
  41. Mandy says

    November 17, 2012 at 10:33 am

    You can also use sheets found super cheap at thrift stores!!!!
    A king sheet will go for about $3.50 at goodwill.

    Reply
    • Rubycantoo says

      February 2, 2013 at 9:38 am

      if you use sheets – use a couple or three layers for every piece, or it will tear apart very soon.

      Reply

Leave a Reply Cancel reply

Your email address will not be published. Required fields are marked *

Categories

New Post email notification signup

You Subscribed!

Legal Stuff

Terms of Use

Privacy Policy

Disclosure

Recent Posts

  • March 2023 Lodge Update- Moved in
  • January 2023 Lodge Update
  • Lodge Update – Floors, Cabinets, Countertops, and Appliances
  • Lodge Kitchen Cabinet Progress
  • Halloween Mad Gab – Halloween Party Ideas

Disclaimer:

Although it is my intention to provide accurate plans and clear instructions, not all plans have been tried and tested. Using plans or information found on SawdustGirl.com indicates that you agree with the Terms of Use policy and will accept full responsibility for the process and outcome of any project you attempt. All plans are for private use only. Plans and information published on SawdustGirl.com may not be reproduced, republished or distributed in any manner without written permission from Sandra Powell, Sawdust Girl. Actual projects built using Sawdust Girl plans may be published on your own site without instructions or "tutorial" as long as you provide a link to my original post with full post title or "SawdustGirl.com" as link title.

Copyright © 2023 · anchored theme by <a target="_blank"