How to Build a Wood Floor Countertop
I got lots of questions about my Office wood floor countertop after I posted said that I built it out of Oak Flooring. So, I created some sketches to try to give you a better idea of how you can make all your dreams come true…if you’re wondering how to build counters out of hardwood flooring!

How to Build a Wood Floor Countertop
*I’m purposely not giving you any surface dimensions because you have to build the countertop to fit your work space.
My work space happened to be T-shaped, you could do the same thing with a straight countertop, or L or X or + shaped for that matter!
1. Create a plywood base
- Cut a plywood base the shape of your countertop but subtract the thickness of your finish material from the desired final width. (I used 3/4″ flooring for my countertops so I made my plywood base 3/4″ narrower!) Why? Because you are going to put a “face” on your countertop to make it look thicker, which will add to the total width.
- Use two layers of plywood to create a strong base. If you have seams, stagger your second layer so you’re seams do not end up in the same place. Screw both layers together to secure the seams.
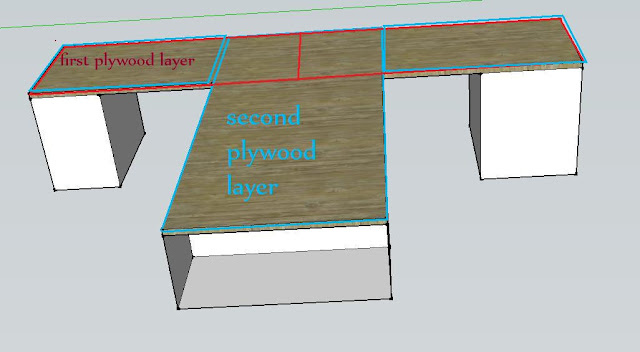
- If the ends of your countertop are going to be exposed, do the same “adjustment” for the length. (My countertop goes wall to wall so the ends don’t matter)
2. Attach Hardwood
I used unfinished 3/4″ Oak wood floor material because it was cheaper than buying regular 3/4″ Oak from the lumber store. Plus, the tongue and groove helped secure each row together without using glue and clamps which I would have done had I used regular wood.
I started on the front and worked my way back. In order for the countertop to appear to be 1 1/2″ thick, I added a 1 1/2″ front edge that was joined with a bevel.
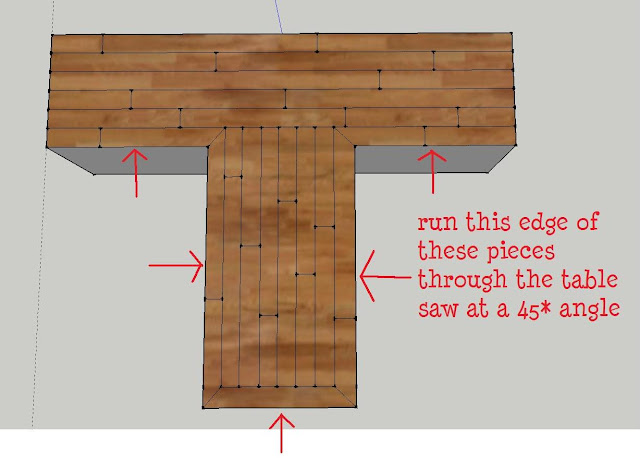
Bevel the first row of wood planks
- Rip enough of your wood floor planks at 45* angles on a table saw. You’ll need enough planks for the whole first row plus a front edge.

- The front edge pieces will need to be ripped to 1 1/2″ wide planks. (My wood was wide enough to get 2 strips out of each plank so I mitered both sides before I cut it to width)
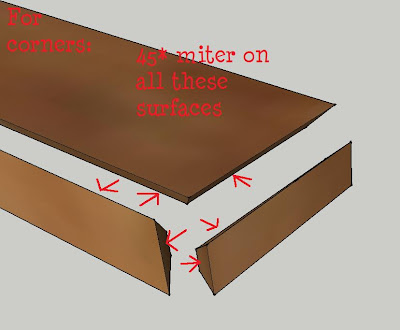
Miter front edge corner pieces
- The corner pieces had to be mitered at 45* angles for the corners as well as the top bevel. I used my miter saw for the end cuts.
Nail wood floor onto MDF countertop base
- I just nailed right through the top since it was unfinished wood. Wood putty in all the nail holes, cracks and corners. The whole thing had to have a good sanding anyway.
- (Make sure you use the proper length nail! I didn’t calculate for that and had to go back after I was finished and pound UP a few nails from the bottom. Don’t want to snag your knees…!)
- Finish! I used (ebony tinted) Tung oil (which I LOVE but make sure you use a RESPIRATOR and the proper gloves if you go that route.)




Penny, I have the same problem as you. I used a pre-finished wood flooring as well with little grooves. I decided to fill in the seams with wood filler and sand the entire surface down and resurface. One problem, I have no idea what I am doing and boy, that finish is tough stuff!