• Home
  • About
    • Personal Posts
  • Privacy
  • Shop
    • My Account
    • Checkout
    • Email
    • Facebook
    • Instagram
    • Pinterest
    • Twitter
    • YouTube
Sawdust Girl®

Sawdust Girl®

Renovation, cabinet building and woodworking plans and tutorials. Build like a Girl®

  • My Home
    • Clinton TN House
      • Clinton TN House in Progress
    • Maryville TN House
      • Maryville TN House Tour – Completed Rooms
      • Maryville TN House in Progress
        • Basement
        • Basement Storage Closet
        • Bedroom Office
        • Craft Room
        • Dining Room
        • Entry
        • Garage
        • Guest Bedroom
        • Hallway
        • Jack and Jill Bathroom
        • Kitchen
        • Kitchen Entry
        • Laundry Room
        • Library
        • Living Room
        • Loft
        • Madison’s Room
        • Master Bedroom
        • Master Closet
        • Pantry
        • Porch
        • Powder Room
        • Wes’ Office
    • Illinois House
    • Calderwood Cottage
  • My Workshop
    • Clinton Workshop
  • Build & Breakfast
  • Cabinet Making 101
    • Cabinets
    • Doors
    • Drawers
  • Projects and Plans
    • Countertops
    • Beds
    • Benches
    • Bookshelves
    • Desks
    • Gift Ideas
    • Holiday
      • Christmas
      • Halloween
    • Home Accessories
    • Kids
    • Kitchen Cabinets
    • Lockers
    • Nightstands
    • Organization accessories
    • Recipes
    • Sewing
    • Tables
    • Vanities
    • Wardrobes
    • Woodworking
      • Wood Finishing
    • Workshop
    • Workshop Storage and Organization
  • Remodeling 101
    • Baseboard and Trim
    • crown molding
    • Demolition
    • Door and Window Casings
    • Door Installation
    • Drywall
    • Electrical work
    • Flooring
    • Home Maintenance
    • Painting
    • Plumbing
    • Resources
    • Safety
    • Tile
    • Wall and Ceiling Treatments
  • The Sawdust Diaries
    • Andrea
    • Ava D.
    • Beckie F.
    • Cara C.
    • Courtney B
    • Fawn T.
    • Jenn D.
    • Kelly C.
    • Kristy K.
    • Lara T.
    • Malisa B.
    • Marnie D.
    • Robin C.
    • Val F.
  • Tools
    • Products
    • Tool Reviews & Overviews
    • Inspiration & Ideas

How to Build a Newel Post

All Posts, Door and Window Casings, Remodeling 101

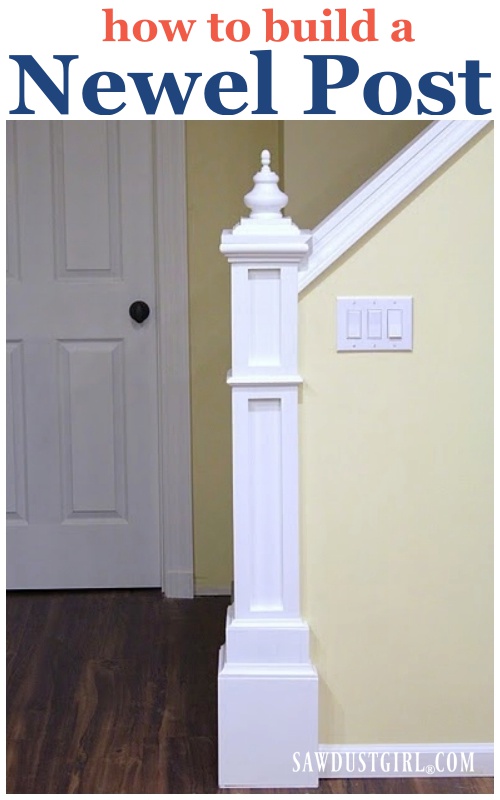
Adding some custom detail to your staircase can be an inexpensive project if you build a newel post yourself. While generally newel posts are structural elements that support the handrail, this one is purely decorative.  When a handrail sits on top of a half wall, a newel post is simply a decorative architectural element that gives an otherwise boring stair wall some character.  

This stairway leads downstairs into my basement where we have a craft room, playroom and entertainment room. Such a fun basement needed more than a boring entry, it needed a newel post!

How to Build a Newel Post

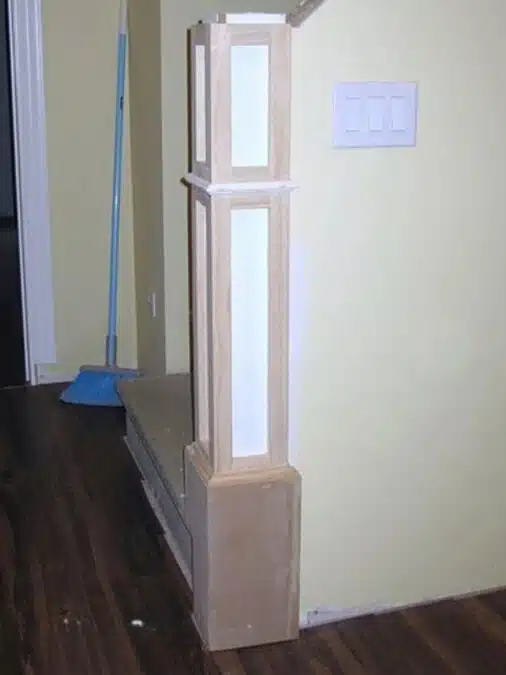
  • I nailed and screwed two 2×4’s onto the end of the wall
  • Covered that on 3 sides with MDF
  • Primed and painted that.
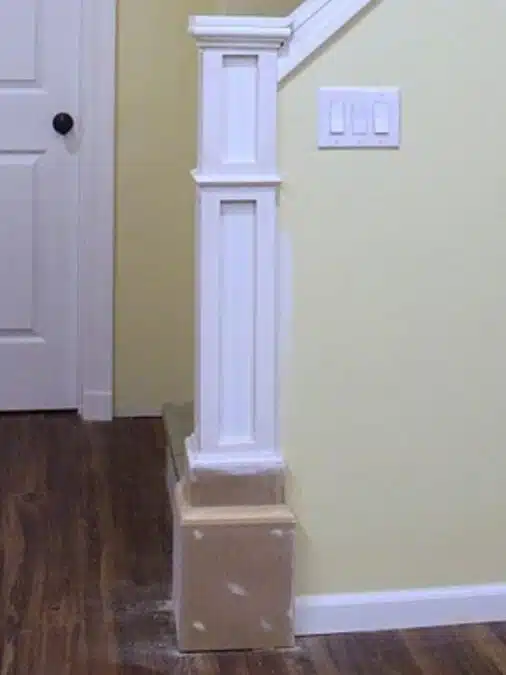
  • Added some more MDF on the bottom to “stack” the base.
  • Added some 1×2 pine (just cut and nailed in place…no fancy joinery or anything!)
  • Added some moulding
  • Primed and painted that!

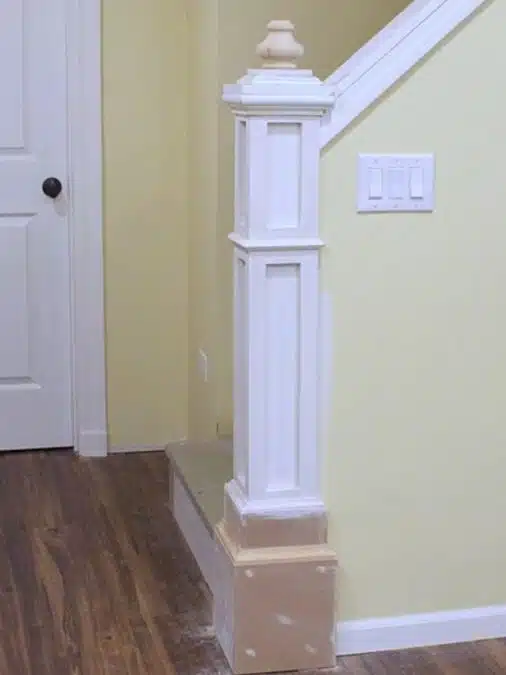
8.  Topped it off with a piece of MDF (making sure the top would extend over the edge far enough to cover the crown moulding I was going to attach.)
9.  Added a small Crown moulding.
10.  Added some more MDF, moulding and a finial on the top (because I thought it needed something more.)

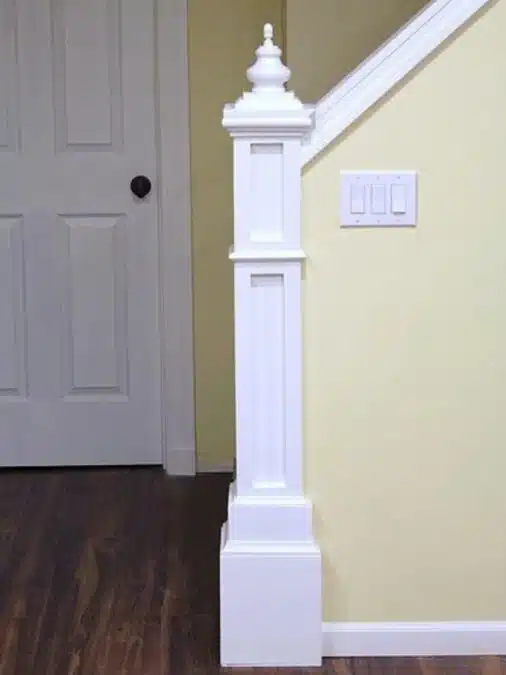
11.  Added another, even smaller finial to the first finial because it was flat on top and I thought it looked weird being flat!
12.  Primed what needed to be primed and painted everything again!

That’s how I built my Newel post!
How to build a newel post
13 more projects to do on this house, 13 more project to do.
I have to get a lot done today because tomorrow is Get Nothing Done Wednesday because I volunteer at Maddie’s schoooool,
13 more projects to do…!!!

January 11, 2011 · 27 Comments

« Chantelle’s Bathroom Cabinet {Buildhers Club Spotlight}
House For Sale…Finally! »

Comments

  1. MostlySunny says

    January 11, 2011 at 1:12 pm

    This is perfect!!! I have a very plain area just like that –that is begging for something pretty!!! Thanks!

    Reply
  2. CarliAlice says

    January 11, 2011 at 1:21 pm

    This is great! I think my walls are the same color as yours.

    Reply
  3. Bette says

    January 11, 2011 at 1:37 pm

    That looks awesome. I actually just ran downstairs to see if I could do that on my rail, but I don't have a post just a plain rail.

    Reply
  4. Katy says

    January 11, 2011 at 2:32 pm

    ha ha ha this rocks. I would totally build something out of stacks and stacks of 2X4's and MDF – anything without fancy joints! 🙂 Now is that a curtain rod finial? I was thinking one of those Bunn feet might work too. It would be flat though hmm.

    Reply
  5. Sawdust and Paperscraps says

    January 11, 2011 at 2:52 pm

    The large finial was something I bought at the home improvement store. It's for a fence post I think. The smaller finial, is one I had on hand. It came in a pack of 4. I think I got them at JoAnn's or Hobby Lobby.

    Reply
  6. Gayle says

    January 11, 2011 at 3:19 pm

    I just love this! I am adding it to my project list, I will have to modify it because I have a weird wall/corner at the bottom of my stairs but this gives me a great starting point.

    Reply
  7. jayma15 says

    January 11, 2011 at 4:51 pm

    I need a before, I HAVE to see what it looked like before. this is amazing that you could just "make" that!! You rock!

    Reply
  8. Jen @ tatertotsandjello.com says

    January 11, 2011 at 5:18 pm

    Wow – you are just so talented and amazing!!! Love it I shared it on my tatertots and jello facebook page 🙂 xoxoJen

    Reply
  9. Lauren says

    January 11, 2011 at 5:25 pm

    Wow this seriously dresses up your staircase. It is beautiful! Very classy.

    Reply
  10. - Brittany says

    January 11, 2011 at 6:34 pm

    I just love that newel post! Your house should sell in no time flat!Brittany http://www.prettyhandygirl.com

    Reply
  11. pinktoesandpowertools says

    January 11, 2011 at 6:55 pm

    Love it! I think I have the perfect spot for one of these!I agree with Brittany. If I were a buyer and went through your house, I'd lock the door and guard it until the closing papers were signed.

    Reply
  12. Courtney Price ~ Vintage Ginger Peaches says

    January 11, 2011 at 7:07 pm

    All your hard work is TOTALLY going to pay off!

    Reply
  13. rebecca @ older and wisor says

    January 11, 2011 at 9:00 pm

    So perfect!! It looks like raised paneling that could've always been there…the perfect finishing touch to seduce a buyer…(although I could've thought of a few {mostly inappropriate} things to put on that spot – HA!)

    Reply
  14. Lorajean says

    January 12, 2011 at 1:50 am

    good for you! I love getting home improvements finished!

    Reply
  15. Remodelaholic says

    January 12, 2011 at 3:15 am

    LOOKS AM-A-ZA-ZING! I love it! We are just going to build a newel post for our stairs one of these days, I can't wait to see how ours turns out! IF it looks half the good I will be perfectly happy!

    Reply
  16. Chantelle - ThousandSquareFeet says

    January 12, 2011 at 4:59 am

    This.Is.Amazing! Totally love it! I will print this out and save it for the next house!

    Reply
  17. Julie @ followyourheartwoodworking says

    January 12, 2011 at 6:32 pm

    Your work is just fabulous… and I can tell that you can see it in your mind before you make it. So many people don't possess that skill. PLUS, you do all this so quickly you are putting the rest of us to shame!You go girl!!

    Reply
  18. [email protected] says

    January 13, 2011 at 9:01 pm

    Love your post, gorgeous trim work and the finial was the perfect finishing touch.

    Reply
  19. Lucy Designs says

    January 15, 2011 at 12:39 am

    this is friggin' awesome! I love it!

    Reply
  20. Kristi says

    January 17, 2011 at 5:28 pm

    Can I ask the paint color? I really like that shade of yellow! Nice job with the post, it looks awesome!

    Reply
  21. Tam-A-Roo says

    January 17, 2011 at 11:08 pm

    Love this! Could you share your budget…I need to convince the hubby 😉

    Reply
  22. Diane at Perfectly Imperfect Life says

    February 10, 2011 at 4:01 am

    Sandra, you are seriously a genius! and I suppose you did it all in about an hour too?

    Reply
  23. tatiana says

    December 5, 2011 at 11:57 pm

    Are the corners of the mdf and the 1x2s mitered? I really want to do this project, but I would love to see pics of the front and back… Pretty please?

    Reply
    • Nyanna says

      June 25, 2012 at 12:04 am

      That’s the thkinnig of a creative mind

      Reply
  24. Sandra says

    December 6, 2011 at 7:30 am

    No, I didn’t miter anything. If you can enlarge the second picture enough, you can see the right side of the bottom piece of MDF is the end of the piece of MDF on the other side. I just butted everything up and sanded well, smeared some wood filler in the “end grain” of the MDF, sanded again, then primed. You might need to sand the MDF again after priming if you use water based primer that raises the wood fibers and makes it rough. Then you can paint and it should look pretty good. I was trying to hurry at this point to finish and get my house sold. If you aren’t frantic like I was, miters would be nice. 😀

    Reply
  25. Pine Tree Home says

    March 22, 2012 at 2:19 pm

    I’m back to check this post out again. I just had light bulb moment that I may be able to do this. My stairs are boxed in all the way to the end and are half walls like your photo, but on both sides. I thought of taking the walls back and adding railing and spindles, but then I lose wall space. BUT the newel post at the end makes it look so classy. I have to really figure our the 2×4 placement so I can box it all in nice like yours.

    Reply

Leave a Reply Cancel reply

Your email address will not be published. Required fields are marked *

Categories

New Post email notification signup

You Subscribed!

Legal Stuff

Terms of Use

Privacy Policy

Disclosure

Recent Posts

  • Building and Installing a Giant Faux Beam on the Ceiling
  • White Wash Pine Wood Ceiling
  • Lodge and Life Update
  • How to Choose Which Track Saw to Buy in 2021
  • How to Choose a Paint Sprayer to Buy in 2021

Disclaimer:

Although it is my intention to provide accurate plans and clear instructions, not all plans have been tried and tested. Using plans or information found on SawdustGirl.com indicates that you agree with the Terms of Use policy and will accept full responsibility for the process and outcome of any project you attempt. All plans are for private use only. Plans and information published on SawdustGirl.com may not be reproduced, republished or distributed in any manner without written permission from Sandra Powell, Sawdust Girl. Actual projects built using Sawdust Girl plans may be published on your own site without instructions or "tutorial" as long as you provide a link to my original post with full post title or "SawdustGirl.com" as link title.

Copyright © 2022 · anchored theme by <a target="_blank"