• Home
  • About
    • Personal Posts
  • Privacy
  • Shop
    • My Account
    • Checkout
    • Email
    • Facebook
    • Instagram
    • Pinterest
    • Twitter
    • YouTube
Sawdust Girl®

Sawdust Girl®

Renovation, cabinet building and woodworking plans and tutorials. Build like a Girl®

  • My Home
    • Clinton TN House
      • Clinton TN House in Progress
    • Maryville TN House
      • Maryville TN House Tour – Completed Rooms
      • Maryville TN House in Progress
        • Basement
        • Basement Storage Closet
        • Bedroom Office
        • Craft Room
        • Dining Room
        • Entry
        • Garage
        • Guest Bedroom
        • Hallway
        • Jack and Jill Bathroom
        • Kitchen
        • Kitchen Entry
        • Laundry Room
        • Library
        • Living Room
        • Loft
        • Madison’s Room
        • Master Bedroom
        • Master Closet
        • Pantry
        • Porch
        • Powder Room
        • Wes’ Office
    • Illinois House
    • Calderwood Cottage
  • My Workshop
    • Clinton Workshop
  • Build & Breakfast
  • Cabinet Making 101
    • Cabinets
    • Doors
    • Drawers
  • Projects and Plans
    • Countertops
    • Beds
    • Benches
    • Bookshelves
    • Desks
    • Gift Ideas
    • Holiday
      • Christmas
      • Halloween
    • Home Accessories
    • Kids
    • Kitchen Cabinets
    • Lockers
    • Nightstands
    • Organization accessories
    • Recipes
    • Sewing
    • Tables
    • Vanities
    • Wardrobes
    • Woodworking
      • Wood Finishing
    • Workshop
    • Workshop Storage and Organization
  • Remodeling 101
    • Baseboard and Trim
    • crown molding
    • Demolition
    • Door and Window Casings
    • Door Installation
    • Drywall
    • Electrical work
    • Flooring
    • Home Maintenance
    • Painting
    • Plumbing
    • Resources
    • Safety
    • Tile
    • Wall and Ceiling Treatments
  • The Sawdust Diaries
    • Andrea
    • Ava D.
    • Beckie F.
    • Cara C.
    • Courtney B
    • Fawn T.
    • Jenn D.
    • Kelly C.
    • Kristy K.
    • Lara T.
    • Malisa B.
    • Marnie D.
    • Robin C.
    • Val F.
  • Tools
    • Products
    • Tool Reviews & Overviews
    • Inspiration & Ideas

DIY Wall Decor Art Idea- Upcycled Headboard

All Posts, Madison's Room, Projects and Plans

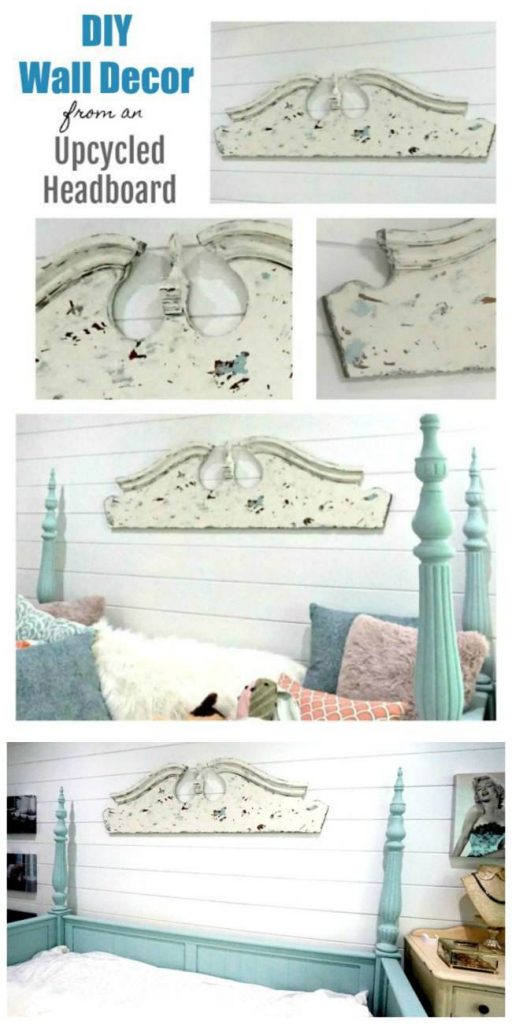
DIY wall decor art idea from an upcycled headboard. This is a fun, inexpensive, easy DIY that adds architectural interest to any room.

Maddison’s bed turned out fabulous; and the added posters defined a large wall space that was a perfect opportunity for some overscale DIY wall decor. We wanted to create something sculptural that would tie in to the color and style of the bed.  We really liked the idea of a pair of angel wings and were brainstorming ways to create them when we found this headboard at Restore. Not exactly angel wings, but the shape is referential and it has great architectural bones; and for $20, it was the perfect starting point for our DIY wall art.
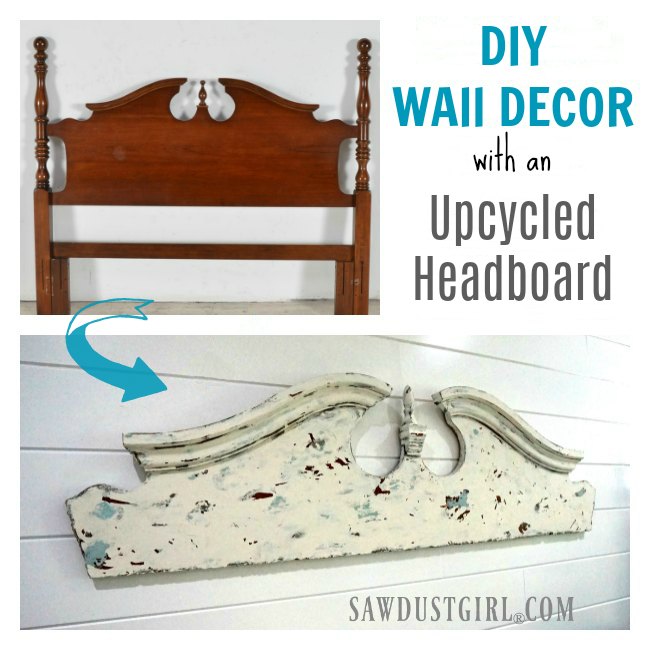
DIY wall decor art idea from an upcycled headboard. This is fun, inexpensive, easy DIY that adds architectural interest to any room.

DIY Wall Decor Art Idea

DIY Wall Decor Supply List:

  • Old Headboard
  • Fusion Mineral Paint (Chnmpness blue, Buttermilk Cream, and the Bronze metallic)
  • Dark Stain
  • Wax (paint resist and finish)
  • Keyhole hangers
  • Sawzall or jigsaw
  • Sand paper

Let me start by reassuring you that we did not destroy an antique mahogany Chippendale headboard. This was a sad 1970’s reproduction made of  photo laminated MDF, and we kept the turned posts for another project.

Step 1: Cut

Cut off the posts and legs.  Cut the bottom to achieve desired height.  Because we wanted the piece to reference angel wings, we rounded the ends to reflect the curve of a shoulder. In order to compensate for the poor material (MDF), we created a handcrafted edge detail on all of the cut edges. This was achieved by wiggling the saw blade along the edges. The edge detail added a pretty bespoke touch, especially when painted with the metallic paint.
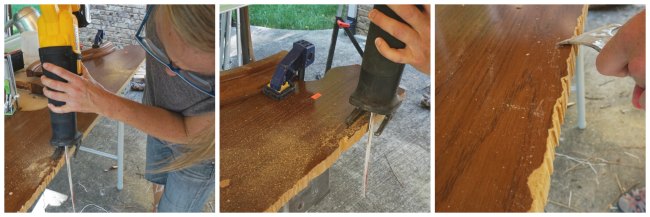
How to cut DIY wall decor

DIY Wall Decor: Cut to size and shape

Step 2: Paint

Lightly sand and clean with mineral spirits and it’s ready for the fun part- painting.  All of the paints and wax we used were from Fusion Mineral, which is my new fav specialty paint! It goes on really smooth, and the coverage and hide are great, it dries very flat – no brush stokes, and it sands beautifully. The wax goes on smooth and even and buffs to a perfect luster.

I started by painting patches of the same Champness blue chalk paint that we used on the bed. Then I rubbed a dark stain along the edges and over any exposed MDF and let that dry completely. Next I rubbed wax as a paint resist over areas that I wanted to show through the next layer of paint and then painted over the entire piece with the Buttermilk Cream chalk paint. I wanted this layer to be thick and gloppy with lots of brush strokes and drips. I even threw a little dirt on some areas for good measure. The idea is create the look of years and years of paint and repaint, use and abuse so it looks 100+ years old.
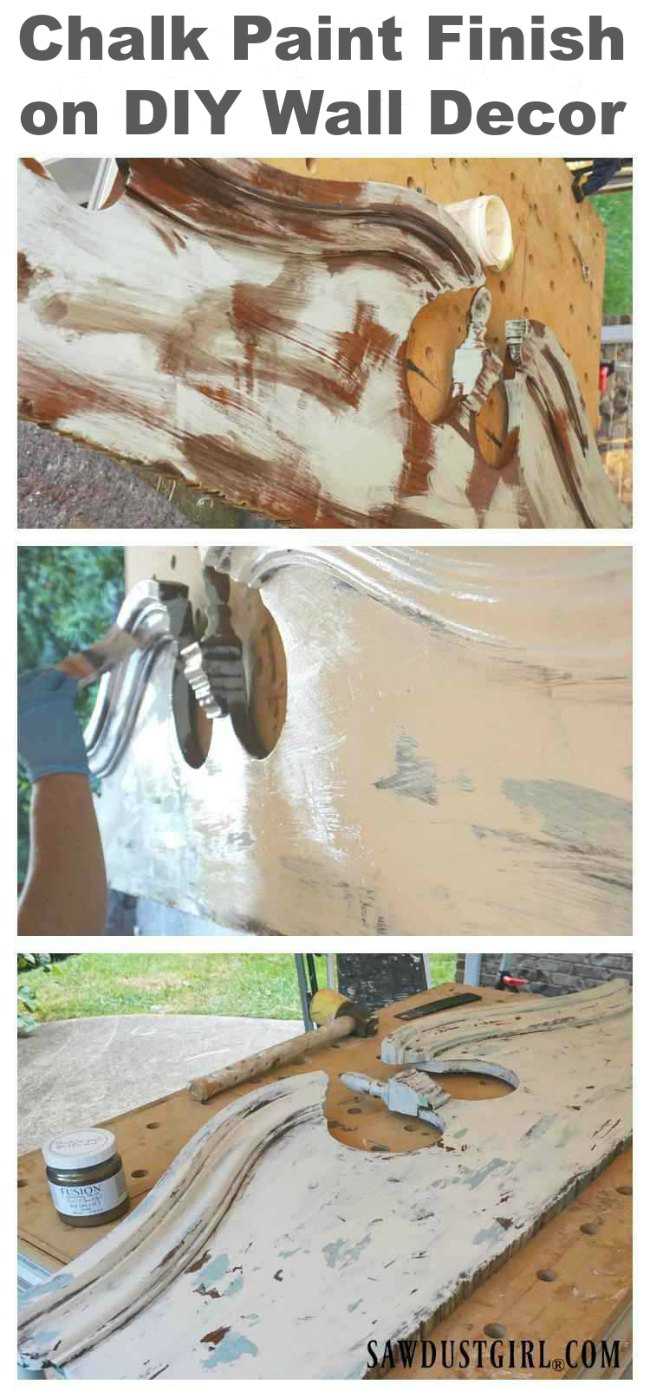
DIY Wall Decor Art Idea Chalk Paint Finish

Once this layer of paint was dry I scraped and sanded and then went back and repeated the process until I achieve the balance I was looking for. Then I used the Fusion Mineral Metallic glaze to highlight the edge detail and some of the molding edges. The metallic glaze added a lovely sparkle and glamour to the piece, it doesn’t show well in the photos, but in person the sparkle is really glam.

Step 3: Finish

Once I was happy with the overall look of the paint, I wiped the finishing wax over the entire piece and buffed to a soft sheen. This wax seals and protects the piece and gives it a lovely hand rubbed luster. Lastly I added keyhole hangers to the back–this art piece weighs about 10-15 pounds and I don’t want it coming down on Madison’s head while she is sleeping!
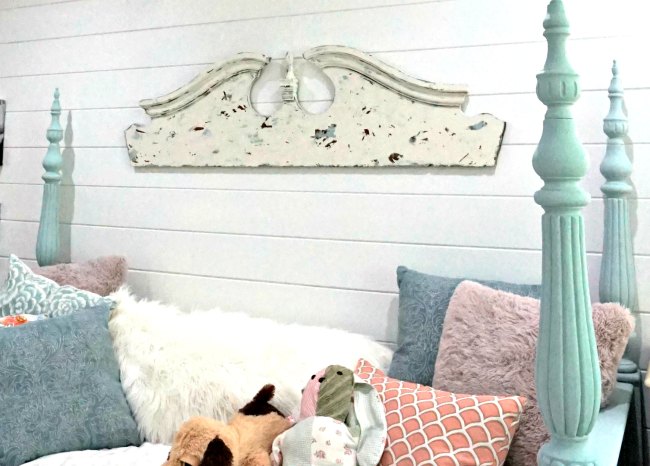
This wall decor art idea turned out so beautiful! It is fills the space perfectly and gives Madison her very own Angel wings to dream under.

August 14, 2017 · Leave a Comment

« Upcycle a Daybed for an Oh-So-Pretty Bedroom
Kristy’s Bedroom Built-ins – Part 5 »

Leave a Reply Cancel reply

Your email address will not be published. Required fields are marked *

Categories

New Post email notification signup

You Subscribed!

Legal Stuff

Terms of Use

Privacy Policy

Disclosure

Recent Posts

  • White Wash Pine Wood Ceiling
  • Lodge and Life Update
  • How to Choose Which Track Saw to Buy in 2021
  • How to Choose a Paint Sprayer to Buy in 2021
  • How to Install a Smart Door Lock

Disclaimer:

Although it is my intention to provide accurate plans and clear instructions, not all plans have been tried and tested. Using plans or information found on SawdustGirl.com indicates that you agree with the Terms of Use policy and will accept full responsibility for the process and outcome of any project you attempt. All plans are for private use only. Plans and information published on SawdustGirl.com may not be reproduced, republished or distributed in any manner without written permission from Sandra Powell, Sawdust Girl. Actual projects built using Sawdust Girl plans may be published on your own site without instructions or "tutorial" as long as you provide a link to my original post with full post title or "SawdustGirl.com" as link title.

Copyright © 2022 · anchored theme by <a target="_blank"