• Home
  • About
    • Personal Posts
  • Privacy
  • Shop
    • My Account
    • Checkout
    • Email
    • Facebook
    • Instagram
    • Pinterest
    • Twitter
    • YouTube
Sawdust Girl®

Sawdust Girl®

Renovation, cabinet building and woodworking plans and tutorials. Build like a Girl®

  • My Home
    • Clinton TN House
      • Clinton TN House in Progress
    • Maryville TN House
      • Maryville TN House Tour – Completed Rooms
      • Maryville TN House in Progress
        • Basement
        • Basement Storage Closet
        • Bedroom Office
        • Craft Room
        • Dining Room
        • Entry
        • Garage
        • Guest Bedroom
        • Hallway
        • Jack and Jill Bathroom
        • Kitchen
        • Kitchen Entry
        • Laundry Room
        • Library
        • Living Room
        • Loft
        • Madison’s Room
        • Master Bedroom
        • Master Closet
        • Pantry
        • Porch
        • Powder Room
        • Wes’ Office
    • Illinois House
    • Calderwood Cottage
  • My Workshop
    • Clinton Workshop
  • Build & Breakfast
  • Cabinet Making 101
    • Cabinets
    • Doors
    • Drawers
  • Projects and Plans
    • Countertops
    • Beds
    • Benches
    • Bookshelves
    • Desks
    • Gift Ideas
    • Holiday
      • Christmas
      • Halloween
    • Home Accessories
    • Kids
    • Kitchen Cabinets
    • Lockers
    • Nightstands
    • Organization accessories
    • Recipes
    • Sewing
    • Tables
    • Vanities
    • Wardrobes
    • Woodworking
      • Wood Finishing
    • Workshop
    • Workshop Storage and Organization
  • Remodeling 101
    • Baseboard and Trim
    • crown molding
    • Demolition
    • Door and Window Casings
    • Door Installation
    • Drywall
    • Electrical work
    • Flooring
    • Home Maintenance
    • Painting
    • Plumbing
    • Resources
    • Safety
    • Tile
    • Wall and Ceiling Treatments
  • Sawdust Squad
  • The Sawdust Diaries
    • Andrea
    • Ava D.
    • Beckie F.
    • Cara C.
    • Courtney B
    • Fawn T.
    • Jenn D.
    • Kelly C.
    • Kristy K.
    • Lara T.
    • Malisa B.
    • Marnie D.
    • Robin C.
    • Val F.
  • Tools
    • Products
    • Tool Reviews & Overviews
    • Inspiration & Ideas

White Painted Countertops and Cabinets

Countertops, Craft Room, Loft, Projects and Plans

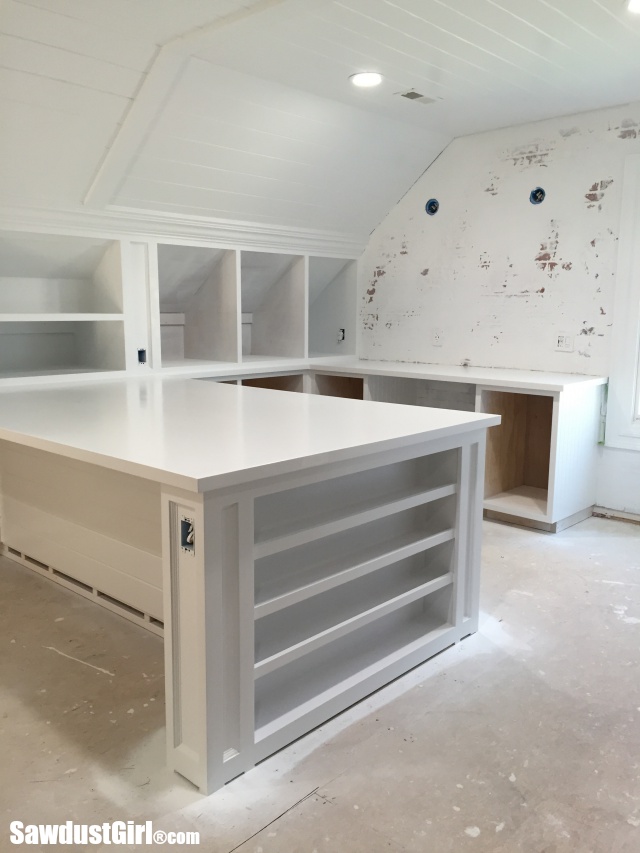
Hey guys!  I wanted to share a craft room update because I’ve finished my white painted countertops and cabinets!  I built these countertops  many weeks ago because I needed them in place so I could build my angled cabinets.
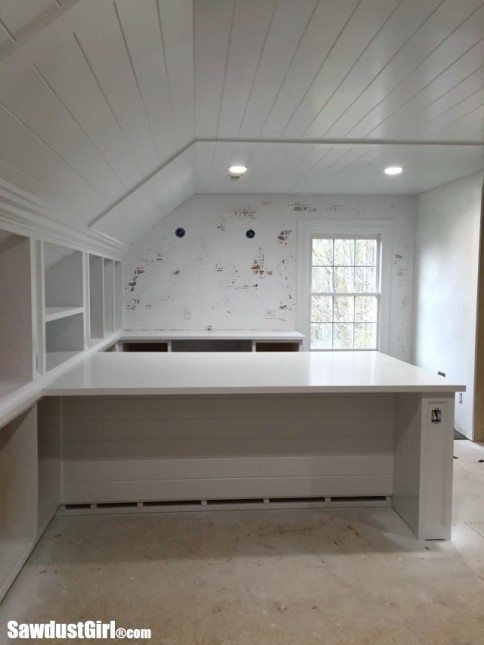
White Painted Countertops and Cabinets

The countertops are a layer of MDF glued to a layer of plywood.  The island is very large so I had to use two pieces of each material so I made sure to stagger the seams and strategically place them off center, over the cabinets.Building Countertops in place
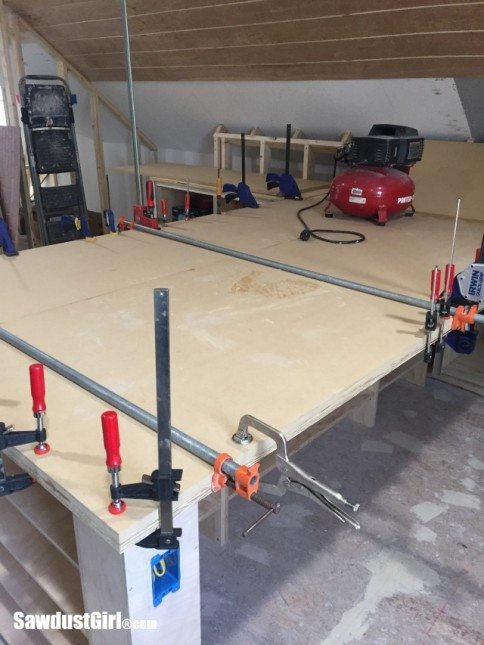
White Painted Countertops and Cabinets

Now that the cabinets are all finished it’s time to complete the countertops because the cabinets and countertops will both be painted white at the same time.  I secure 1×2 poplar to the face of my countertop sandwich with glue and nails.  I shot nails into both the MDF and plywood layers, alternately.Attaching face to countertops
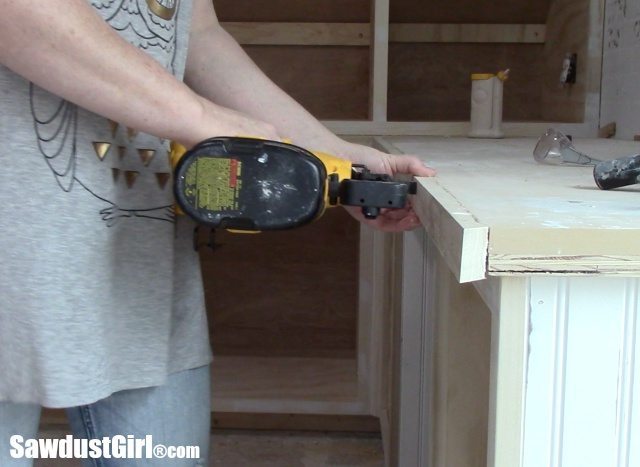
When I say I used glue — I’m talking enough glue to cover the entire face of the countertop and the back of the poplar with plenty extra that squeezed out.  I wanted that poplar stuck for life!  After the glue had dried, I used a scraper to scrape off all the glue squeeze out as well as a few dried puddles of paint.  I hadn’t tried to protect this countertop at all during the projects that took place after the countertop installation.  I learned my lesson from my Pantry Countertop not to even bother with finishing the countertop until after everything else was done.
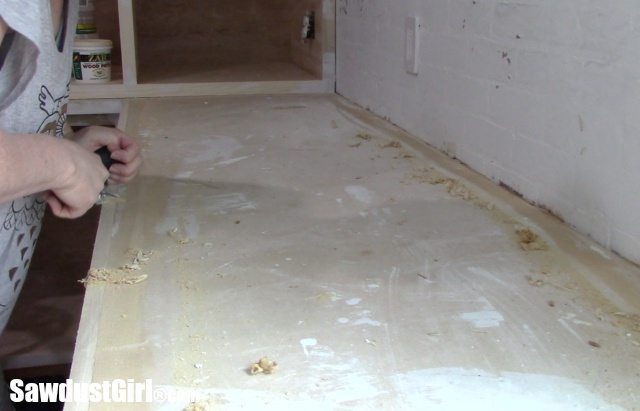
Scraping glue from countertops.

I scraped off all the glue and then sanded the entire surface down to a super smooth finish.Sanding Countertops before painting
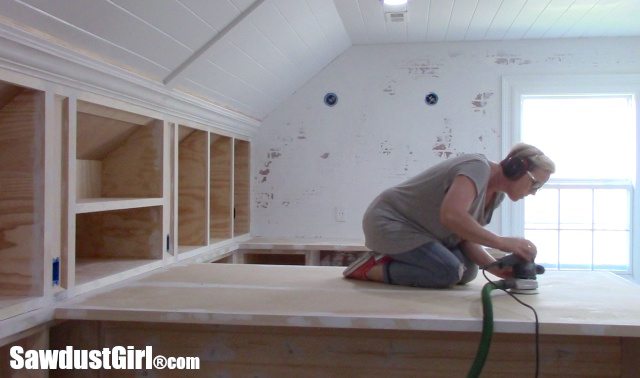
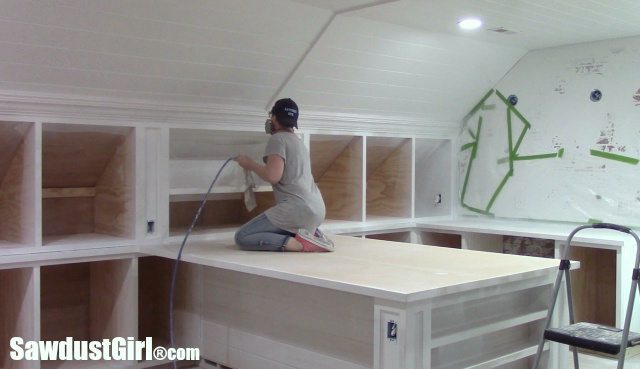
Then I primed.  I use a water borne primer (Sherwin Williams ProBlock).  I don’t like using oil based products with my sprayer because it opens up the door to a whole slew of additional concerns like — combustion.  Also, I don’t like cleaning up with chemicals.
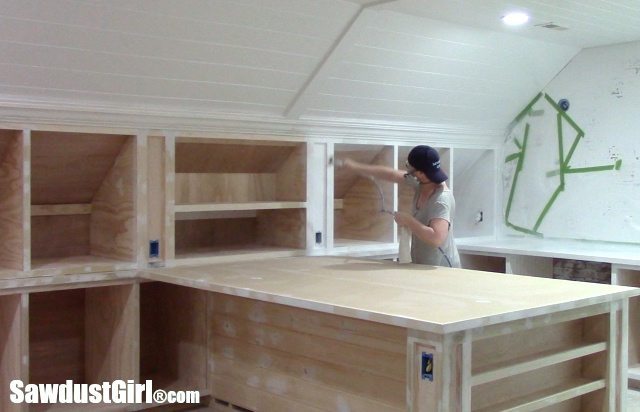
White Painted Craft Room Cabinets and Countertops

Painting Countertops and Cabinets

Painting Countertops and Cabinets

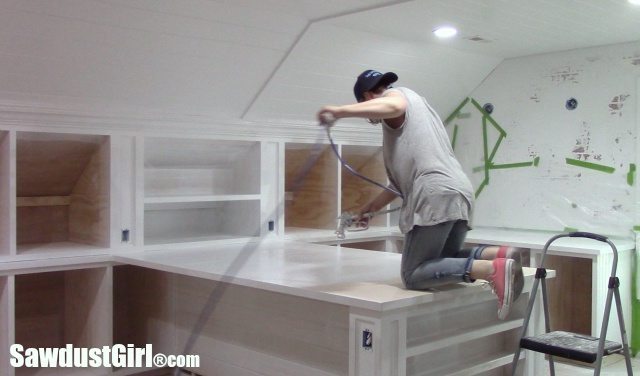
I primed the cabinets and countertop together. Do you like my spider web of green tape on my brick wall?  I was using scraps of plastic left over from painting my plank ceiling.
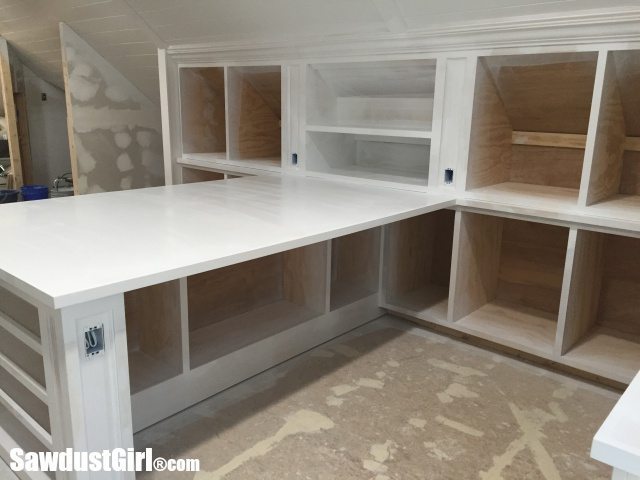
Primed Countertops and Cabinets

After the primer dried I went in and lightly sanded everything.  Water borne primer raises the wood grain (AND wood fibers in MDF) so it’s important to sand after priming.  I sanded the column moulding and inside the two open shelf cabinets by hand.  The cabinets that didn’t get primed will house drawers so I didn’t bother priming them — though I did hit them with primer on my second coat just because all that visible brown will bug me too much until I get drawers installed.
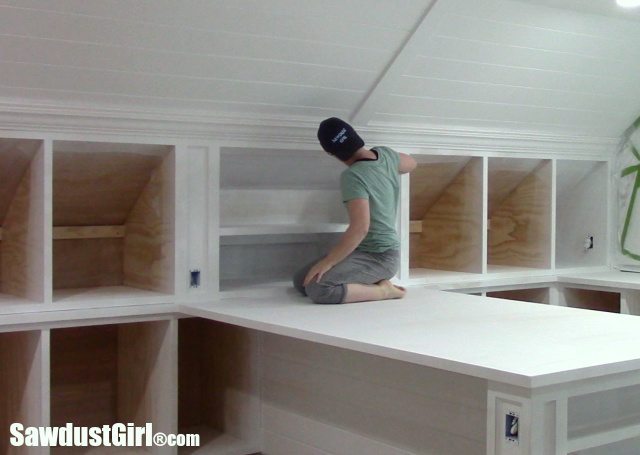
Sanding Countertops and Cabinets after priming.

I sanded the flat faceframes and the countertop surface with an electric sander.  After sanding, I vacuumed and wiped everything down with a damp cloth.  I vacuumed the cabinets, countertops and the floors.  I don’t want any dust in this room that can settle into my paint as it dries.  I also have a fan in the window that pulls the air from the room and exhausts it out the window.  That helps tremendously preventing the room from becoming a big cloud of overspray.Sanding Countertops and Cabinets after priming.
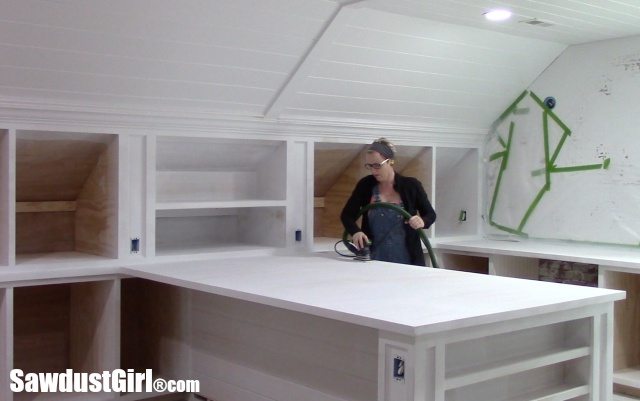
I did a second coat of primer in just a few areas where I felt the first coat was too thin.  Then I put down my first coat of paint.  I’m using an acrylic latex enamel, semi gloss paint.  (Sherwin Williams ProClassic in Decorator White.)
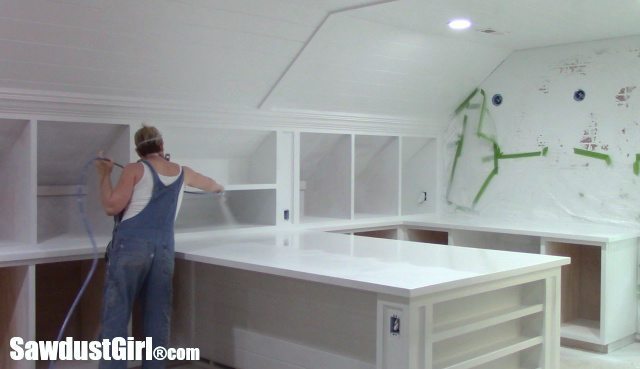
Painting Countertops and Cabinets

I sprayed a second coat the next morning.  I found a couple areas where I had been overzealous with my paint spraying and had some paint drips I had to shave off.  I also found one spot on my island countertop that felt rough to the touch so I sanded that again and then went ahead and added a third coat to the islands.
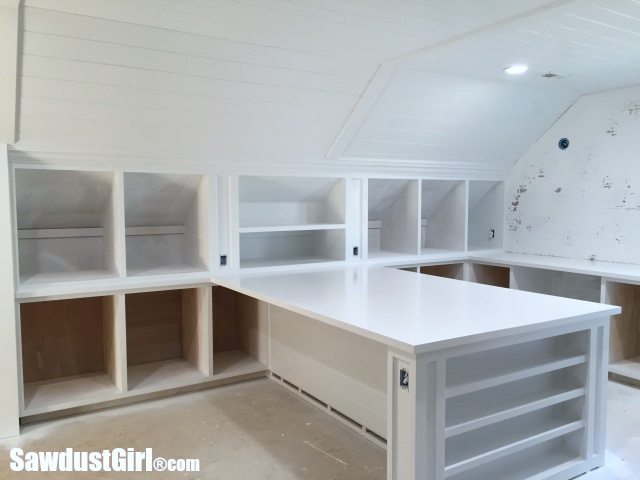
White Painted Countertops and Cabinets

I put the paint on pretty thick on the islands because they are flat, horizontal surfaces and the paint will level out as it dries.  This paint is my go-to paint for cabientry.  It levels out really well and dries hard so it is very durable.  I will add a topcoat to just the white painted countertops for extra durability since they are going to get some serious crafting use.  I am letting my paint cure for two weeks before I do my top coat though so I’m moving on with other tasks and will just have to tape off and cover surfaces when I come back to spray on my topcoat.

I know I’ve said this a few times not but I’m GETTING EXCITED about this space!
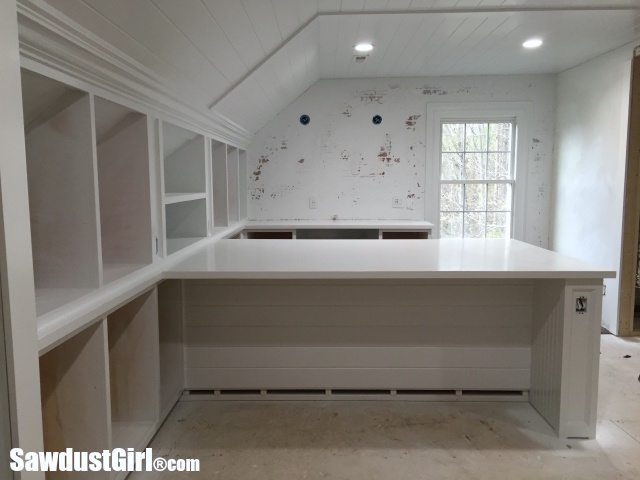
White Painted Countertops and Cabinets

White Painted Countertops and Cabinets

April 1, 2016 · 27 Comments

« Crown Moulding on Angled Ceiling
Hiding HVAC equipment »

Comments

  1. Feral Turtle says

    April 1, 2016 at 10:10 am

    I am excited for you Sandra! It looks amazing. Can hardly wait to see all the great projects you create in your new domain! Happy weekend!

    Reply
    • Sandra says

      April 4, 2016 at 10:03 am

      It will be exciting to actually use the room! Thanks.

      Reply
  2. Tom says

    April 1, 2016 at 10:16 am

    Are you going to be doing drawers for the upper cabinets? Can you tell us more about that? Very cool project!

    Reply
    • Sandra says

      April 4, 2016 at 10:03 am

      That is my plan and I’m sure I’ll tell you all about it after I do it. 🙂

      Reply
  3. Deb says

    April 1, 2016 at 10:21 am

    Looks awesome !

    Reply
  4. Sharon c says

    April 1, 2016 at 11:34 am

    Wow, this is looking so gorgeous. You are one serious designer, creator and builder! I’m in awe of your talent and skills. Amazing!!!!!

    Reply
  5. Dave Carpenter says

    April 1, 2016 at 11:47 am

    Why go to all that trouble finishing your wonderful project and make that wall look like that!!!!!
    It looks as if you have forgotten to paint it!!!

    Reply
    • Sandra says

      April 4, 2016 at 10:04 am

      We all have our likes and dislikes. I like that wall and wanted it to look just like that. 🙂

      Reply
      • gail says

        April 4, 2016 at 3:04 pm

        agree – it’s gorgeous!

        Reply
      • Dave Carpenter says

        April 6, 2016 at 5:15 am

        SORRY !!!!!!!!!

        Reply
  6. Sandra Clair says

    April 1, 2016 at 11:55 am

    What product are you going to use as the topcoat for the countertop? I love how they look and want to try my hand at it too!

    Reply
    • Geoff Roberts says

      April 11, 2016 at 7:24 am

      Sherwin Williams Top Coat in Decorator white

      Reply
  7. Suzanne says

    April 1, 2016 at 12:44 pm

    I LOVE your room. I could only hope to be so crafty. I still have about a year you go before my little garage space will be available for use. Keep up the GREAT work!

    Reply
  8. pj says

    April 1, 2016 at 1:25 pm

    Gorgeous and amazing ( both you and your build) So wishing it was mine. I do live vicariously through your projects. Thanks for sharing, I learn a lot from you.

    Reply
    • Sandra says

      April 4, 2016 at 10:02 am

      Thanks PJ.

      Reply
  9. Roxanne says

    April 1, 2016 at 5:33 pm

    What paint sprayer did you use?

    Reply
  10. Mike says

    April 1, 2016 at 6:40 pm

    Have you used painted countertops before? I’m wondering how well they will withstand scratching and chipping.

    Reply
  11. MATT says

    April 2, 2016 at 12:12 pm

    I’m sorry, but your countertops won’t last a week.
    There’s a reason why they use hard and resistant surfaces such granite, quartz, or laminate.
    That paint WILL NOT last. unless you somehow have a super-hard layer of clear epoxy on the top.

    Reply
    • Sandra says

      April 4, 2016 at 10:02 am

      I spent a lot of time thinking about all the options I had and did not want stone or concrete because I’ll be setting grommets and pounding on the countertop with a mallet. I knew I would do wood, either painted or with an overlay. We’ll see how it holds up.

      Reply
  12. Jake's a Girl says

    April 4, 2016 at 3:14 pm

    Absolutely gorgeous of course! I love it!

    Reply
  13. Kris says

    April 5, 2016 at 2:38 pm

    Wow. Totally impressed

    Reply
  14. Mindi says

    April 7, 2016 at 5:19 pm

    Sandra you are kicking some serious trash on this room, it is looking Amazing!! Awesome job!

    Reply
  15. Kat says

    May 23, 2019 at 4:45 pm

    I paint an array of items you never want to use a polyurethane on any white service on poly acrylic polyurethane wll turn your white yellow..since your countertop is flat have you ever thought about using an clear epoxy by building a form of melamine cover wood and you can line any wood will foil tape and just slowly mix small amounts of epoxy smooth out with a large flat putry knife or squeegee then build the height you want and then let set it will be more durable than just the MDF alone. Well hope you at least try it on a sample piece first takes days to set up. Good luck!!!! Kat at K&W Designs. LLC

    Reply
  16. Carol says

    December 2, 2020 at 8:11 am

    You do absolutely beautiful work. Since it’s been a while, do you have an update on how well the countertop on your island held up? I would think that with the care you took in building and finishing it that it would still be in great shape. So glad I found your posts.

    Reply
    • Sandra says

      December 5, 2020 at 5:39 pm

      It still looked great when we sold the house in Jan 2020.

      Reply
  17. Laurie Burton says

    January 17, 2022 at 12:50 pm

    Hiya. How beautiful. Was the island surface completely white, like a solid surface white countertop would look, or did you see some hint of wood grain? Thanks so much for answering (even though you moved!)

    Reply
    • Sandra says

      February 6, 2022 at 9:37 am

      It was completely white with no texture. It was soft and smooth. It held up quite well — though it really didn’t get used much.

      Reply

Leave a Reply Cancel reply

Your email address will not be published. Required fields are marked *

New Post email notification signup

You Subscribed!

Categories

Legal Stuff

Terms of Use

Privacy Policy

Disclosure

Recent Posts

  • Remove Baseboard with the Trim Puller
  • March 2023 Lodge Update- Moved in
  • January 2023 Lodge Update
  • Lodge Update – Floors, Cabinets, Countertops, and Appliances
  • Lodge Kitchen Cabinet Progress

Disclaimer:

Although it is my intention to provide accurate plans and clear instructions, not all plans have been tried and tested. Using plans or information found on SawdustGirl.com indicates that you agree with the Terms of Use policy and will accept full responsibility for the process and outcome of any project you attempt. All plans are for private use only. Plans and information published on SawdustGirl.com may not be reproduced, republished or distributed in any manner without written permission from Sandra Powell, Sawdust Girl. Actual projects built using Sawdust Girl plans may be published on your own site without instructions or "tutorial" as long as you provide a link to my original post with full post title or "SawdustGirl.com" as link title.

Copyright © 2023 · anchored theme by <a target="_blank"