• Home
  • About
    • Personal Posts
  • Privacy
  • Shop
    • My Account
    • Checkout
    • Email
    • Facebook
    • Instagram
    • Pinterest
    • Twitter
    • YouTube
Sawdust Girl®

Sawdust Girl®

Renovation, cabinet building and woodworking plans and tutorials. Build like a Girl®

  • My Home
    • Clinton TN House
      • Clinton TN House in Progress
    • Maryville TN House
      • Maryville TN House Tour – Completed Rooms
      • Maryville TN House in Progress
        • Basement
        • Basement Storage Closet
        • Bedroom Office
        • Craft Room
        • Dining Room
        • Entry
        • Garage
        • Guest Bedroom
        • Hallway
        • Jack and Jill Bathroom
        • Kitchen
        • Kitchen Entry
        • Laundry Room
        • Library
        • Living Room
        • Loft
        • Madison’s Room
        • Master Bedroom
        • Master Closet
        • Pantry
        • Porch
        • Powder Room
        • Wes’ Office
    • Illinois House
    • Calderwood Cottage
  • My Workshop
    • Clinton Workshop
  • Build & Breakfast
  • Cabinet Making 101
    • Cabinets
    • Doors
    • Drawers
  • Projects and Plans
    • Countertops
    • Beds
    • Benches
    • Bookshelves
    • Desks
    • Gift Ideas
    • Holiday
      • Christmas
      • Halloween
    • Home Accessories
    • Kids
    • Kitchen Cabinets
    • Lockers
    • Nightstands
    • Organization accessories
    • Recipes
    • Sewing
    • Tables
    • Vanities
    • Wardrobes
    • Woodworking
      • Wood Finishing
    • Workshop
    • Workshop Storage and Organization
  • Remodeling 101
    • Baseboard and Trim
    • crown molding
    • Demolition
    • Door and Window Casings
    • Door Installation
    • Drywall
    • Electrical work
    • Flooring
    • Home Maintenance
    • Painting
    • Plumbing
    • Resources
    • Safety
    • Tile
    • Wall and Ceiling Treatments
  • Sawdust Squad
  • The Sawdust Diaries
    • Andrea
    • Ava D.
    • Beckie F.
    • Cara C.
    • Courtney B
    • Fawn T.
    • Jenn D.
    • Kelly C.
    • Kristy K.
    • Lara T.
    • Malisa B.
    • Marnie D.
    • Robin C.
    • Val F.
  • Tools
    • Products
    • Tool Reviews & Overviews
    • Inspiration & Ideas

How to create a Pegboard organization wall

All Posts, Workshop (My), Workshop Storage and Organization

Another part of my workshop “once and for all” cleanup and organization effort was installing a pegboard organization wall for tool storage.  A pegboard organization wall is an easy and inexpensive way to organize and store your workshop tools.  There’s a lot of wall in the workshop and you know don’t like to waste space.

This post is sponsored by Scotch ® Brand.

How to create a pegboard organization wall

How to create a Pegboard organization wall

To install pegboard, you have to create space between the pegboard and the wall for the hooks and accessories.  I cut 3/8″ thick strips of wood off a 2×4.  If you don’t have a table saw and thin strip cutting guide, you can purchase 1×2’s.   They’re like $1 for an 8′ length.

For organizational accessories to use ON the pegboard, I used assorted pegboard hooks and accessories available at home improvement stores and online and these Scotch Mounting and Fastening products:

  • Scotch Handle Straps
  • Scotch Extreme mounting tape
  • Scotch Bundling Straps.

How to create a Pegboard organization wall

Installing a pegboard wall


-Start by removing receptacle covers and marking studs on the wall.  Mark stud location on baseboard with painters tape so you know where to put your screws once the pegboard is on the wall, covering your pencil marks.

-Nail wood strips to wall making sure to hit studs.  I spaced my wood strips about 18″ apart.

-Secure strip of wood directly above and below outlets.

How to install pegboard

-Secure the pegboard to the wall with screws — make sure you hit the studs.  Choose the length of screw depending on the thickness of your wood strips.  I used 2″ screws with a large washer head so they wouldn’t pull through the pegboard.

-You might need help holding the pegboard in place while you secure it.  It’s difficult to lift and hold a full sheet of pegboard in place while driving in screws to secure to the wall.

-I have 10′ ceilings so I secured a full pegboard and then added more wood strips and pegboard to fill in the bare space.  Even though I have to use a ladder to get to top of the wall I wanted to take advantage of every bit of storage as possible.  I have things to store that I don’t use very often so I’ll put those items at the top.

How to install a pegboard wall

-Transfer outlet location onto pegboard and cut out the hole using a trim saw or jigsaw.

How to install a pegboard wall.

After you pull your outlets through and rescuer them, put the covers on and you’re done.  (It’s a good idea to use an outlet extender too.)

The rest is FUN organizational bliss!  Use your pegboard hooks and accessories to hang your tools where you want them.

Pegboard Wall - Workshop Tool Storage

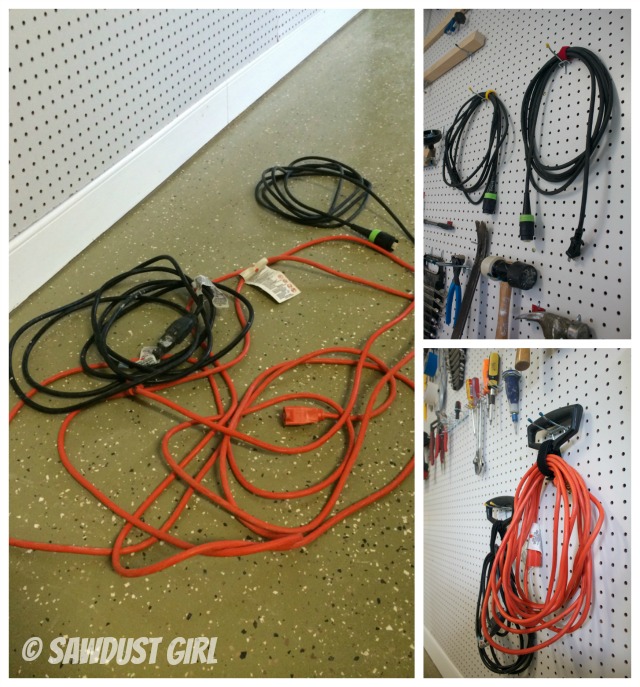
My Scotch Handle Straps and Bundling Straps keep my extension cords bundled and ready to grab and use.

Pegboard Wall - Workshop Tool Storage

My Festool tools each have a removable cord and there are two different ends.  Certain tools require certain cords and then ends won’t attach if it’s the wrong cord (I’m sure it has something to do with the electrical current each tool needs to draw).  I use color coded Scotch Bundling Straps to designate the type of cord so I can grab it and go without examining the end of the tool and then the end of the cord.  I just put a little matching colored dot on the tool and grab the right cord.

color_coded_cords

One perpetual problem with regular pegboard hooks is that they tend to fall out when you remove a tool.  Even the plastic arm thingy’s that are meant to hold the hook in place while you pull the tool from it don’t work very well.  It drives me CRAZY!

Tip for keeping pegboard hooks ON the wall.

There are hooks that have brackets and screws that KEEP them in place.  The problem with those are the screws make a big mess of a hole and if you ever want to move said hook you leave behind said mess.  Eventually you have a hot mess of a pegboard wall.  I like my hooks to stay put when I want them to stay put but let me move them without major damage when I want to move them.


So I used the Scotch Extreme Mounting Tape to hold my hooks in place.  The tape is double sided but I simply did not remove the backing after I stuck in in place.  It HOLDS but I can pull up if I want to.  It did pull up a bit of paint with it but didn’t damage the board.

Pegboard hooks - keeping them in place.
I LOVE my new pegboard walls (I’ve done this on both walls in my shop.  I’m a working machine when I don’t have to waste time searching for tools, safety gear, push sticks, adjustment wrenches etc.  I keep everything handy near the space where I need it and it takes seconds to grab nearly anything I need while working – or cleaning up.

Pegboard Wall - Organization for Workshop Tools

Pegboard Wall - Workshop Tool Storage


disclaimer


You might also like:

rolling workshop tool cart with pegboard storage.

Adjustable pegboard drawer organizer


August 13, 2014 · 9 Comments

« Installing LED Shop Lights
Craft Closet Makeover »

Comments

  1. Andrea says

    August 13, 2014 at 2:00 pm

    I’ve had a sheet of pegboard in my garage for months (it was in the scrap pile at Home Depot for half price and I couldn’t pass it up). I just need a tiny piece to build a little jewelry holder for saylor, and will have plenty left to put up somewhere in the garage. This might get me motivated to finally install it and get organized!

    Reply
  2. Guerrina says

    August 13, 2014 at 2:39 pm

    Those pictures make my heart race! I am in love! Now to clean out basement to create my workshop!

    Reply
  3. Melissa Boyce says

    August 13, 2014 at 3:00 pm

    I’m jealous of all your tools! We need to do this in our garage.

    Reply
  4. Rebecca says

    August 13, 2014 at 8:09 pm

    This is terrific! Thank you for sharing this with everyone. This weekend I will be adding a pegboard wall in the garage where I work! 🙂

    Reply
  5. Kim says

    August 13, 2014 at 8:34 pm

    Now you just need to outline each tool so you know exactly where it goes back. Beautiful piece of organization and I like the tape idea. I hate it when those hangers fall off too! You’re making great progress on your workshop. 🙂

    Reply
  6. MarieRoxanne says

    August 14, 2014 at 5:11 pm

    I may be the only one who doesn’t like pegboard… I would probably like it more if it wasn’t white. Maybe have a design painted on it? But oh, well, I guess I am allowed “not” to like something, right? But it does the job in keeping all the tools organized.

    Reply
  7. Helen Ewoldt says

    April 10, 2018 at 5:39 pm

    I enjoyed your article, but I am a neat freak and don’t like the looks of the tape on each hook. However, like you, it drives me nuts when pegs fall out. What are other ways to secure the pegs?

    Reply
    • Robby says

      October 7, 2018 at 12:25 pm

      Hot Melt glue from a glue gun. the glue & the gun are very inexpensive at the big box stores.

      Reply
  8. Paul holden says

    July 4, 2018 at 2:02 pm

    Where did you get the peg board, at what cost??

    Reply

Leave a Reply Cancel reply

Your email address will not be published. Required fields are marked *

Categories

New Post email notification signup

You Subscribed!

Legal Stuff

Terms of Use

Privacy Policy

Disclosure

Recent Posts

  • March 2023 Lodge Update- Moved in
  • January 2023 Lodge Update
  • Lodge Update – Floors, Cabinets, Countertops, and Appliances
  • Lodge Kitchen Cabinet Progress
  • Halloween Mad Gab – Halloween Party Ideas

Disclaimer:

Although it is my intention to provide accurate plans and clear instructions, not all plans have been tried and tested. Using plans or information found on SawdustGirl.com indicates that you agree with the Terms of Use policy and will accept full responsibility for the process and outcome of any project you attempt. All plans are for private use only. Plans and information published on SawdustGirl.com may not be reproduced, republished or distributed in any manner without written permission from Sandra Powell, Sawdust Girl. Actual projects built using Sawdust Girl plans may be published on your own site without instructions or "tutorial" as long as you provide a link to my original post with full post title or "SawdustGirl.com" as link title.

Copyright © 2023 · anchored theme by <a target="_blank"