Sawdust Girl®

Renovation, cabinet building and woodworking plans and tutorials. Build like a Girl®

  • Home
  • About Me
    • Personal Posts
  • My Home
    • Illinois House
    • Tennessee House in Progress
      • Basement
      • Basement Storage Closet
      • Bedroom Office
      • Craft Room
      • Dining Room
      • Entry
      • Garage
      • Guest Bedroom
      • Hallway
      • Jack and Jill Bathroom
      • Kitchen
      • Kitchen Entry
      • Laundry Room
      • Library
      • Living Room
      • Loft
      • Madison’s Room
      • Master Bedroom
      • Master Closet
      • Pantry
      • Porch
      • Powder Room
      • Wes’ Office
      • Workshop (My)
    • Tennessee House Tour – Completed Rooms
  • Projects
    • Cabinet Making 101
      • Doors
      • Drawers
    • Countertops
    • Gift Ideas
    • Holiday
      • Christmas
      • Halloween
    • Recipes
    • Sewing
    • Woodworking
      • Wood Finishing
    • Workshop Storage and Organization
  • Woodworking Plans
    • Beds
    • Benches
    • Bookshelves
    • Desks
    • Home Accessories
    • Kitchen Cabinets
    • Lockers
    • Nightstands
    • Organization accessories
    • Tables
    • Vanities
    • Wardrobes
    • Workshops
  • Remodeling 101
    • Baseboard and Trim
    • crown molding
    • Demolition
    • Door and Window Casings
    • Door Installation
    • Drywall
    • Electrical work
    • Flooring
    • Home Maintenance
    • Painting
    • Plumbing
    • Resources
    • Safety
    • Tile
    • Wall and Ceiling Treatments
  • The Sawdust Diaries
    • Andrea
    • Ava D.
    • Beckie F.
    • Cara C.
    • Courtney B
    • Fawn T.
    • Jenn D.
    • Kelly C.
    • Kristy K.
    • Lara T.
    • Malisa B.
    • Marnie D.
    • Robin C.
    • Val F.
  • Tools and Products
    • Products
    • Tool Reviews and Overviews
  • E-books and Plans
    • My Account
    • Checkout
  • Build like a Girl® T-Shirts
  • Inspiration and Ideas
  • Calderwood Cottage
  • Privacy Policy
Sandra January 28, 2014

Apothecary Console Table -free plans

Sharing is caring!

  • Share
  • Tweet
  • Pin

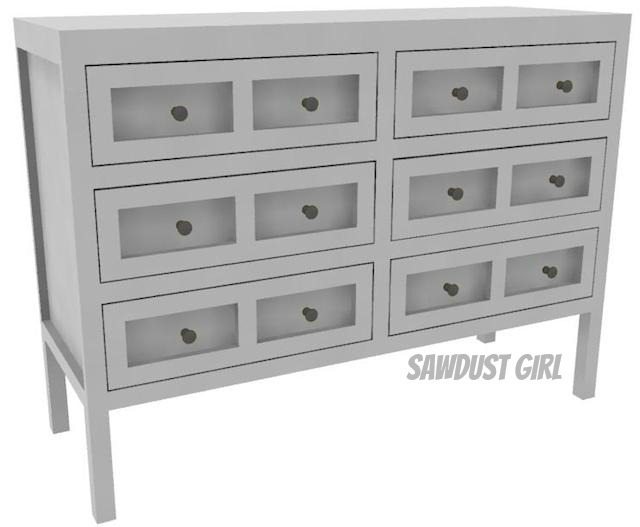
This console table looks good from all angles.  It’s 48″ wide and only 17″ deep so it would be perfect for a TV console, an entry table or a sofa table. It could be used in a bedroom for clothes if you have a shallow area and need to optimize storage. Or, modify the woodworking plans to make it deeper, taller, wider or whatever your heart desires. free woodworking plans for this awesome apothecary console table!
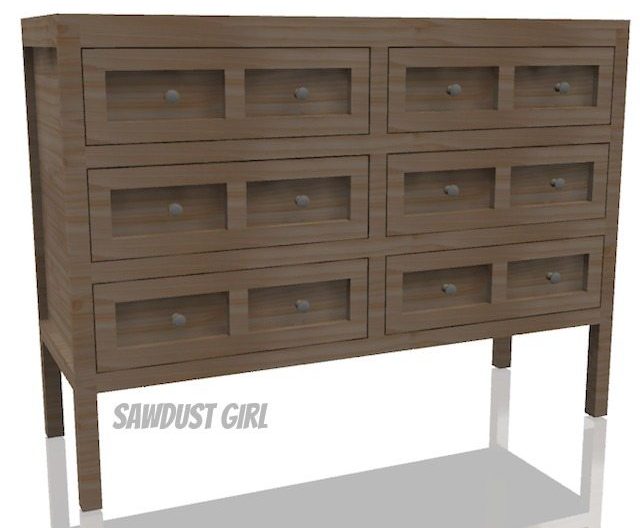
Apothecary Console Table

Materials:

  • Pocket hole jig and 1 1/4″ pocket hole screws
  • 1 3/4″ wood screws
  • wood glue
  • 1×2 wood for face frame (I like poplar for painted pieces if you plan on staining your table you’ll want to match your plywood.)
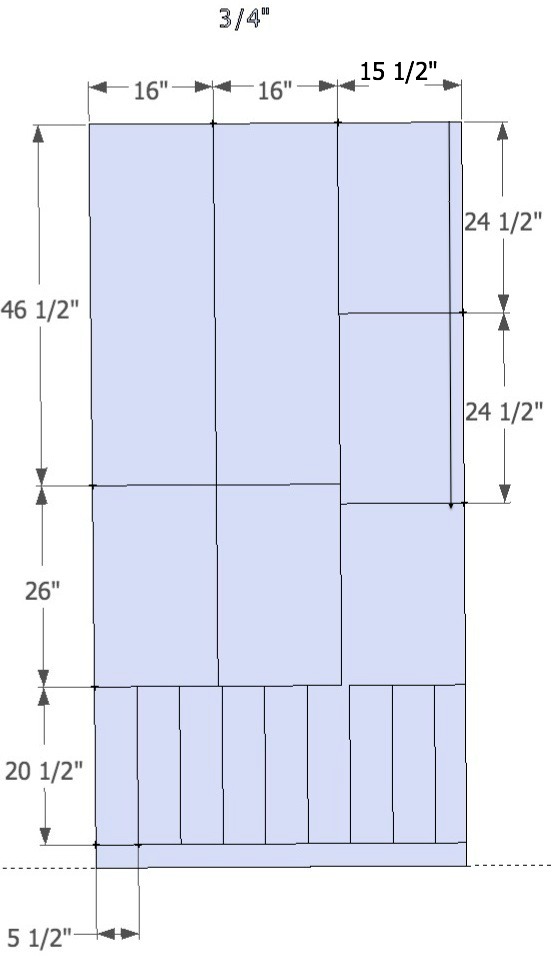
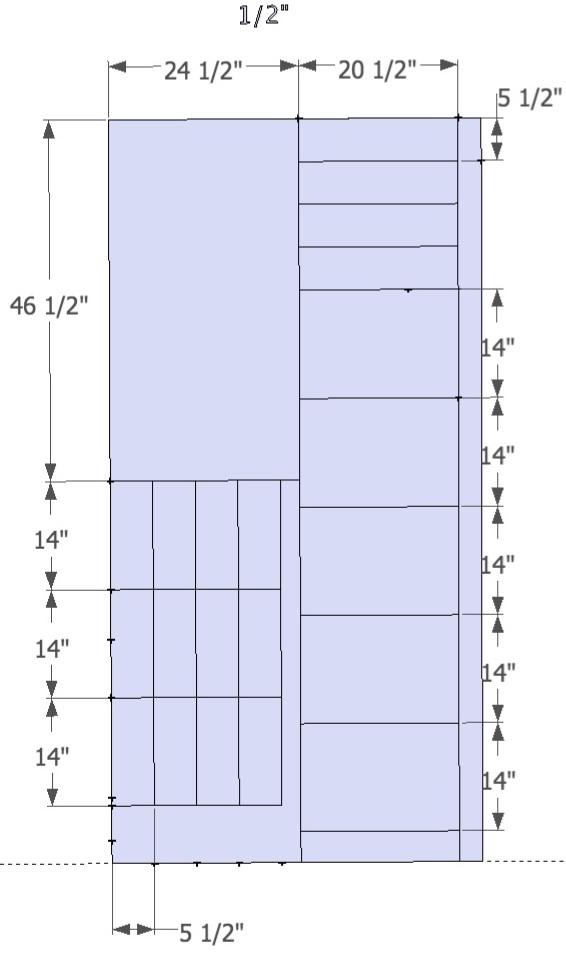
  • 1 sheet each of 1/2″ and 3/4″ plywood cut as shown below
  • Additional wood for top (optional)

apothacary-table-34 Free Plans to build an apothecary console table from Sawdust Girl.

Step 1:  Attach Sides

  • Attach top and bottom INSIDE the sides.
  • Use wood glue and 1 3/4″ wood screws. (see tutorial)

Free Plans to build an apothecary console table from Sawdust Girl.

Step 2:  Attach Center Dividers

  • Use glue and pocket hole screws and secure from inside cabinet or drive wood screws through top and bottom.
  • Center dividers are flush with cabinet on front and recessed 1/2″ from back.
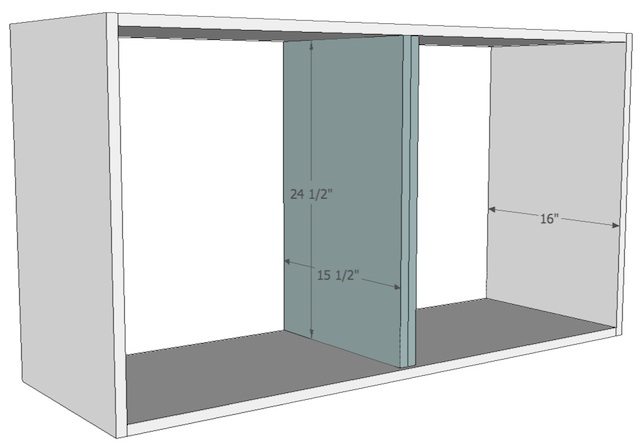
Free Plans to build an apothecary console table from Sawdust Girl.

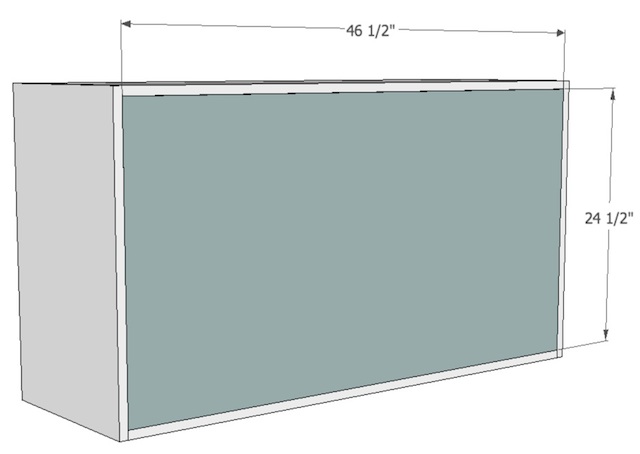
Step 3:  Attach Back (1/2″ plywood)

  • Use wood glue and screws to secure back inside “box”.
Free Plans to build an apothecary console table from Sawdust Girl.

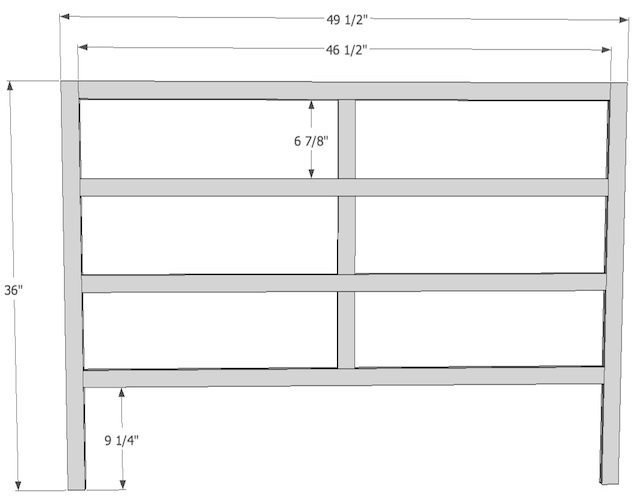
Step 4:  Build Faceframes

  • Pocket hole construction (see tutorial)

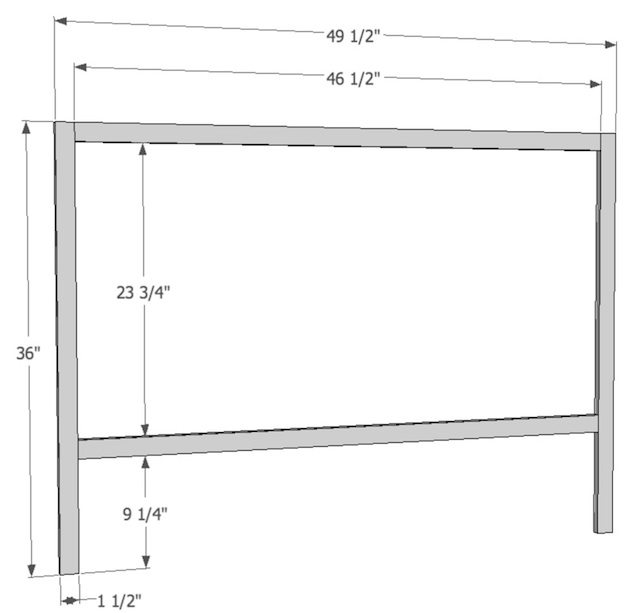
Front Faceframe
Free Plans to build an apothecary console table from Sawdust Girl.

Back Face frame

Free Plans to build an apothecary console table from Sawdust Girl.


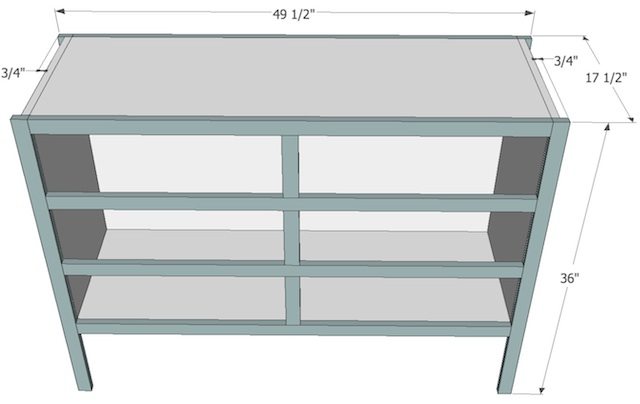
Step 5:  Attach Faceframes

  • Pocket hole construction (see tutorial)
  • Faceframes should extend beyond “box” by 3/4″ on each side
Free Plans to build an apothecary console table from Sawdust Girl.

Step 6:  Add 1×2 bottom brace

  • use pocket screws on ends of brace – screw into legs


Free Plans to build an apothecary console table from Sawdust Girl.

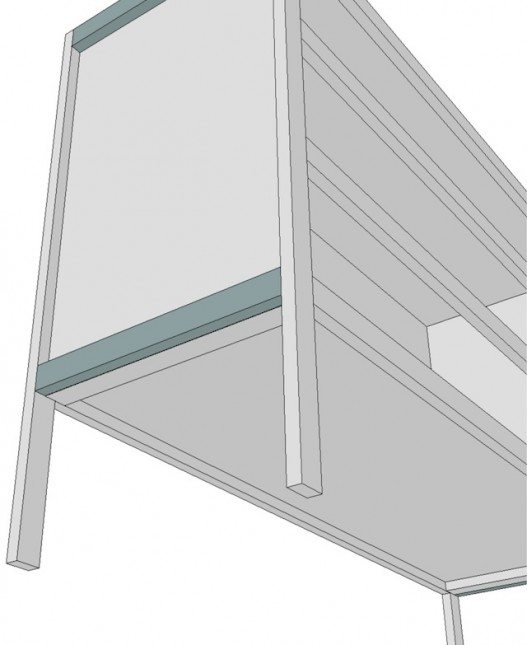
Step 7:  Add side frames

  • Use glue and brad nails to attach 1×2 flush with top and bottom between front and back face frames.
Free Plans to build an apothecary console table from Sawdust Girl.

Step 8:  Add Leg Support

  • Use glue and brad nails to attach additional 1×2 to the “inside” of legs.  Should match up in width.

Free Plans to build an apothecary console table from Sawdust Girl.

Step 9:  Top

  • If painting, edges and fasteners and be filled, sanded, primed and painted.  OR
  • Top piece with additional plywood and edge with decorative moulding
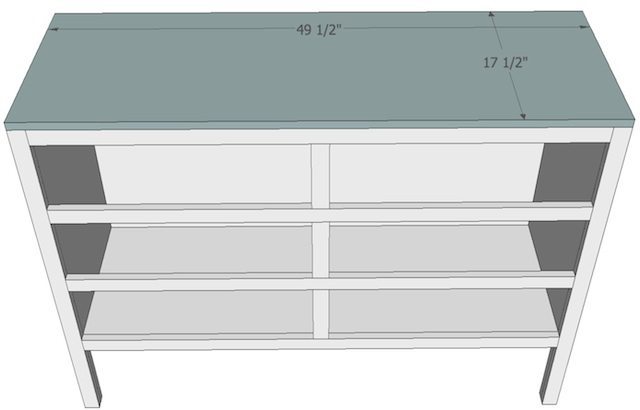
Free Plans to build an apothecary console table from Sawdust Girl.

Step 10:  Drawers and Drawer Fronts

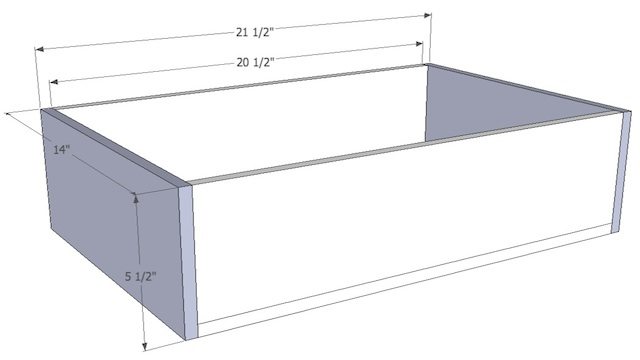
  • Drawer Building Tutorial
  • Build a Drawer Front Tutorial
  • Installing Drawers
  • Installing Drawer Fronts

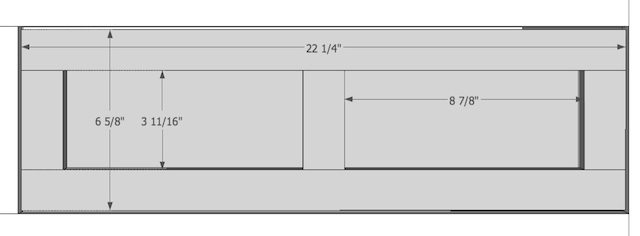
drawers


drawer front

Depending on the material you made it out of, this table could look great with a coat of poly, stain, wax or painted!free woodworking plans for this awesome apothecary console table!
Free Plans to build an apothecary console table from Sawdust Girl.

Refer to other tutorials in Cabinet Making 101 for reference and additional help. Check out my other free woodworking plans for tables.

Sharing is caring!

  • Share
  • Tweet
  • Pin

More From My Site

Filed Under: Free Plans, Tables Tagged With: Free Plans, Tables Leave a Comment
Previous article: Built-in Window Seat – Bench Plans
Next article: Super Easy Hanging Storage Boxes

I love your comments! Thank you! Cancel reply

Categories

Legal Stuff

Terms of Use

Privacy Policy

Disclosure

Subscribe to our Newsletter

mailpoet webform


Select list(s):

Disclaimer: Although it is my intention to provide accurate plans and clear instructions, not all plans have been tried and tested. Using plans or information found on SawdustGirl.com indicates that you agree with the Terms of Use policy and will accept full responsibility for the process and outcome of any project you attempt. All plans are for private use only. Plans and information published on SawdustGirl.com may not be reproduced, republished or distributed in any manner without written permission from Sandra Powell, Sawdust Girl. Actual projects built using Sawdust Girl plans may be published on your own site without instructions or "tutorial" as long as you provide a link to my original post with full post title or "SawdustGirl.com" as link title.


Copyright © 2011- 2019 · Sawdust Girl · Login

Return to top of page

110shares