• Home
  • About
    • Personal Posts
  • Privacy
  • Shop
    • My Account
    • Checkout
    • Email
    • Facebook
    • Instagram
    • Pinterest
    • Twitter
    • YouTube
Sawdust Girl®

Sawdust Girl®

Renovation, cabinet building and woodworking plans and tutorials. Build like a Girl®

  • My Home
    • Clinton TN House
      • Clinton TN House in Progress
    • Maryville TN House
      • Maryville TN House Tour – Completed Rooms
      • Maryville TN House in Progress
        • Basement
        • Basement Storage Closet
        • Bedroom Office
        • Craft Room
        • Dining Room
        • Entry
        • Garage
        • Guest Bedroom
        • Hallway
        • Jack and Jill Bathroom
        • Kitchen
        • Kitchen Entry
        • Laundry Room
        • Library
        • Living Room
        • Loft
        • Madison’s Room
        • Master Bedroom
        • Master Closet
        • Pantry
        • Porch
        • Powder Room
        • Wes’ Office
    • Illinois House
    • Calderwood Cottage
  • My Workshop
    • Clinton Workshop
  • Build & Breakfast
  • Cabinet Making 101
    • Cabinets
    • Doors
    • Drawers
  • Projects and Plans
    • Countertops
    • Beds
    • Benches
    • Bookshelves
    • Desks
    • Gift Ideas
    • Holiday
      • Christmas
      • Halloween
    • Home Accessories
    • Kids
    • Kitchen Cabinets
    • Lockers
    • Nightstands
    • Organization accessories
    • Recipes
    • Sewing
    • Tables
    • Vanities
    • Wardrobes
    • Woodworking
      • Wood Finishing
    • Workshop
    • Workshop Storage and Organization
  • Remodeling 101
    • Baseboard and Trim
    • crown molding
    • Demolition
    • Door and Window Casings
    • Door Installation
    • Drywall
    • Electrical work
    • Flooring
    • Home Maintenance
    • Painting
    • Plumbing
    • Resources
    • Safety
    • Tile
    • Wall and Ceiling Treatments
  • Sawdust Squad
  • The Sawdust Diaries
    • Andrea
    • Ava D.
    • Beckie F.
    • Cara C.
    • Courtney B
    • Fawn T.
    • Jenn D.
    • Kelly C.
    • Kristy K.
    • Lara T.
    • Malisa B.
    • Marnie D.
    • Robin C.
    • Val F.
  • Tools
    • Products
    • Tool Reviews & Overviews
    • Inspiration & Ideas

No Sew T-Shirt Apron Tutorial

All Posts, Gift Ideas, Sewing

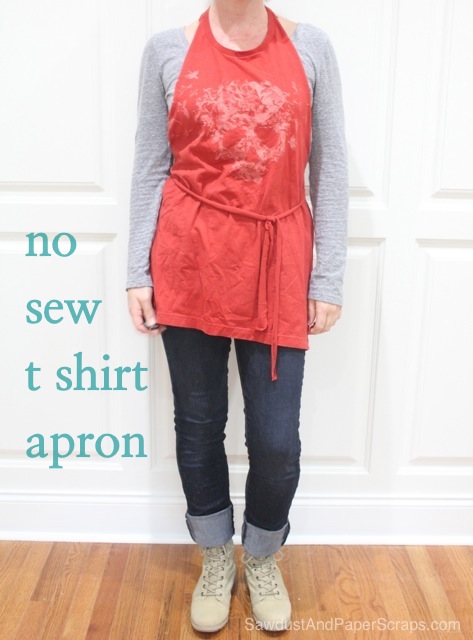
Cheap and easy  apron tutorial made from cutting a t-shirt.  No sewing.

Lately I’ve been spending more time building and painting than baking and candy making.  I used to enjoy doing those other things –occasionally.  I did make time to whip up a funky little apron recently.  Why?  Because I really should wear aprons when I PAINT because I have such a bad habit of wiping my hands on my pants!

I made this apron by cutting up an old T-Shirt — no sewing involved.   Quick!


T-shirt aprons are soft and movable.  Stiff aprons make me feel like I’m wearing an extra starched jacket that is two sizes too small.


This one cost me $0.00 because I raided my husbands t-shirt drawer for an old shirt but you could buy a super inexpensive one from Ross or a thrift store and it would still be cheap cheap cheap  a thrifty gift.

I started out with a 2x men’s t-shirt.  (This totally does not look like a 2x but it is!  It must have SHRUNK which is why my 6’5″ hubby never wears it.) 
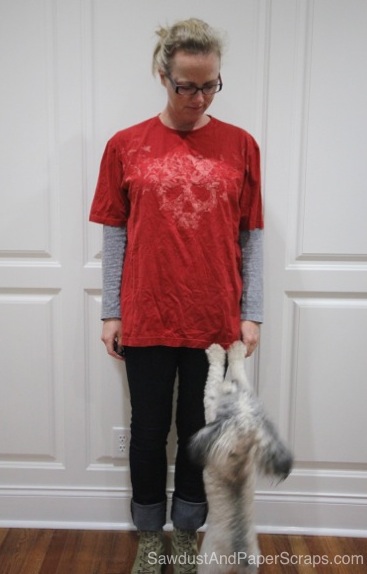
No Sew T-Shirt Apron Tutorial


There is absolutely no sewing with this tutorial.  Just a couple cuts here and there and you’re done.  Bam!  You can use either scissors or a rotary cutter.  I used both.  One here –the other there.  
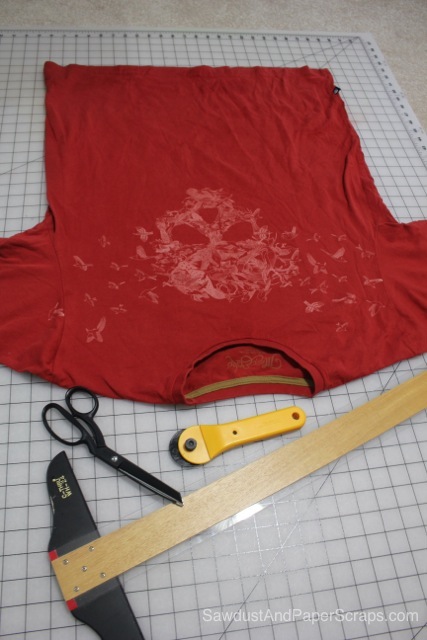
No Sew T-Shirt Apron Tutorial


1.  First thing to do is cut along the side seams of the t-shirt but STOP before you get to the armpit.  I left about 2 1/2″.
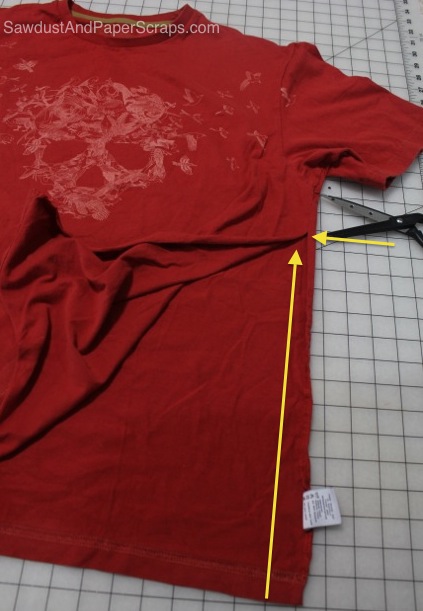
No Sew T-Shirt Apron Tutorial


2.  Now, with the t-shirt laying front down, pull the front section up out of the way and cut two strips up the back on both sides as demonstrated in the following picture.  Again, I stopped the cut 2 1/2″ under the armpit.
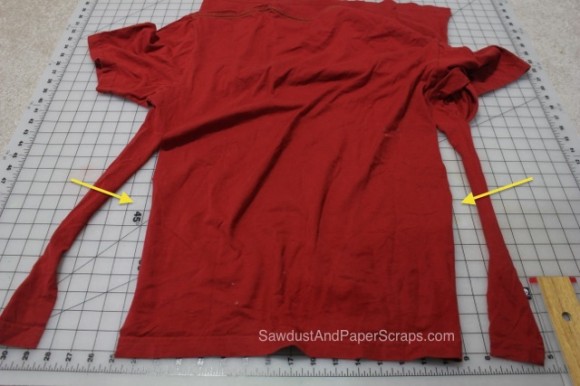
No Sew T-Shirt Apron Tutorial


3.  Now cut straight across the back so that bottom “flap” is removed.
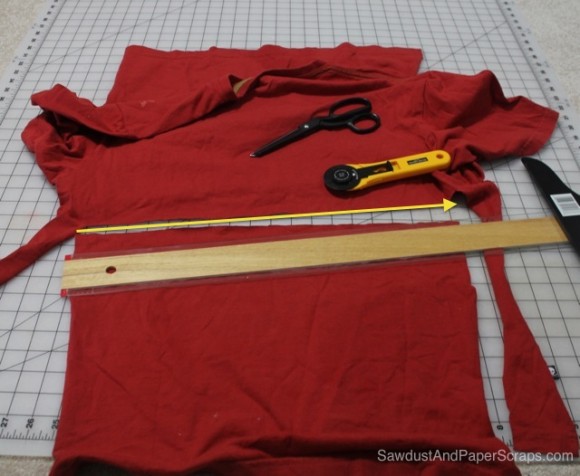
No Sew T-Shirt Apron Tutorial


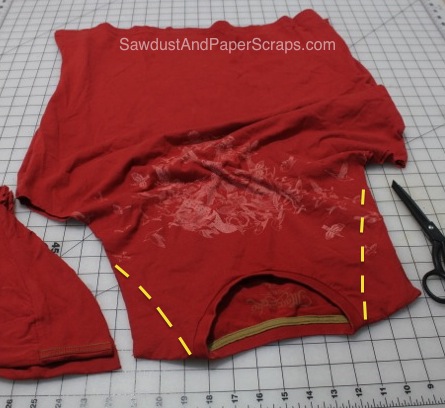
4.  Now flip the tshirt over so it’s front side up and cut off the sleeves.  Start at the armpit and curve right up to the ribbing on the neckline.  Follow my yellow dotted lines.  I first attempted to create a  different pattern — which didn’t work out so I came back and cut where the yellow lines are.  
No Sew T-Shirt Apron Tutorial


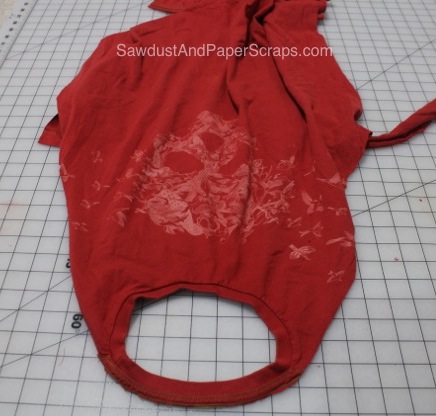
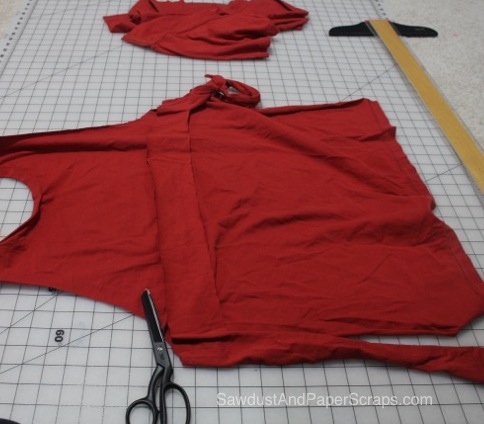
5.  Now cut around the back of the neck and that will create a flap on the top of the shirt, much like the one we started out with on the bottom of the shirt back.  Cut above Leave a 2 1/2″ strip and cut the rest off.  It will look like this in the back.  
No Sew T-Shirt Apron Tutorial

And this in the front.

No Sew T-Shirt Apron Tutorial

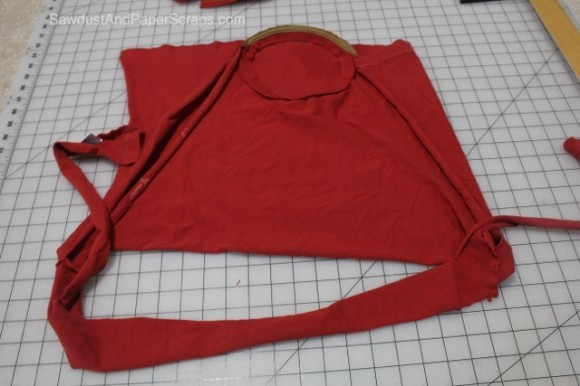
So now you’ve got two tails hanging down the back and one strip right across the back.
No Sew T-Shirt Apron Tutorial


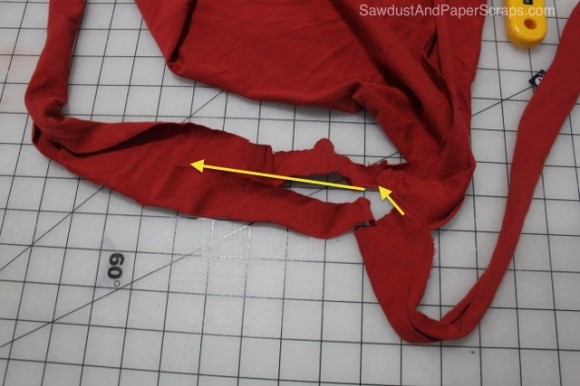
6.  You’re going to cut that strip in half lengthwise.  Start by cutting halfway up the “strip” on one side and then keep cutting right down the center.
No Sew T-Shirt Apron Tutorial

7.  Cut until you come to the other side of the strip and then cut up so the top section of the  strip separates from the shirt on that side but the bottom half is still attached.
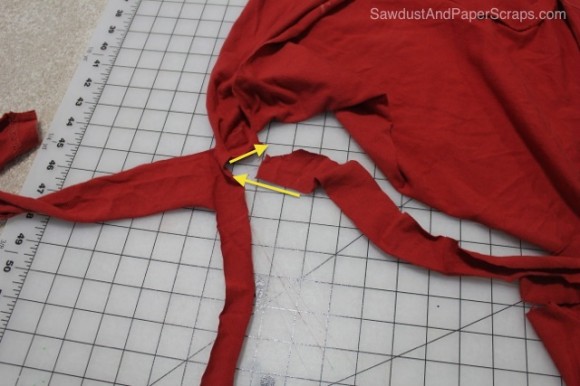
No Sew T-Shirt Apron Tutorial


8.  And that gives you two tails one each side of the apron.  No worries if your cuts were less than stellar, mine certainly weren’t great.  When you stretch strips of knit, it curls inward so just give each tail a gentle tug.   That will hide most of the imperfections. Snip off the ends that have the original hem because that will prevent the end from curling and make it look silly.  Clean up any odd angles by eyeballing it.  Just don’t cut too close to your ties.  You don’t want to leave them so thin that they tear off. 
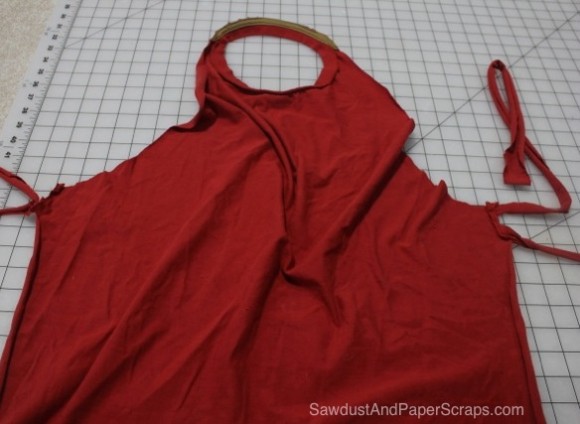
No Sew T-Shirt Apron Tutorial

So that’s it, you’re done!  I did say 5 minutes.  🙂

I tie one set of ties in front just for looks.  It gives the wearer a bit of a waist.  The other ties actually TIE the apron on.
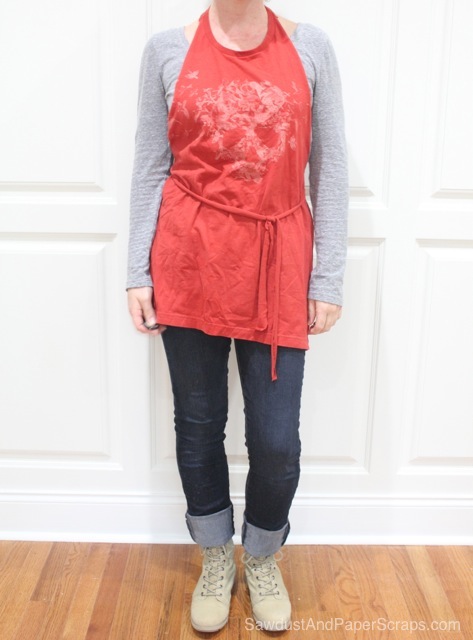
No Sew T-Shirt Apron Tutorial

I love the look.  Though this t shirt could have used a de-wrinkling first.  HA!  You can really have fun with designed t shirts or add your own design after the fact.  Fun times– fun times. 
 

January 16, 2013 · 11 Comments

« Instruction manuals — Really, you think you can call it that?
Chane- chane- change! {this IS happening!} »

Comments

  1. Jess says

    January 16, 2013 at 2:18 pm

    I have a pair of paint pants that I always wear to paint ever since I ruined them. I was painting once and got a ton on my hands, so to be funny I slapped my butt and had a big handprint on them. That would be great and all, except I forgot about the handprint and went to Home Depot wearing them one day. I realized I was walking around the store with a big ol’ handprint on my butt and was totally embarrassed haha. Moral of the story, I should definitely be making one of these aprons, although knowing me I wouldn’t remember to wear it. Great idea!

    Reply
  2. Heather says

    January 16, 2013 at 2:22 pm

    You could also use some of the material that you cut off and create a pocket on the front. I know I’m always putting things down and can’t remember where 30 seconds later.

    Reply
  3. kristin says

    January 16, 2013 at 2:23 pm

    Very clever Sandra! And it looks cute too! My concern would be the paint getting trough to the shirt underneath so I guess a te hat is thicker is better, yes? I just have a few “outfits” from over the years that are my paint clothes/caulk clothes. Just keep adding to the gunk. But you are out there for the world to see and do this every day so rock it. PS–glad you got your new pink safety gooles! I had to buy a few of my own gifts this year also!

    Reply
    • kristin says

      January 16, 2013 at 2:47 pm

      Sorry for the writing…my keys are sticking because I KNOW I don’t type that fast!! It would say “a tee that is thicker” and “through” not “trough”! GOGGLES! Ugh. NO more comments for me today!!!!

      Reply
  4. Mel @ Trailing After God says

    January 16, 2013 at 10:48 pm

    Great idea! Especially since I am big busted so most aprons do not fit or cover me! I have a few shirts I could easily do this to.

    Reply
  5. Sandra @Beneath this Roof, Within these Walls says

    January 17, 2013 at 2:13 am

    What a fabulous idea! So easy, and so cheap, or free, if one has the old shirts. Gotta make one for my daughter who is sooo messy in the kitchen.

    Reply
  6. katie says

    January 17, 2013 at 2:53 pm

    What an awesome idea! I can’t wait to go raid our closet and make a few of these for me!

    Reply
  7. Joy2Journey says

    January 18, 2013 at 3:27 pm

    I love this idea as I seem to need a place to wipe stuff off my hands and always am searching for where I put my rag down (which as you know takes up a LOT of time!) Thanks for the great idea!
    Hugs

    Reply
  8. Sandra Daimaru says

    January 20, 2013 at 7:22 pm

    What a great idea! Gotta make it. Thanks for share.

    Reply
  9. [email protected] says

    January 21, 2013 at 8:40 pm

    Very clever – I love it. Will be making one soon. 🙂

    Reply
  10. Chrissy @ Adventures In DIY says

    November 30, 2013 at 3:46 pm

    I agree with Kristin – the thicker the shirt the better. I have old t-shirts I use while painting and the paint that does get on my shirt always seem to seep through and get on my skin. I even got some paint on one of my good bras. lol

    Reply

Leave a Reply Cancel reply

Your email address will not be published. Required fields are marked *

Categories

New Post email notification signup

You Subscribed!

Legal Stuff

Terms of Use

Privacy Policy

Disclosure

Recent Posts

  • March 2023 Lodge Update- Moved in
  • January 2023 Lodge Update
  • Lodge Update – Floors, Cabinets, Countertops, and Appliances
  • Lodge Kitchen Cabinet Progress
  • Halloween Mad Gab – Halloween Party Ideas

Disclaimer:

Although it is my intention to provide accurate plans and clear instructions, not all plans have been tried and tested. Using plans or information found on SawdustGirl.com indicates that you agree with the Terms of Use policy and will accept full responsibility for the process and outcome of any project you attempt. All plans are for private use only. Plans and information published on SawdustGirl.com may not be reproduced, republished or distributed in any manner without written permission from Sandra Powell, Sawdust Girl. Actual projects built using Sawdust Girl plans may be published on your own site without instructions or "tutorial" as long as you provide a link to my original post with full post title or "SawdustGirl.com" as link title.

Copyright © 2023 · anchored theme by <a target="_blank"