• Home
  • About
    • Personal Posts
  • Privacy
  • Shop
    • My Account
    • Checkout
    • Email
    • Facebook
    • Instagram
    • Pinterest
    • Twitter
    • YouTube
Sawdust Girl®

Sawdust Girl®

Renovation, cabinet building and woodworking plans and tutorials. Build like a Girl®

  • My Home
    • Clinton TN House
      • Clinton TN House in Progress
    • Maryville TN House
      • Maryville TN House Tour – Completed Rooms
      • Maryville TN House in Progress
        • Basement
        • Basement Storage Closet
        • Bedroom Office
        • Craft Room
        • Dining Room
        • Entry
        • Garage
        • Guest Bedroom
        • Hallway
        • Jack and Jill Bathroom
        • Kitchen
        • Kitchen Entry
        • Laundry Room
        • Library
        • Living Room
        • Loft
        • Madison’s Room
        • Master Bedroom
        • Master Closet
        • Pantry
        • Porch
        • Powder Room
        • Wes’ Office
    • Illinois House
    • Calderwood Cottage
  • My Workshop
    • Clinton Workshop
  • Build & Breakfast
  • Cabinet Making 101
    • Cabinets
    • Doors
    • Drawers
  • Projects and Plans
    • Countertops
    • Beds
    • Benches
    • Bookshelves
    • Desks
    • Gift Ideas
    • Holiday
      • Christmas
      • Halloween
    • Home Accessories
    • Kids
    • Kitchen Cabinets
    • Lockers
    • Nightstands
    • Organization accessories
    • Recipes
    • Sewing
    • Tables
    • Vanities
    • Wardrobes
    • Woodworking
      • Wood Finishing
    • Workshop
    • Workshop Storage and Organization
  • Remodeling 101
    • Baseboard and Trim
    • crown molding
    • Demolition
    • Door and Window Casings
    • Door Installation
    • Drywall
    • Electrical work
    • Flooring
    • Home Maintenance
    • Painting
    • Plumbing
    • Resources
    • Safety
    • Tile
    • Wall and Ceiling Treatments
  • Sawdust Squad
  • The Sawdust Diaries
    • Andrea
    • Ava D.
    • Beckie F.
    • Cara C.
    • Courtney B
    • Fawn T.
    • Jenn D.
    • Kelly C.
    • Kristy K.
    • Lara T.
    • Malisa B.
    • Marnie D.
    • Robin C.
    • Val F.
  • Tools
    • Products
    • Tool Reviews & Overviews
    • Inspiration & Ideas

DIY Table Lamp – Make Your Own Lamp
All Posts, Projects and Plans

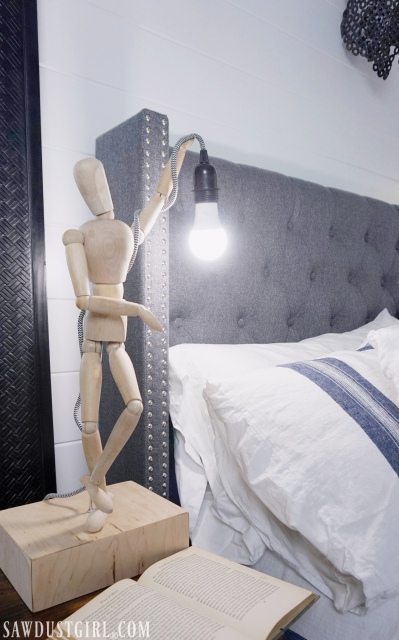
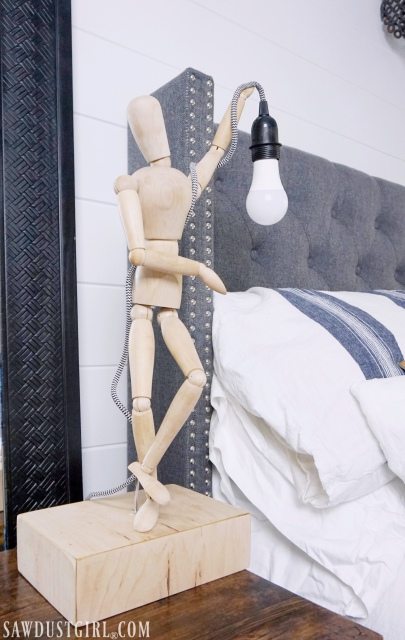
DIY Table LampOnce in a while I have to step away from the home remodeling work that goes on and on for months and months without looking like any progress is being made …and make something that I can start and finish in one day.  For sanity sake!  After finishing three weeks of back breaking demolition on Calderwood Cottage, I needed a sanity project. So I made this fun, DIY table lamp with Krazy Glue.  And guess what?  I’m going to show you how to make your own lamp too!

This project is sponsored by Krazy Glue. Project idea, process and opinions are my own.

How to Make your Own Lamp
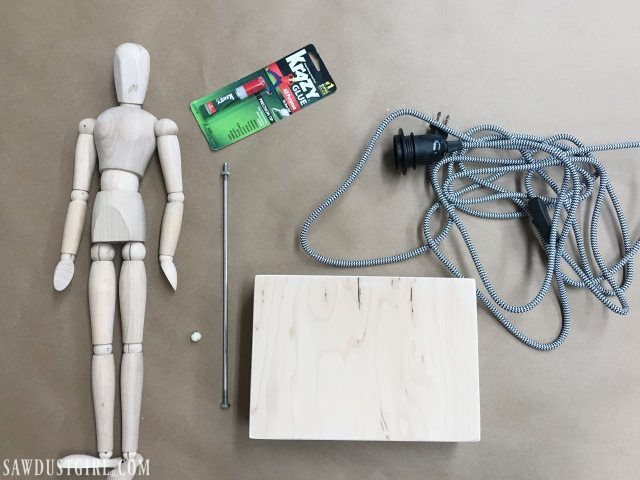
What you’ll need:

  • Sturdy base (Mine is a 6″x12″ 3/4″ plywood box grabbed from a bin full of unfinished projects.)
  • 20″ articulating artist mannequin Kit (Female) or (Male)
  • LED bulb and lamp cord
  • Krazy Glue (I used “All Purpose”)
  • M6 Threaded insert nut

Prepare Base

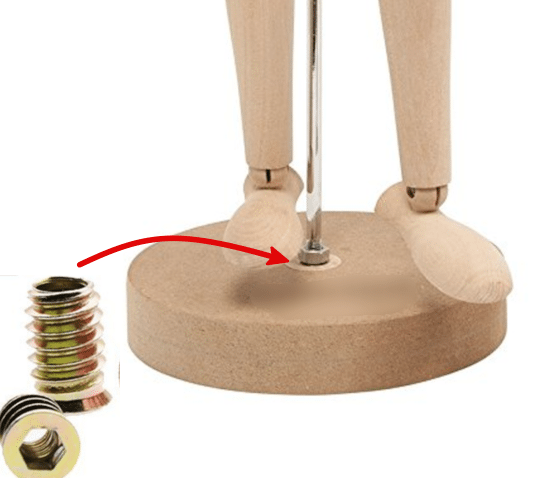
The mannequin I referenced in my “materials list” comes as a kit with a long bolt and small mdf base (which has a threaded insert nut).  If you want to, very carefully, try to remove that metal insert nut so you can re-use it.  I used a band saw and cut notches and was able to remove mine.  It was a bit precarious AND then I lost that insert nut anyway.  Had to run to the hardware store to buy one anyway…  So you might just pick one up to begin with.  Base with threaded insert nut
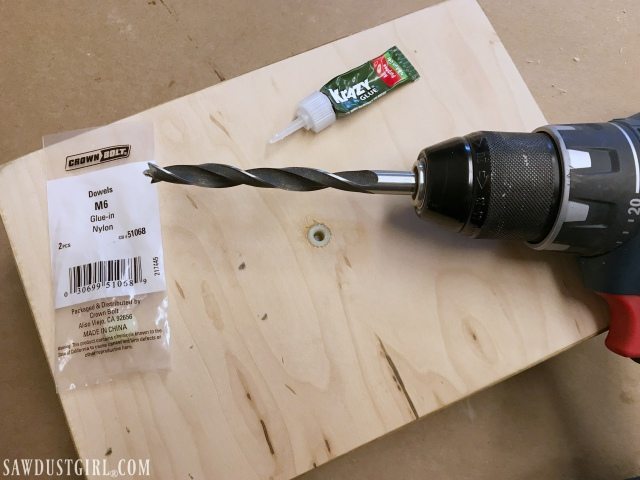
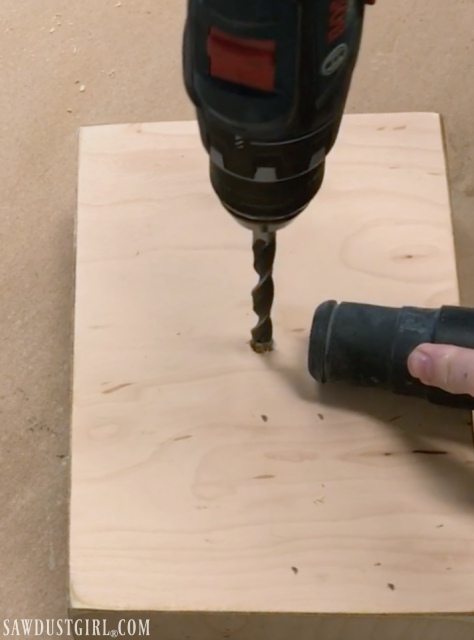
Drill a hole for the M6 threaded insert nut with a 6mm drill bit.
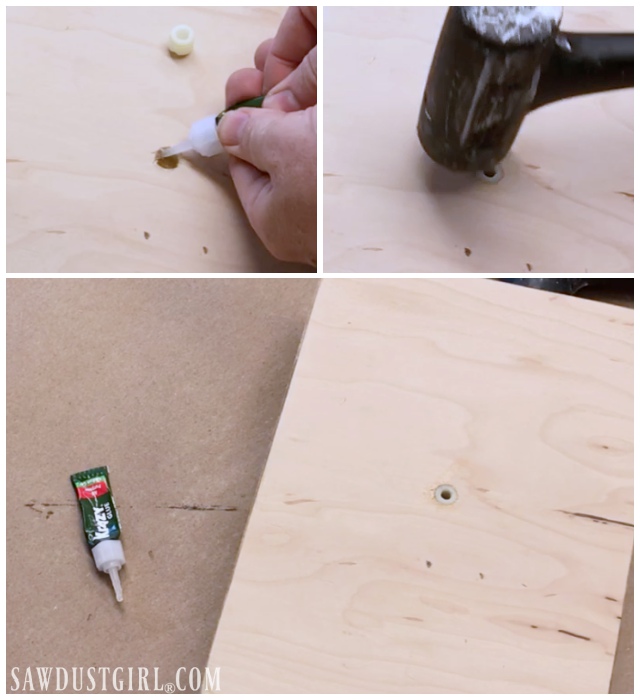
Since I lost my metal threaded insert nut, had to go buy a new one.  The hardware store only had a plastic one in the size I needed.  Whether using plastic or metal, it’s always a good idea to add glue if you want your insert nut to be permanently installed.  With threaded inserts, you drive them in – like a screw.  These plastic ones were meant to be glued in are just pressed in.  Those definitely need to be glued!  I squeezed in a couple drops of Krazy glue and pressed my insert nut in place.  A rubber mallet was required because my thumbs are seriously wimpy.  Despite my daily thumb workouts.

Give the glue ample time to set up.
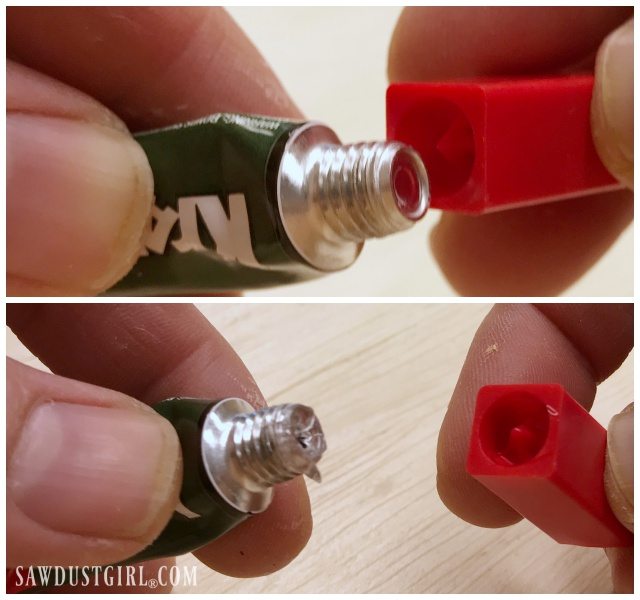
Just in case you think your brand new bottle of Krazy Glue bottle is dried up because nothing comes out when you squeeze…you have to remove the nozzle and break the seal.  The top of the cap has a handy point made for this purpose.
Attach Mannequin to DIY Lamp Base

Now you can secure the long bolt to the base.  Screw the bolt into the base and then tighten with one of the included nuts.  Make sure both nuts are on the bolt before you secure the mannequin.
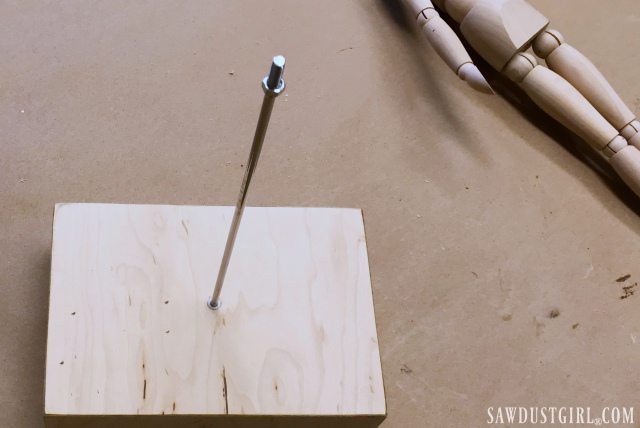
Next secure the mannequin to the bolt and tighten the second nut.
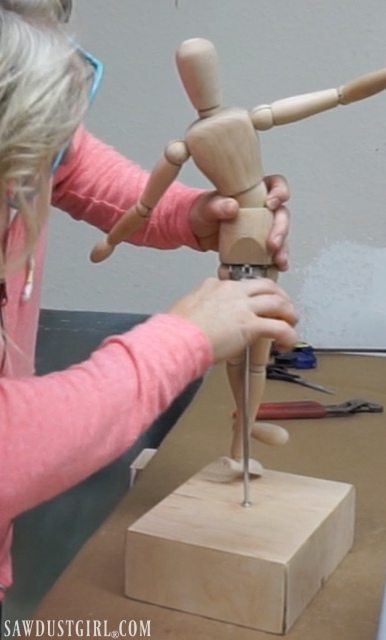
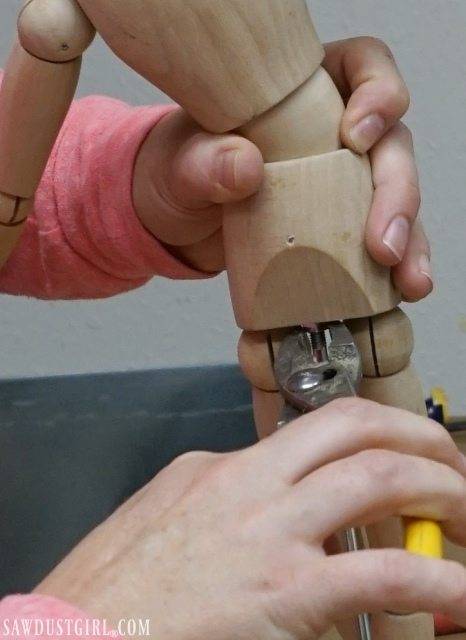
DIY Table Lamp Cord Management.

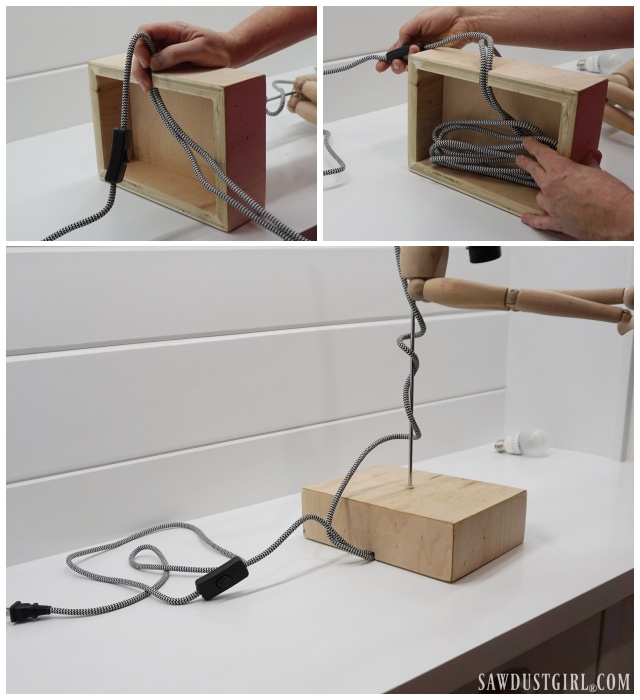
This step was the solution to a problem I discovered after setting my DIY lamp on the table.  The cord was all over the place.  It would definitely be easier to do this before attaching the mannequin.  I used my table saw to cut a small notch in the back of my base.
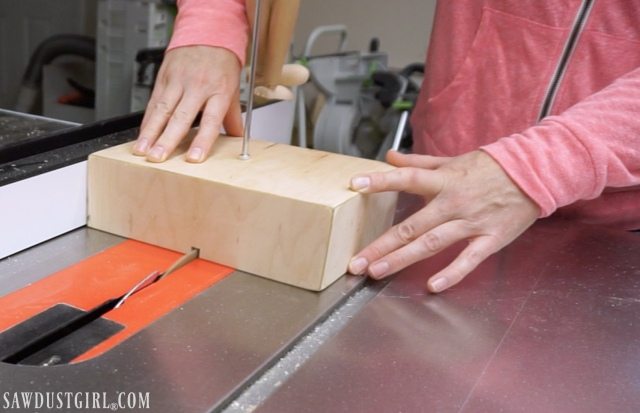
The notch is large enough for the cord to go in and out, with whatever portion of cord not needed to reach the receptacle left IN the box.
Secure Cord Kit to Mannequin

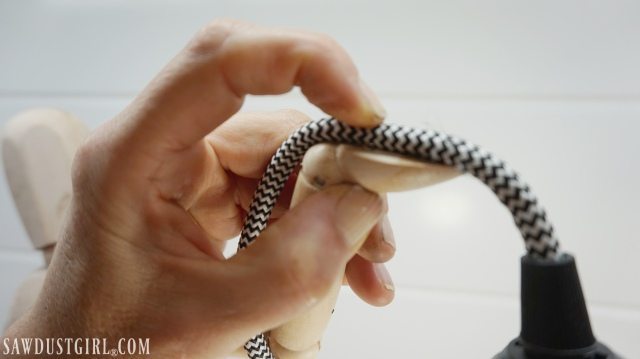
My lamp does not weigh 2000 pounds so I wasn’t able to test out the “krazy strong” claim that a single drop of Krazy Glue can hold up to 2,000 pounds. That’s a lot of weight!  A couple drops did secure the light cord to my mannequin’s hand.  (It dries very quickly so you have to watch where you put your fingers!)  I pressed the cord firmly into the glue for 30 seconds and that was that.
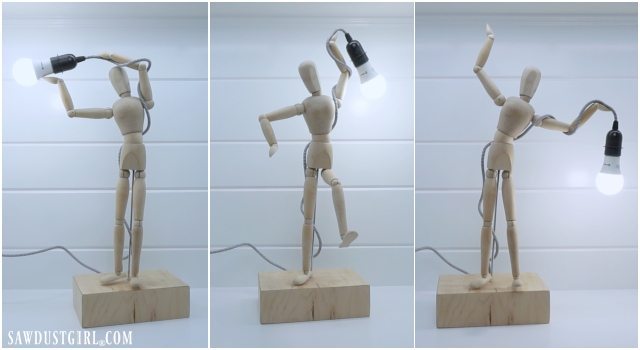
Since the mannequin’s joints articulate, I intended to use some glue to keep him permanently positioned how I wanted him.  However, the tension in his joint was tight enough to hold his position.  Also, it’s fun to change up his position.
I had so much fun making my DIY table lamp that I want to share the fun!  I’m giving away a $100 Visa gift card to one lucky winner –so you can make your own lamp too!

Enter for a chance to win $100 Visa GC

  • Leave a comment on this post AND
  • Click in the Rafflecopter Giveaway box below

a Rafflecopter giveaway

Thanks to Krazy Glue for sponsoring this post.  Good luck y’all!
November 10, 2017 · 81 Comments

« Working with Dowel Joints
Porter-Cable 20V MAX Wet-Dry Vac – PCC795B »

Comments

  1. Kz says

    November 10, 2017 at 8:04 am

    So whimsical!

    Reply
  2. Dave says

    November 10, 2017 at 8:22 am

    Neat. You could also stain the wood for a different look.

    Reply
  3. Jessica H says

    November 10, 2017 at 9:34 am

    I love this! I might make one to give as a Christmas gift!

    Reply
  4. Tricia says

    November 10, 2017 at 11:15 am

    So cool! This could go with different home decors. I have a little mannequin and a small bulb I may try making a miniature too!

    Reply
  5. Ellen Casper says

    November 10, 2017 at 11:18 am

    What a fun and unique lamp!

    Reply
  6. Kay Mc says

    November 10, 2017 at 11:37 am

    Such a fun project! Thanks for sharing it. I think my grandson would love one of these!

    Reply
  7. Sharon H says

    November 10, 2017 at 11:47 am

    This is adorable, I might have to try this!

    Reply
  8. Debby J says

    November 10, 2017 at 11:48 am

    Cute

    Reply
  9. carol clark says

    November 10, 2017 at 12:00 pm

    that is unique looking and if it was possible cutting a piece out on the bottom and making it a small draw for hiding jewerly if it would work might not

    Reply
  10. Ginny J says

    November 10, 2017 at 12:05 pm

    You are so creative and talented. I wish my mind worked like yours.

    Reply
  11. Jean says

    November 10, 2017 at 12:07 pm

    Such a cute lamp. I call these in and out projects. Very satisfying. Enjoy your blog.

    Reply
  12. Tom says

    November 10, 2017 at 12:08 pm

    Very cool for a child’s room also.

    Reply
  13. Rhonda rutherford says

    November 10, 2017 at 12:08 pm

    Super cute!!

    Reply
  14. Andrea Greco- Freveletti says

    November 10, 2017 at 12:22 pm

    Awesome. I AM MAKING ONE OF THESE.

    Reply
  15. Garry says

    November 10, 2017 at 12:26 pm

    If one were adept at making mall clothes, it might be a fun thing to make them for holidays. events. or just for a fun display. So many possibilities for going farther but as it is, it is still a very good looking lamp.

    Reply
  16. Michelle Dry says

    November 10, 2017 at 12:29 pm

    Pretty neat how you can move it around.

    Reply
  17. kim says

    November 10, 2017 at 12:29 pm

    cool!

    Reply
  18. Bernadette varner says

    November 10, 2017 at 12:39 pm

    I love this! All the different poses are so cute!

    Reply
  19. Kathleen says

    November 10, 2017 at 12:45 pm

    This is pretty cool. I need to get back to making fun things like this. It can’t be all reno all the time!!! Wish I had someone to make this for. Great tutorial.

    Reply
  20. Karina says

    November 10, 2017 at 12:52 pm

    I think leaving the joints unglued is the way to go! It looks way more fun to have different poses.

    Reply
  21. Lisa says

    November 10, 2017 at 1:11 pm

    Such a fun project! I’m doing over my 15 year old son’s room and something like this would be really cute in there!

    Reply
  22. Maggie says

    November 10, 2017 at 1:12 pm

    It is nice to have a few quick projects on the back burner and handy for when you need to pause and have a brain break on a bigger project! I find little projects to do with the Grandkids and the lamp looks like a perfect one! Thanks

    Reply
  23. Tani wojcik says

    November 10, 2017 at 1:13 pm

    Love it!

    Reply
  24. Elaine says

    November 10, 2017 at 1:17 pm

    Thanks for the great idea and clear instructions!

    Reply
  25. Magalene Mitchell says

    November 10, 2017 at 1:22 pm

    Genius idea. Love it!

    Reply
  26. Bill Evans says

    November 10, 2017 at 1:23 pm

    Cute lamp, would make a great gift.

    Reply
  27. Sojourner says

    November 10, 2017 at 1:49 pm

    Really a nice idea, and simple to make. You could
    even make a lamp with three mannequins holding
    up a light. Gets my creativity going! Thank you.

    Reply
  28. Sharon Flasche says

    November 10, 2017 at 1:56 pm

    I love this lamp I intend to steal your idea and make one of my own.

    Reply
  29. Becky m says

    November 10, 2017 at 1:57 pm

    I love learning from you! You go girl!

    Reply
  30. Mary STewart says

    November 10, 2017 at 2:06 pm

    Amazon is sold out of that mannequin but I know I can find it elsewhere. I see it made with a tiny tutu, a simple rose crown on its head and ballet slippers for my 11-year-old granddaughter. She’s been in training with the Houston Ballet since she was 5! Super cute!

    Reply
  31. Mandy Casey says

    November 10, 2017 at 2:10 pm

    My girls would have so much fun painting that lamp!

    Reply
    • Mandy Casey says

      November 13, 2017 at 10:28 am

      Thank you again!!! I’m so excited to make this!

      Reply
  32. Margaret says

    November 10, 2017 at 2:44 pm

    That is so cute. I have one of those wooden men and he just stands around doing nothing!

    Reply
  33. Guerrina says

    November 10, 2017 at 2:47 pm

    My grandson would love this lamp in his room! AND it’s a project he could do with me!

    Reply
  34. Michelle Marie says

    November 10, 2017 at 2:56 pm

    Enjoy reading your blog !! 🙂

    Reply
  35. Teresa says

    November 10, 2017 at 3:17 pm

    Very cool! Inspirations for a few other ideas!

    Reply
  36. Ronda Batchelor says

    November 10, 2017 at 3:25 pm

    What a clever idea!

    Reply
  37. Carly Williams says

    November 10, 2017 at 3:56 pm

    Love that lamp! What a great idea!

    Reply
  38. Frani says

    November 10, 2017 at 4:23 pm

    What a wonderful imagination you have! I love the mannequin lamp!!! I can think of so many fun things to do with it Thank you for sharing!!! ♥

    Reply
  39. Malcolm Starling says

    November 10, 2017 at 4:45 pm

    Very Cool Lamp!

    Reply
  40. aLISON s says

    November 10, 2017 at 5:35 pm

    This is a very fun and creative lamp! Thanks for sharing.

    Reply
  41. Donna says

    November 10, 2017 at 5:59 pm

    Original!

    Reply
  42. Jessie G says

    November 10, 2017 at 6:02 pm

    I what a neat lamp concept.

    Reply
  43. KimberlyJ says

    November 10, 2017 at 6:15 pm

    I love him!

    Reply
  44. Cathy johnson says

    November 10, 2017 at 6:30 pm

    Such a fun project and very unusual!

    Reply
  45. Starr says

    November 10, 2017 at 6:39 pm

    I love it how cute. My grandson will want one

    Reply
  46. Lisa says

    November 10, 2017 at 7:20 pm

    My Grandkids would like one of these.

    Reply
  47. Maryann Smith says

    November 10, 2017 at 7:39 pm

    Very novel!

    Reply
  48. alicia gordon says

    November 10, 2017 at 7:44 pm

    that is really cool!!! I love the whole concept of the lamp. i think it is very creative!

    Reply
  49. Katie C. says

    November 10, 2017 at 8:14 pm

    I NEVER would have thought to do this with an artist’s mannequin! Your project is incredibly creative.

    Reply
  50. Ali says

    November 10, 2017 at 8:21 pm

    Love it such a unique piece!!

    Reply
  51. Karen Peterson says

    November 10, 2017 at 9:15 pm

    I love this project. So cute!

    Reply
  52. Sophia C says

    November 10, 2017 at 9:31 pm

    So fun, go to have it!

    Reply
  53. Barb H. says

    November 10, 2017 at 9:37 pm

    My daughter had one of these mannequins for drawing when she was in school. I’d love to make this lamp for her new home. Fun to change the pose too.

    Reply
  54. Jessica Mcfarlin says

    November 10, 2017 at 9:53 pm

    i love diy projects but this one is so unique I love it!

    Reply
  55. Gail says

    November 10, 2017 at 10:04 pm

    Very creative; i might try it!!

    Reply
  56. Justine says

    November 10, 2017 at 11:20 pm

    Such a cute lamp!!!

    Reply
  57. Carol Burgess says

    November 11, 2017 at 12:00 am

    Very cool. Love it

    Reply
  58. Sandra smith says

    November 11, 2017 at 2:15 am

    I would love posing the lamp in a new position every day. Such a cute idea!

    Reply
  59. Kristin C. says

    November 11, 2017 at 2:33 am

    Great instructions! I’m making one

    Reply
  60. Laura says

    November 11, 2017 at 7:15 am

    Wow! What a fun idea!

    Reply
  61. Rita Hays says

    November 11, 2017 at 9:41 am

    I have one of these mannekins. What a great idea to use it!

    Reply
  62. Ac says

    November 11, 2017 at 11:36 am

    Hey Sawdust Girl!! Your lamp is clever and charming. What I want to know, tho’, is about that wrap-around headboard in the pic. I can do the tufted upholstery. Is the frame YOUR build- or bought? Thanks.

    Reply
    • Sandra says

      November 11, 2017 at 11:58 am

      I bought it. When pricing out linen fabric and foam, it wasn’t cost effective for me to build my own. I searched online for the best price I could find and ordered it. Don’t even remember from where.

      Reply
      • Ac says

        November 11, 2017 at 4:14 pm

        Well, drat. That angled headboard wing would be a good way to stop my pillows from shifting off-kilter when I’m reading in bed. Still, thank you kindly for responding so quickly and have a blessed weekend.

        Reply
  63. Kelly Smith says

    November 11, 2017 at 12:27 pm

    So cute and fun!

    Reply
  64. Nikki says

    November 11, 2017 at 4:42 pm

    This is really cute!

    Reply
  65. Elle says

    November 11, 2017 at 7:27 pm

    Great idea and good step by step pictures/instructions.

    Reply
  66. Karen says

    November 11, 2017 at 8:15 pm

    Definitely making this for my son’s room! So cute!

    Reply
  67. Brenda Haines says

    November 11, 2017 at 9:33 pm

    This is one of the most creative lamps I have seen. You did such a good job on it!

    Reply
  68. Latonya ramsey says

    November 11, 2017 at 9:54 pm

    Such a beauiful creative lamp. I love it

    Reply
  69. Renate Wolfe says

    November 12, 2017 at 5:39 am

    Thank you for sharing. I LOVE this idea. My daughter has a mannequin…think we can do this project together.

    Reply
  70. John Heavey says

    November 12, 2017 at 8:42 am

    Great project!!

    Reply
  71. Kelly D says

    November 12, 2017 at 8:49 am

    I love this lamp idea! It’s great that you can adjust it too.

    Reply
  72. Candace Harris says

    November 12, 2017 at 9:18 am

    I love the way the mannequin can be positioned. I’m going to try this!

    Reply
  73. Bobbi palmer says

    November 12, 2017 at 11:28 am

    Fun easy project, exactly what you need every now and then.

    Reply
  74. Rebecca b says

    November 12, 2017 at 1:23 pm

    Love the lamp. I would love to my that in my room.

    Reply
  75. Patti McGarry says

    November 12, 2017 at 3:23 pm

    Wouldn’t it be fun to make a “his” and “hers” for the master bedroom?!
    And my grandson would love one of these as well!

    Reply
  76. Elizabeth says

    November 12, 2017 at 9:58 pm

    No way! That lamp is amazing. I gotta make a cool DIY lamp like that!

    Reply
  77. pterripterodactyl says

    November 15, 2017 at 9:35 pm

    I’ve got a thing for unique lamps, clocks, and chairs, made from unexpected, preferably free (or close to it) stuff, and always off the wall. Except for the clocks. Sometimes they’re on the wall. Cool idea — and the challenge begins! >:-D

    Reply
  78. Winter Mccarn says

    December 24, 2017 at 5:11 am

    thanks!

    Reply

Leave a Reply Cancel reply

Your email address will not be published. Required fields are marked *

Categories

New Post email notification signup

You Subscribed!

Legal Stuff

Terms of Use

Privacy Policy

Disclosure

Recent Posts

  • March 2023 Lodge Update- Moved in
  • January 2023 Lodge Update
  • Lodge Update – Floors, Cabinets, Countertops, and Appliances
  • Lodge Kitchen Cabinet Progress
  • Halloween Mad Gab – Halloween Party Ideas

Disclaimer:

Although it is my intention to provide accurate plans and clear instructions, not all plans have been tried and tested. Using plans or information found on SawdustGirl.com indicates that you agree with the Terms of Use policy and will accept full responsibility for the process and outcome of any project you attempt. All plans are for private use only. Plans and information published on SawdustGirl.com may not be reproduced, republished or distributed in any manner without written permission from Sandra Powell, Sawdust Girl. Actual projects built using Sawdust Girl plans may be published on your own site without instructions or "tutorial" as long as you provide a link to my original post with full post title or "SawdustGirl.com" as link title.

Copyright © 2023 · anchored theme by <a target="_blank"