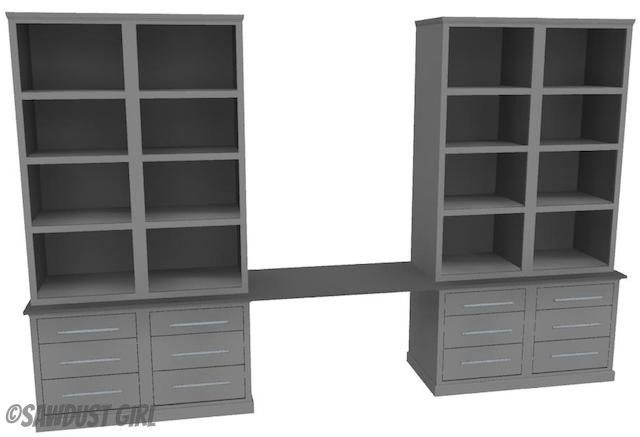
• Home
  • About
    • Personal Posts
  • Privacy
  • Shop
    • My Account
    • Checkout
    • Email
    • Facebook
    • Instagram
    • Pinterest
    • Twitter
    • YouTube
Sawdust Girl®

Sawdust Girl®

Renovation, cabinet building and woodworking plans and tutorials. Build like a Girl®

  • My Home
    • Clinton TN House
      • Clinton TN House in Progress
    • Maryville TN House
      • Maryville TN House Tour – Completed Rooms
      • Maryville TN House in Progress
        • Basement
        • Basement Storage Closet
        • Bedroom Office
        • Craft Room
        • Dining Room
        • Entry
        • Garage
        • Guest Bedroom
        • Hallway
        • Jack and Jill Bathroom
        • Kitchen
        • Kitchen Entry
        • Laundry Room
        • Library
        • Living Room
        • Loft
        • Madison’s Room
        • Master Bedroom
        • Master Closet
        • Pantry
        • Porch
        • Powder Room
        • Wes’ Office
    • Illinois House
    • Calderwood Cottage
  • My Workshop
    • Clinton Workshop
  • Build & Breakfast
  • Cabinet Making 101
    • Cabinets
    • Doors
    • Drawers
  • Projects and Plans
    • Countertops
    • Beds
    • Benches
    • Bookshelves
    • Desks
    • Gift Ideas
    • Holiday
      • Christmas
      • Halloween
    • Home Accessories
    • Kids
    • Kitchen Cabinets
    • Lockers
    • Nightstands
    • Organization accessories
    • Recipes
    • Sewing
    • Tables
    • Vanities
    • Wardrobes
    • Woodworking
      • Wood Finishing
    • Workshop
    • Workshop Storage and Organization
  • Remodeling 101
    • Baseboard and Trim
    • crown molding
    • Demolition
    • Door and Window Casings
    • Door Installation
    • Drywall
    • Electrical work
    • Flooring
    • Home Maintenance
    • Painting
    • Plumbing
    • Resources
    • Safety
    • Tile
    • Wall and Ceiling Treatments
  • Sawdust Squad
  • The Sawdust Diaries
    • Andrea
    • Ava D.
    • Beckie F.
    • Cara C.
    • Courtney B
    • Fawn T.
    • Jenn D.
    • Kelly C.
    • Kristy K.
    • Lara T.
    • Malisa B.
    • Marnie D.
    • Robin C.
    • Val F.
  • Tools
    • Products
    • Tool Reviews & Overviews
    • Inspiration & Ideas

How to build a bookshelf

All Posts, Bookshelves, Free Plans

This super easy diy bookcase with adjustable shelves is the next installment of the Madison Avenue Collection of plans.  This super simple bookcase could sit on the floor alone, or it can set on top of the Madison Avenue Large Desk Cabinet.  This tutorial shows you How to build a bookshelf

How to build a bookshelf - Free plans and tutorial from SawdustGirl.com

How to build a bookshelf

Materials:
  • 3/4″ plywood for cabinet
  • 1/2″ plywood for back panel
  • Kreg Jig
  • Wood Glue (My Favorite)
  • 1 1/4″ pocket  screws for 3/4″ material
  • 1″ pocket screws for 1/2″ material
  • 1×2 Poplar for faceframe
  • shelf pins


1.  Build Cabinet Box – 3/4″ plywood
  • Drill shelf pin holes in your sides if you want adjustable shelves.   Refer to Basic Cabinet Building tutorial for more details.
  • Assemble sides to top and bottom using wood glue and 1 1/4″ pocket hole screws
  • All shelves are adjustable and 1/2″ shallower than the rest of the cabinet to allow for the back panel.
  • Bookshelf will fit 3 adjustable shelves if they are spaced about 16″ apart.

Free plans to show you How to build a bookshelf

How to build a bookshelf

2.  Attach Back — 1/2″ plywood
  • Use wood glue and 1″ pocket screws or finish nails to secure the back panel inside the recess created by inset top and bottom piece.
  • Secure back panel to sides and top and bottom pieces.

Free plans for the "Madison Avenue Bookcase" from www.sawdustgirl.com.

3. Build and Attach Faceframe
  • Use pocket screws to build the face frame (Tutorial)
  • Attach with wood glue and finish nails


Free plans for the "Madison Avenue Bookcase" from www.sawdustgirl.com.

4.  Add Shelves
  • Cut adjustable shelves about 1/8 -1/4″ more narrow than the width of the inside of the bookcase so they can be put in without scratching the sides.
  • Optional:  Set each shelf on shelf pins and then add a face frame piece to the front of each shelf.  Make sure their is a 1/8″ gap on each side of  the shelf face frame and the bookcase face frame to allow the shelf to be moved to a different location in the bookcase later on.


How to build a bookshelf

5.  Crown Moulding — to add or not to add?
  • If you plan on using this bookcase alone, add crown moulding to the front and sides.  If you plan on building multiple bookcases and putting them together, it will look more custom if you add the moulding after they are all built and secured together.


How to build a bookshelf

February 13, 2014 · 6 Comments

« counters, faucets and pantry shelves
Madison Avenue Collection – Office Furniture Plans »

Comments

  1. Chris wade says

    February 11, 2018 at 5:44 pm

    Very helpfull keep up the good post cheers

    Reply
  2. Steve cook says

    May 27, 2018 at 3:12 am

    My wife has asked for a fairly large combination of cabinets and bookshelves for our living room. My question is this, what is your view of doweled joints in mdf. An old unit I have dismantled and it was chipboard with glued doweled joints which have stood for over thirty years. The chipboard used was 1″ thick.

    Reply
  3. Jessica says

    June 27, 2020 at 9:22 pm

    How do you get the size boards that you need? Do you cut them yourself, or do you order the specific dimensions at a store (example Lowes, etc.)?

    Reply
    • Sandra says

      June 28, 2020 at 8:39 am

      You can have a big box store cut them for you but they most likely won’t be super precise cuts. (That said, I relied on this method for years.) It’s good to cut them yourself if you have the tools.

      Reply
  4. Sara says

    May 19, 2022 at 12:40 pm

    How can I print the plans for this bookshelf? It’s beautiful and would like for my husband to build me one….

    Reply
    • Sandra says

      May 24, 2022 at 9:57 am

      Some of these plans I added before there was an easy way to allow people to print. Sorry, you may just have to screen shot each page.

      Reply

Leave a Reply Cancel reply

Your email address will not be published. Required fields are marked *

Categories

New Post email notification signup

You Subscribed!

Legal Stuff

Terms of Use

Privacy Policy

Disclosure

Recent Posts

  • March 2023 Lodge Update- Moved in
  • January 2023 Lodge Update
  • Lodge Update – Floors, Cabinets, Countertops, and Appliances
  • Lodge Kitchen Cabinet Progress
  • Halloween Mad Gab – Halloween Party Ideas

Disclaimer:

Although it is my intention to provide accurate plans and clear instructions, not all plans have been tried and tested. Using plans or information found on SawdustGirl.com indicates that you agree with the Terms of Use policy and will accept full responsibility for the process and outcome of any project you attempt. All plans are for private use only. Plans and information published on SawdustGirl.com may not be reproduced, republished or distributed in any manner without written permission from Sandra Powell, Sawdust Girl. Actual projects built using Sawdust Girl plans may be published on your own site without instructions or "tutorial" as long as you provide a link to my original post with full post title or "SawdustGirl.com" as link title.

Copyright © 2023 · anchored theme by <a target="_blank"