• Home
  • About
    • Personal Posts
  • Privacy
  • Shop
    • My Account
    • Checkout
    • Email
    • Facebook
    • Instagram
    • Pinterest
    • Twitter
    • YouTube
Sawdust Girl®

Sawdust Girl®

Renovation, cabinet building and woodworking plans and tutorials. Build like a Girl®

  • My Home
    • Clinton TN House
      • Clinton TN House in Progress
    • Maryville TN House
      • Maryville TN House Tour – Completed Rooms
      • Maryville TN House in Progress
        • Basement
        • Basement Storage Closet
        • Bedroom Office
        • Craft Room
        • Dining Room
        • Entry
        • Garage
        • Guest Bedroom
        • Hallway
        • Jack and Jill Bathroom
        • Kitchen
        • Kitchen Entry
        • Laundry Room
        • Library
        • Living Room
        • Loft
        • Madison’s Room
        • Master Bedroom
        • Master Closet
        • Pantry
        • Porch
        • Powder Room
        • Wes’ Office
    • Illinois House
    • Calderwood Cottage
  • My Workshop
    • Clinton Workshop
  • Build & Breakfast
  • Cabinet Making 101
    • Cabinets
    • Doors
    • Drawers
  • Projects and Plans
    • Countertops
    • Beds
    • Benches
    • Bookshelves
    • Desks
    • Gift Ideas
    • Holiday
      • Christmas
      • Halloween
    • Home Accessories
    • Kids
    • Kitchen Cabinets
    • Lockers
    • Nightstands
    • Organization accessories
    • Recipes
    • Sewing
    • Tables
    • Vanities
    • Wardrobes
    • Woodworking
      • Wood Finishing
    • Workshop
    • Workshop Storage and Organization
  • Remodeling 101
    • Baseboard and Trim
    • crown molding
    • Demolition
    • Door and Window Casings
    • Door Installation
    • Drywall
    • Electrical work
    • Flooring
    • Home Maintenance
    • Painting
    • Plumbing
    • Resources
    • Safety
    • Tile
    • Wall and Ceiling Treatments
  • Sawdust Squad
  • The Sawdust Diaries
    • Andrea
    • Ava D.
    • Beckie F.
    • Cara C.
    • Courtney B
    • Fawn T.
    • Jenn D.
    • Kelly C.
    • Kristy K.
    • Lara T.
    • Malisa B.
    • Marnie D.
    • Robin C.
    • Val F.
  • Tools
    • Products
    • Tool Reviews & Overviews
    • Inspiration & Ideas

How to Build a Storage Bench – Kristy’s Queen Platform Bed Extension

All Posts, Benches, Free Plans

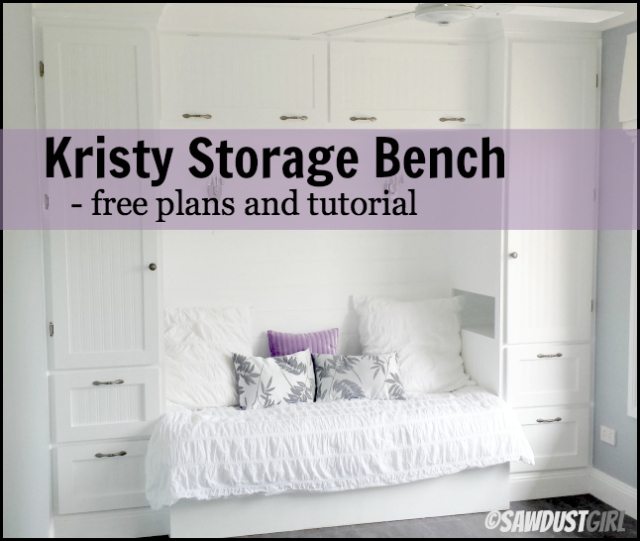
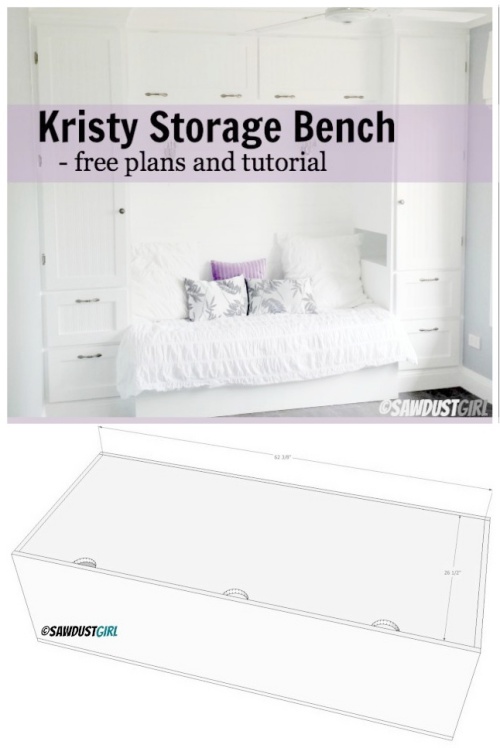
I’m sharing the free woodworking plans for Kristy’s bedroom Built-ins starting with the storage bench. This is actually the first of three parts that make up the Queen platform bed with storage. There is also a center section which is a pullout storage trundle. I always make sure I am getting the most out of the spaces I design, and this project is no exception. These plans were custom designs for a very small bedroom where we wanted to utilize every possible inch for storage.

The bench can be used as a stand-alone bench in addition to being a part of the platform bed configuration.
How to Build a Storage Bench - Queen Platform Bed Extension

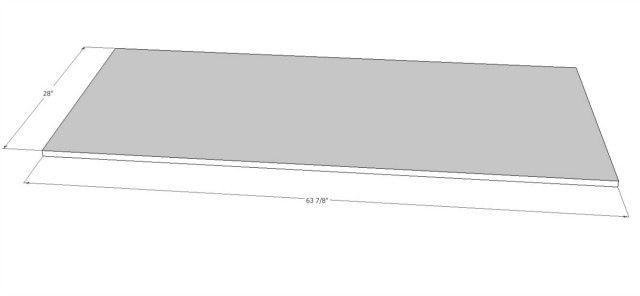
The overall dimensions of the finished bench are: 18″ high, 63 7/8″ wide and 28″ deep.
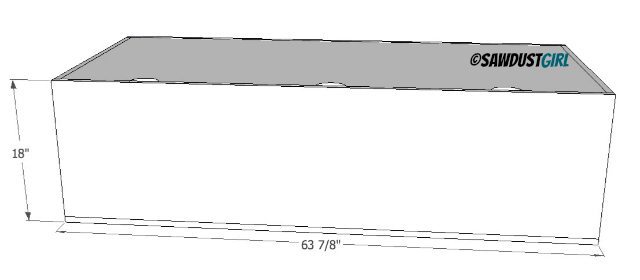
How to Build a Storage Bench - Queen Platform Bed Extension - reading nook plans

Material List

What you’ll need:

  • 2 1/2 sheets of 3/4″ material, either MDF or Plywood.
  • 1 3/4″ wood screws
  • or 1 1/4″ pocket hole screws
  • wood glue
  • drill/driver

Cut List

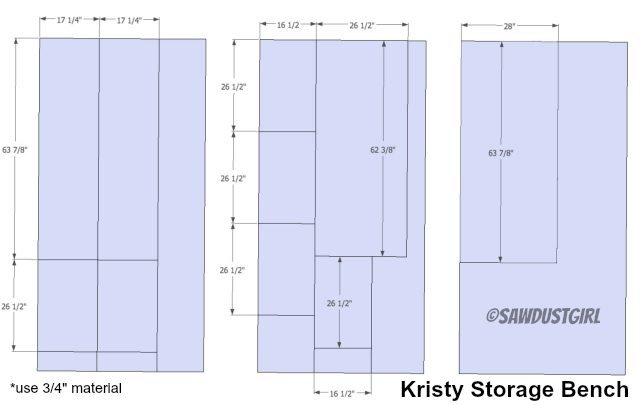
How to Build a Storage Bench - Queen Platform Bed Extension - storage bench plans

Assembly

How to Build a Storage Bench - Queen Platform Bed Extension - reading nook plans

Step 1

Use glue and screws to attach your two long sides to the bottom.  You can either use pocket holes or drive 1 3/4″ screws up through the bottom. If you’re using pocket hole screws, drive them all in from the inside of the box. This way, you won’t have any screw holes to plug or fill on your bench front or back.
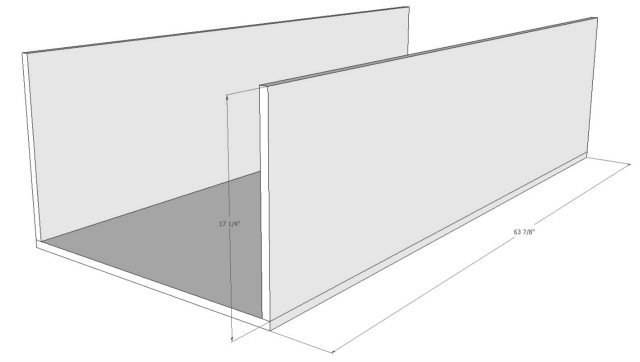
How to Build a Storage Bench - Queen Platform Bed Extension - reading nook plans

Step 2

Attach the two 17 1/4″ ends. Secure with glue and pocket hole screws from the inside of the box. You will have 3 per side on each end.
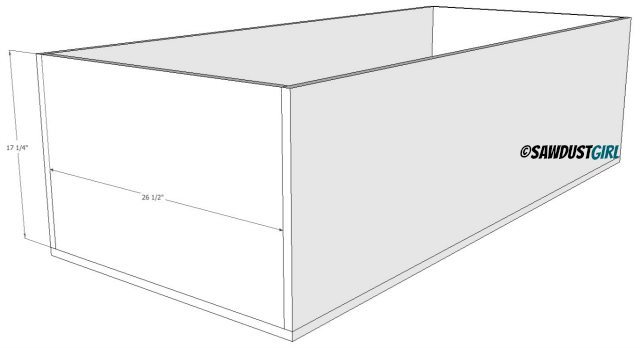
How to Build a Storage Bench - Queen Platform Bed Extension - reading nook plans

Step 3

Secure the dividers with glue and pocket hole screws.
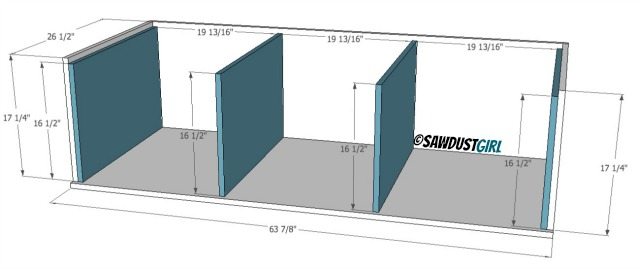
How to Build a Storage Bench - Queen Platform Bed Extension - reading nook bench plans

The dividers are 3/4″ shorter than the sides and ends creating support for the bench top.
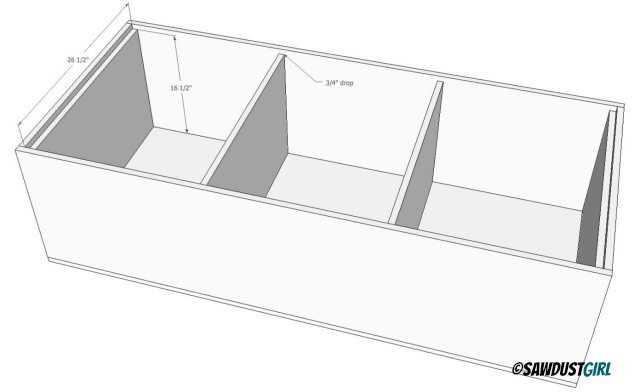
How to Build a Storage Bench - Queen Platform Bed Extension - reading nook plans

Step 4

Cut handholds into your top, so you have a way to open it without needing to attach handles. That would be uncomfortable to sit on!
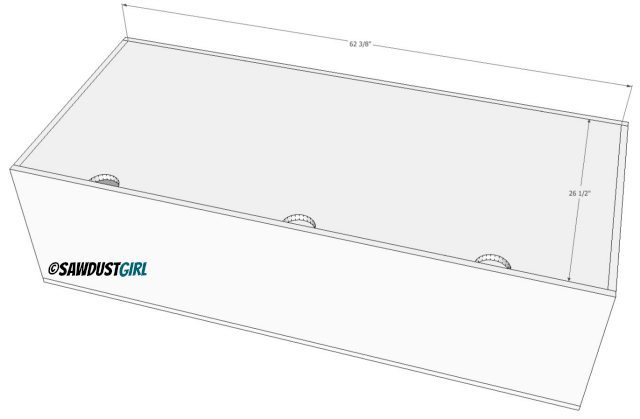
How to Build a Storage Bench - Queen Platform Bed Extension

Step 5

Secure the lid with hinges that keep it from slamming shut.

Step 6

Add decorative molding to the front. Kristy’s bed sits against the front of her bench currently, so we didn’t add trim, but if she ever changes this bedroom to a playroom where she would want the reading nook set up, she could easily add some trim to trick out the front of the bench.

Step 7

Paint and enjoy as is! Or, click here to get the rest of Kristy plans:

  • Queen Platform Bed
  • Drawers and Drawer fronts for Queen Bed
  • Pull-out Storage Trundle
  • Wardrobes with Side Cubby
How to Build a Storage Bench - Queen Platform Bed Extension

You can also get my Cabinet Building 101 eBook.  All the information in one place that you can download and keep on hand!

$9.99Add to cart

September 10, 2021 · 12 Comments

« How to Build a Bench with a Built-in Boot Rack
Building Garage Shelves – Cantilevered Shelf Brackets »

Comments

  1. Tara says

    September 10, 2013 at 12:01 pm

    Thank you so much for sharing this! I can see how thinking and planning of all the possibilities of the use of space are important before the work begins. I am beginning to think the process is 90% planning and 10% building. Very Cool indeed! 🙂

    Reply
    • Sandra says

      September 10, 2013 at 10:58 pm

      I think that’s about right. 🙂

      Reply
  2. Jerri C. TN says

    September 10, 2013 at 9:25 pm

    Love it! I can’t wait til you share the plans of the platform bed; we are doing this one!

    Reply
    • Sandra says

      September 10, 2013 at 10:59 pm

      Well I wanted to get that out today as well but the dentist and the Apple genius bar took up all my time. LOL Hopefully tomorrow!

      Reply
  3. Diana W. says

    September 10, 2013 at 10:52 pm

    Love this project!!! I only wish that daybed had drawers instead of the bench top. I made one like that in my last house and found it was very junky, because I had to pile stuff up to get it in there. Of course mine was one large space and not divided into cubbies. I think I’d rather one that has drawers though. Easier to pull out and see what you have. And I’m more likely to keep something organized if it’s not of the free for all open space thing….. but that’s just me. She did a great job with the entire thing and the finished bedroom is GORGEOUS!!!

    Reply
    • Sandra says

      September 10, 2013 at 10:58 pm

      Well you could certainly put drawers in the front though for this particular project that would defeat the purpose of having storage at all. When the platform bed is in place, you can access the top by pulling the mattress back 2′ which is a lot easier than moving the entire bed. Maybe you’ll see a bench with drawers soon though. 😉

      Reply
  4. CJ says

    September 12, 2013 at 1:58 am

    Love this cant wait for the rest of the plans. What size bed is the measurements for? Thanks

    Reply
  5. Denise F. says

    December 2, 2013 at 10:21 pm

    This is PERFECT! I have been looking for simple plans that I can do myself (no skills whatsoever using power tools, but just inherited every wood cutting, styling tool I could ever ask for. And this is what I wanted to do for my first project to use on our front porch. Thank you so much for sharing your talent with us!

    Reply
  6. Amanda says

    December 18, 2013 at 11:22 am

    Love this set up! Where is the bedding from?!

    Reply
  7. Kaethi says

    March 15, 2014 at 12:21 pm

    Is there a printer-friendly version of all the Kristy collection plans?

    Reply
  8. Marisa says

    March 26, 2019 at 3:30 pm

    Are there instructions somewhere for the wall cabinets that connect over the top by the ceiling? Am I missing them? Haha ? beautiful work! Love it!!!

    Reply
    • Sandra says

      March 26, 2019 at 11:25 pm

      No those aren’t included.

      Reply

Leave a Reply Cancel reply

Your email address will not be published. Required fields are marked *

Categories

New Post email notification signup

You Subscribed!

Legal Stuff

Terms of Use

Privacy Policy

Disclosure

Recent Posts

  • March 2023 Lodge Update- Moved in
  • January 2023 Lodge Update
  • Lodge Update – Floors, Cabinets, Countertops, and Appliances
  • Lodge Kitchen Cabinet Progress
  • Halloween Mad Gab – Halloween Party Ideas

Disclaimer:

Although it is my intention to provide accurate plans and clear instructions, not all plans have been tried and tested. Using plans or information found on SawdustGirl.com indicates that you agree with the Terms of Use policy and will accept full responsibility for the process and outcome of any project you attempt. All plans are for private use only. Plans and information published on SawdustGirl.com may not be reproduced, republished or distributed in any manner without written permission from Sandra Powell, Sawdust Girl. Actual projects built using Sawdust Girl plans may be published on your own site without instructions or "tutorial" as long as you provide a link to my original post with full post title or "SawdustGirl.com" as link title.

Copyright © 2023 · anchored theme by <a target="_blank"