• Home
  • About
    • Personal Posts
  • Privacy
  • Shop
    • My Account
    • Checkout
    • Email
    • Facebook
    • Instagram
    • Pinterest
    • Twitter
    • YouTube
Sawdust Girl®

Sawdust Girl®

Renovation, cabinet building and woodworking plans and tutorials. Build like a Girl®

  • My Home
    • Clinton TN House
      • Clinton TN House in Progress
    • Maryville TN House
      • Maryville TN House Tour – Completed Rooms
      • Maryville TN House in Progress
        • Basement
        • Basement Storage Closet
        • Bedroom Office
        • Craft Room
        • Dining Room
        • Entry
        • Garage
        • Guest Bedroom
        • Hallway
        • Jack and Jill Bathroom
        • Kitchen
        • Kitchen Entry
        • Laundry Room
        • Library
        • Living Room
        • Loft
        • Madison’s Room
        • Master Bedroom
        • Master Closet
        • Pantry
        • Porch
        • Powder Room
        • Wes’ Office
    • Illinois House
    • Calderwood Cottage
  • My Workshop
    • Clinton Workshop
  • Build & Breakfast
  • Cabinet Making 101
    • Cabinets
    • Doors
    • Drawers
  • Projects and Plans
    • Countertops
    • Beds
    • Benches
    • Bookshelves
    • Desks
    • Gift Ideas
    • Holiday
      • Christmas
      • Halloween
    • Home Accessories
    • Kids
    • Kitchen Cabinets
    • Lockers
    • Nightstands
    • Organization accessories
    • Recipes
    • Sewing
    • Tables
    • Vanities
    • Wardrobes
    • Woodworking
      • Wood Finishing
    • Workshop
    • Workshop Storage and Organization
  • Remodeling 101
    • Baseboard and Trim
    • crown molding
    • Demolition
    • Door and Window Casings
    • Door Installation
    • Drywall
    • Electrical work
    • Flooring
    • Home Maintenance
    • Painting
    • Plumbing
    • Resources
    • Safety
    • Tile
    • Wall and Ceiling Treatments
  • Sawdust Squad
  • The Sawdust Diaries
    • Andrea
    • Ava D.
    • Beckie F.
    • Cara C.
    • Courtney B
    • Fawn T.
    • Jenn D.
    • Kelly C.
    • Kristy K.
    • Lara T.
    • Malisa B.
    • Marnie D.
    • Robin C.
    • Val F.
  • Tools
    • Products
    • Tool Reviews & Overviews
    • Inspiration & Ideas

Ghostly Halloween Menu Chalkboard

Halloween

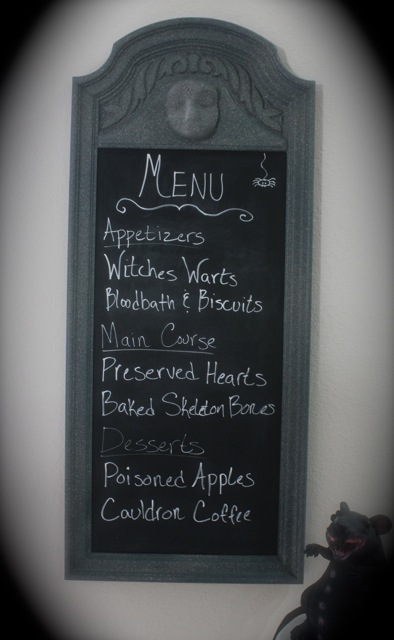
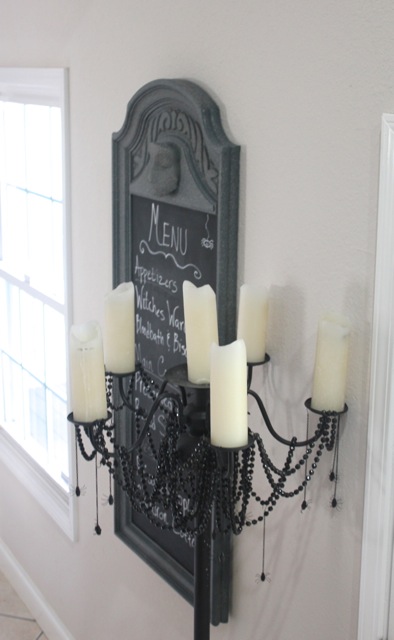
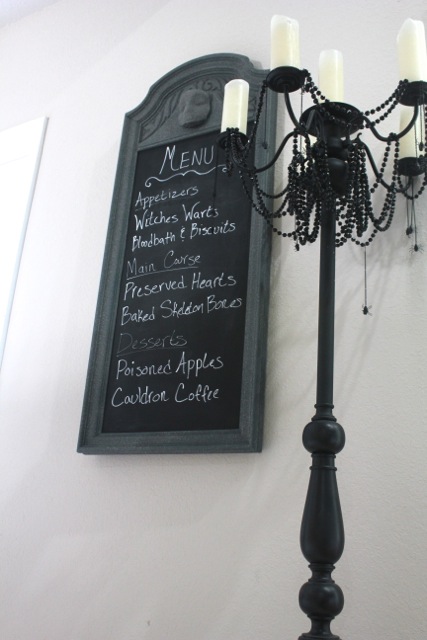
Madison and I have planned a very special dinner for Wes tonight and since it’s so super duper special, we made a special “Ghostly Halloween Chalkboard Menu” so he’d know what he was in for!  Muhahahahahaha

!Ghostly Halloween Menu Chalkboard
[pinit]
I know, you totally want to come over for dinner tonight, right?

Ghostly Halloween Menu Chalkboard


Halloween has always been Madison’s favorite Holiday.  Last year it sneaked up on us and flew past before we knew it was there.  The entire last year did, actually.  BUT NOT THIS YEAR!  This year we have oodles of projects in store.  She has two full weeks of Fall break and SHE has big plans for making about 10 projects.  (I kind of hoped to get some things crossed off my to-do list but…I’ll try to do both.  sigh.)


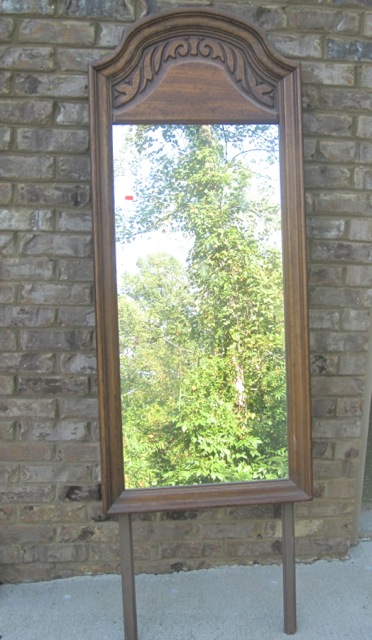
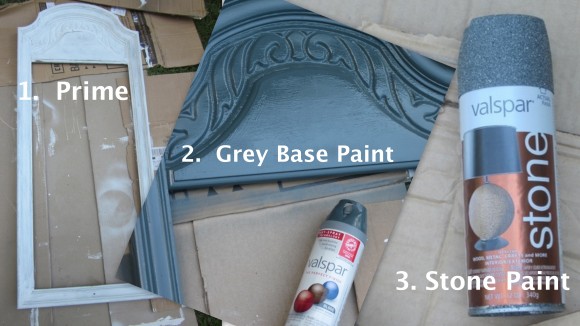
We finished one project today.  It started out as this mirror I bought at the Habitat ReStore for $8.  I removed the mirror and used the hardboard backing for the chalkboard surface.  I used chalkboard spray paint for that — because it’s SO Easy!

Ghostly Halloween Menu Chalkboard


We sanded it lightly then primed it and painted it with a grey base coat.  And then…we painted it with Valspar stone effects paint.  We wanted it to look like a gravestone.  And even though you can’t tell from the pictures, it does…and it’s cool!
Ghostly Halloween Menu Chalkboard

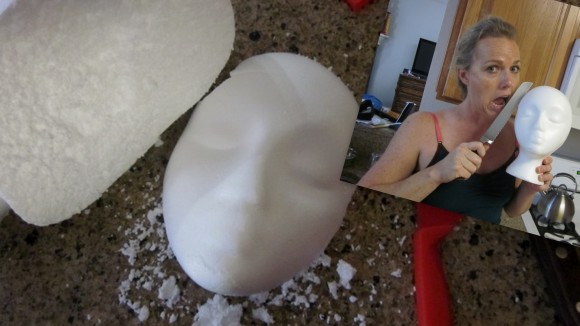
Then I cut the “Ghostly Face” off a Styrofoam Beauty Salon head!  (Sounds so violent.)


Ghostly Halloween Menu Chalkboard


If you aren’t aware, spray paint KIND OF MELTS Styrofoam so don’t be alarmed if you try this at home and  your “Face” shrinks a bit.  The stone effect hid it though so we didn’t care.

Then Madison got creative with our menu!

Ghostly Halloween Menu Chalkboard
We’ll start off with a few “Witches Warts” and a zesty “Bloodbath and Biscuits” soup.  Followed by “Preserved Hearts” and “Baked Skeleton Bones”.  And last but not least, “Poisoned Apple”s and “Cauldron Coffee” for dessert.  You TOTALLY want to come over for dinner!Ghostly Halloween Menu Chalkboard

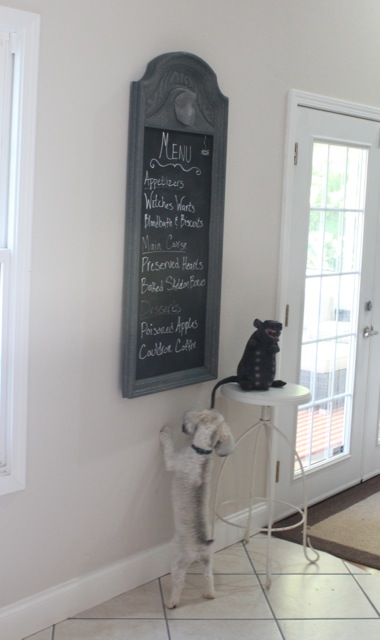
We tried styling it with out GROSS rat from our All Inclusive Holiday Mantle but Brody kept trying to eat the spider hanging off Mr, Rat’s tail!
Ghostly Halloween Menu Chalkboard

So we ended up with our famous Halloween Candelabra sans Kitty.  I did find her though.  The movers packed her up in a box of fabric and labeled the box “Garage”.  ???  Whatever!

Ghostly Halloween Menu Chalkboard

Happy October!

October 4, 2012 · 15 Comments

« When you hate DIY’ing!
Out of the Wild »

Comments

  1. Funky Junk Interiors says

    October 4, 2012 at 8:14 pm

    Very cool! Loving that candelabra too!

    You are so funny in your pics!

    Reply
    • Sandra says

      October 6, 2012 at 12:15 pm

      I aim to get a laugh! It’s my goal in life. LOL

      Reply
  2. Jaime says

    October 4, 2012 at 8:17 pm

    Sandra great makeover. You have some of the best quality Halloween decorations, I really love your subway art a few years back.

    Reply
    • Sandra says

      October 6, 2012 at 12:14 pm

      Thanks Jaime! That one didn’t fare too well in the move but it’s still usable. Just lost a spider.

      Reply
  3. Karen says

    October 5, 2012 at 7:04 am

    I love your awesome blackboard this year. I was just at the thrift store and saw some Styrofoam wig heads too. I’ve always admired your candelabra. You come up with some of the best Halloween decorations!!

    Reply
    • Sandra says

      October 6, 2012 at 12:16 pm

      Thank you Karen. I have some BIG ideas in my head but don’t seem to have enough time to make them happen. Maddie and I said we were going to start making Halloween decorations back in July and are just now starting. “story of my life” LOL

      Reply
  4. Kathy H says

    October 5, 2012 at 12:10 pm

    I think this project is awesome! Do you think the styrofoam face would have stayed intact better if it had been painted with a coat of acrylic craft paint first? I’m just wondering because I’ve melted styrofoam myself with spray paint.

    Reply
    • Sandra says

      October 6, 2012 at 12:17 pm

      I think it would have. I thought about doing that but knew that the stone effect paint would hide it and the melted effect would just add to the spookiness of it. (Translation: I was too lazy)

      Reply
  5. Julie @ follow your heart woodworking says

    October 5, 2012 at 12:30 pm

    HAHA, I just love the photo of you with the knife and the head… crazy funny!

    Reply
    • Sandra says

      October 6, 2012 at 12:17 pm

      Funny or sick! One or the other. LOL

      Reply
  6. leslie says

    October 5, 2012 at 4:14 pm

    Love the menu board. ALso like the candelabra. I’ll come over for a creepy dinner anytime!

    Reply
    • Sandra says

      October 6, 2012 at 12:18 pm

      WiItches warts coming right up, Leslie! Come of over.

      Reply
  7. Lyn says

    October 6, 2012 at 8:31 am

    I love your creativity & ReDESIGN ideas ! VERY cool !

    Reply
    • Sandra says

      October 6, 2012 at 12:19 pm

      Thanks Lyn.

      Reply
  8. Jean says

    October 8, 2012 at 11:23 pm

    Stone paint…now why didn’t I think of that?!! Great job!

    Reply

Leave a Reply Cancel reply

Your email address will not be published. Required fields are marked *

Categories

New Post email notification signup

You Subscribed!

Legal Stuff

Terms of Use

Privacy Policy

Disclosure

Recent Posts

  • January 2023 Lodge Update
  • Lodge Update – Floors, Cabinets, Countertops, and Appliances
  • Lodge Kitchen Cabinet Progress
  • Halloween Mad Gab – Halloween Party Ideas
  • Concrete Backsplash or Vertical Wall Treatment

Disclaimer:

Although it is my intention to provide accurate plans and clear instructions, not all plans have been tried and tested. Using plans or information found on SawdustGirl.com indicates that you agree with the Terms of Use policy and will accept full responsibility for the process and outcome of any project you attempt. All plans are for private use only. Plans and information published on SawdustGirl.com may not be reproduced, republished or distributed in any manner without written permission from Sandra Powell, Sawdust Girl. Actual projects built using Sawdust Girl plans may be published on your own site without instructions or "tutorial" as long as you provide a link to my original post with full post title or "SawdustGirl.com" as link title.

Copyright © 2023 · anchored theme by <a target="_blank"