• Home
  • About
    • Personal Posts
  • Privacy
  • Shop
    • My Account
    • Checkout
    • Email
    • Facebook
    • Instagram
    • Pinterest
    • Twitter
    • YouTube
Sawdust Girl®

Sawdust Girl®

Renovation, cabinet building and woodworking plans and tutorials. Build like a Girl®

  • My Home
    • Clinton TN House
      • Clinton TN House in Progress
    • Maryville TN House
      • Maryville TN House Tour – Completed Rooms
      • Maryville TN House in Progress
        • Basement
        • Basement Storage Closet
        • Bedroom Office
        • Craft Room
        • Dining Room
        • Entry
        • Garage
        • Guest Bedroom
        • Hallway
        • Jack and Jill Bathroom
        • Kitchen
        • Kitchen Entry
        • Laundry Room
        • Library
        • Living Room
        • Loft
        • Madison’s Room
        • Master Bedroom
        • Master Closet
        • Pantry
        • Porch
        • Powder Room
        • Wes’ Office
    • Illinois House
    • Calderwood Cottage
  • My Workshop
    • Clinton Workshop
  • Build & Breakfast
  • Cabinet Making 101
    • Cabinets
    • Doors
    • Drawers
  • Projects and Plans
    • Countertops
    • Beds
    • Benches
    • Bookshelves
    • Desks
    • Gift Ideas
    • Holiday
      • Christmas
      • Halloween
    • Home Accessories
    • Kids
    • Kitchen Cabinets
    • Lockers
    • Nightstands
    • Organization accessories
    • Recipes
    • Sewing
    • Tables
    • Vanities
    • Wardrobes
    • Woodworking
      • Wood Finishing
    • Workshop
    • Workshop Storage and Organization
  • Remodeling 101
    • Baseboard and Trim
    • crown molding
    • Demolition
    • Door and Window Casings
    • Door Installation
    • Drywall
    • Electrical work
    • Flooring
    • Home Maintenance
    • Painting
    • Plumbing
    • Resources
    • Safety
    • Tile
    • Wall and Ceiling Treatments
  • Sawdust Squad
  • The Sawdust Diaries
    • Andrea
    • Ava D.
    • Beckie F.
    • Cara C.
    • Courtney B
    • Fawn T.
    • Jenn D.
    • Kelly C.
    • Kristy K.
    • Lara T.
    • Malisa B.
    • Marnie D.
    • Robin C.
    • Val F.
  • Tools
    • Products
    • Tool Reviews & Overviews
    • Inspiration & Ideas

DIY Beaded Chandelier Tutorial

All Posts, Projects and Plans

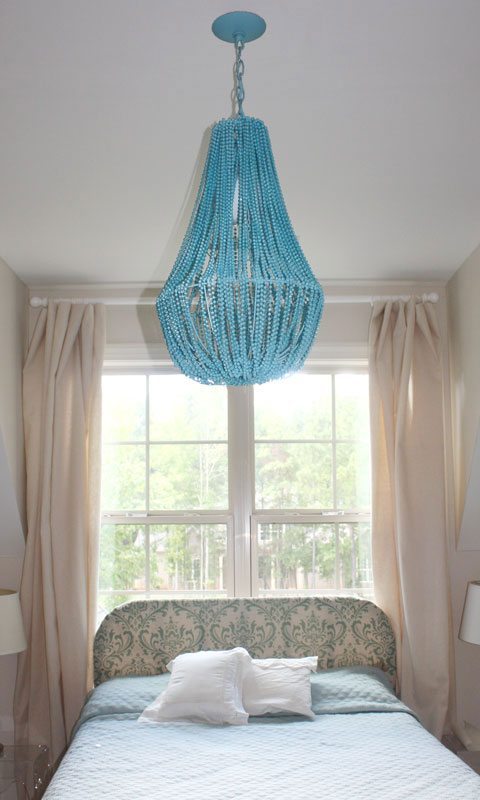
I’m excited to share a crazy inventive tutorial for a diy beaded chandelier from  Britt over at A Penny Saved.  She created this amazing diy beaded chandelier  out of a hanging fruit basket, a ton of beads, and a simple light socket kit.

how to make a diy light

Gather your materials:

LOTS of beaded necklaces, cut into long strands (the Mardi Gras kind)
Metal hanging garden basket
A spool of thin-gauge wire
Wire cutters
Wire clothes hanger
Pendant light kit (cord & socket)
Metal chain to hang the fixture
Light fixture mounting bracket, bolt & loop
Light fixture ceiling cap

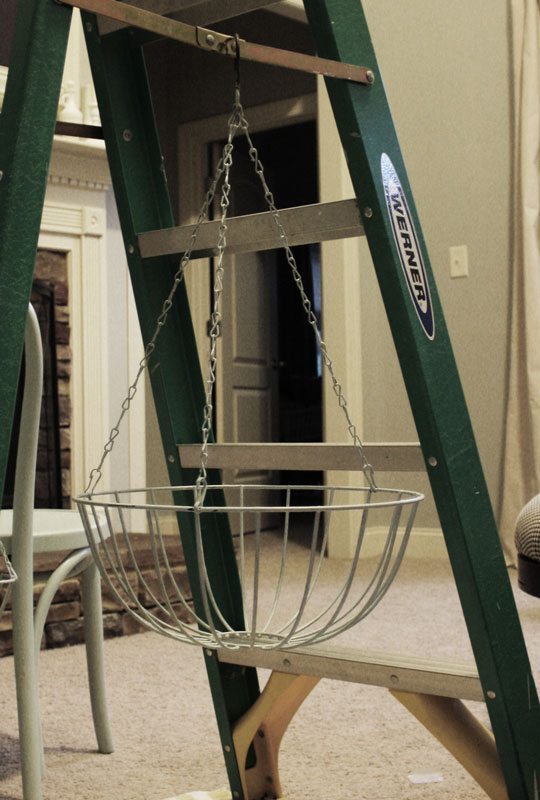
Start with a hanging garden basket.

Go ahead and paint it to blend with your beads (or the finished color of your chandelier if you plan to paint your beads).  I used a ladder to suspend the chandelier while I worked on it.

making a diy chandelier

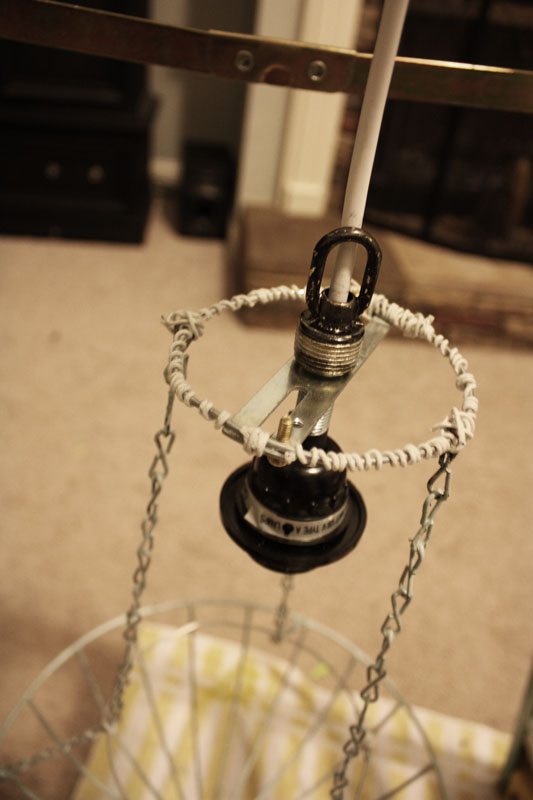
Top it off.  Because I wanted to wire this fixture, the metal hook on the basket wasn’t going to cut it.  I needed to be able to add a pedant light cord and a chain somehow.  I ended up wiring a light fixture ceiling bracket to a ring made from a bent clothes hanger.  The loop on top screws onto a hollow bolt that screws into the bracket, which later allowed me to attach a chain.

Beaded Chandelier Tutorial

Add a little structure.  I wired on a ring (again, made from a bent hanger) about half way between the top of the chandelier and the lower ring for a little more shape.  This allowed the beaded strands to swag a little without the metal chains showing.

diy project chandelier

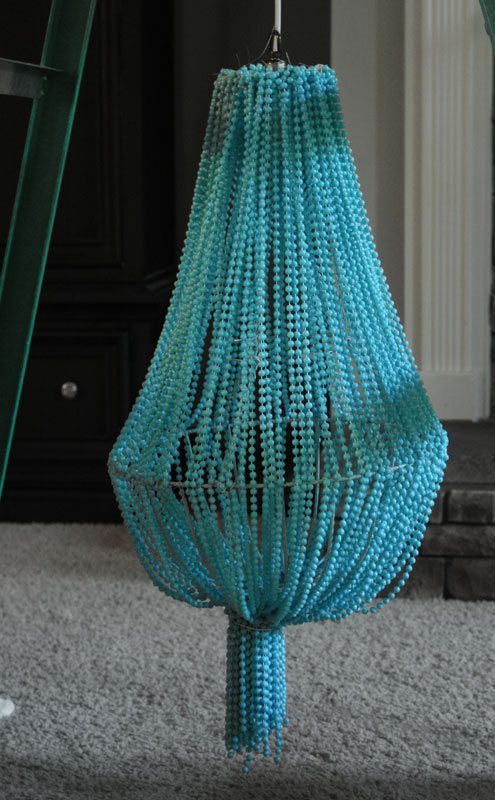
Start beading!  After figuring out that my beaded strands were just a tad longer than I needed to go from the top to the bottom of the fixture with a little swag in the middle, I started attaching them around the top ring by looping wire around the top bead of each strand and the metal ring.diy beaded chandelier

My chandelier looked a little crooked at this point, but straightened up once we attached the chain and hung it.

Trim away the excess.  If your strands are a little longer than you need, just cut off the extra after attaching at the bottom of the fixture. Aaaaand bead some more.  This is definitely the most time-consuming part.  Just make sure that you have good coverage all the way around.  I attached all my strands at the top first, then at the middle (the top part of the basket — so they would swag a little), then at the bottom.  In the photo above I had attached the beads at the top and middle and was trying to make sure there weren’t any bare spots before attaching them at the bottom.

Add a chain and ceiling cap.  

Paint it up.  Give the whole thing a coat or two of paint if you want.  I decided to do this because I found that it made the wires and chains blend in better with the beads.  I used this to spray the fixture a custom color.

Hang it.


Admire.  

how to make a beaded chandelier

Thank you Britt, for the awesome tutorial!  Go check out A Penny Saved to see Britt’s many other creative transformational projects.   

November 4, 2010 · 16 Comments

« Skull Book Ends
Hanging Bed {Guest Post} »

Comments

  1. heartofacountryhome says

    November 4, 2010 at 4:07 pm

    Fancy! and so colorful! love it.

    Reply
  2. Jennifer says

    November 4, 2010 at 5:18 pm

    Oh it is so amazing!!!!

    Reply
  3. Modern Country Lady says

    November 4, 2010 at 9:38 pm

    Crikey! Can't believe it !!

    Reply
  4. Jenna @ SAS Interiors - Simple. Affordable. Stylish. says

    November 8, 2010 at 2:39 am

    What an awesome idea…it looks so beautiful and sophisticated!~Jenna @ SAS Interiorswww.sasinteriors.blogspot.com

    Reply
  5. Baker Family says

    November 8, 2010 at 3:44 am

    This is SO amazing! I never would have thought it up. Very cool! Thanks for sharing :)<3Risa

    Reply
  6. [email protected] says

    November 8, 2010 at 7:40 pm

    Oh wow, that's GORGEOUS! What a fabulous project, thanks so much to both of you for the post. I'll be linking.

    Reply
  7. Jennifer says

    November 9, 2010 at 5:43 pm

    Thanks so much for sharing. This is a great project!

    Reply
  8. Nancy ~ Inkcicles says

    November 10, 2010 at 4:59 pm

    So clever and cute!:-)

    Reply
  9. Clair says

    November 10, 2010 at 11:35 pm

    This is crazily good!

    Reply
  10. sarah says

    March 20, 2011 at 4:09 pm

    wow… amazing. i really love it and thanks for sharing.

    Reply
  11. Mirna says

    May 12, 2011 at 12:05 am

    You are a genius!!! Thank you so much fore sharing.

    Reply
  12. mehak says

    January 6, 2012 at 8:40 am

    hmm gud one

    Reply
  13. Marya says

    January 6, 2012 at 9:13 am

    Thanks for sharing. Its very pretty.

    Reply
  14. Jami says

    May 21, 2012 at 4:54 pm

    Where did u get the beads?

    Reply

Leave a Reply Cancel reply

Your email address will not be published. Required fields are marked *

Categories

New Post email notification signup

You Subscribed!

Legal Stuff

Terms of Use

Privacy Policy

Disclosure

Recent Posts

  • March 2023 Lodge Update- Moved in
  • January 2023 Lodge Update
  • Lodge Update – Floors, Cabinets, Countertops, and Appliances
  • Lodge Kitchen Cabinet Progress
  • Halloween Mad Gab – Halloween Party Ideas

Disclaimer:

Although it is my intention to provide accurate plans and clear instructions, not all plans have been tried and tested. Using plans or information found on SawdustGirl.com indicates that you agree with the Terms of Use policy and will accept full responsibility for the process and outcome of any project you attempt. All plans are for private use only. Plans and information published on SawdustGirl.com may not be reproduced, republished or distributed in any manner without written permission from Sandra Powell, Sawdust Girl. Actual projects built using Sawdust Girl plans may be published on your own site without instructions or "tutorial" as long as you provide a link to my original post with full post title or "SawdustGirl.com" as link title.

Copyright © 2023 · anchored theme by <a target="_blank"